7 Best Snipping Tools for Mac [2025]

  • Capture everything, not just your browser tabs
  • Highlight keystrokes and mouse actions
  • Draw on videos in real time

Free online screen recorder

  • Webcam
  • Microphone
  • Sound
  • Watermark

Supported browsers: Google Chrome, Mozilla Firefox, Microsoft Edge, Opera

Edited by
Ben Jacklin
44207

Key takeaways

  • There’s no shortage of ways to snip on a Mac, from the built-in shortcuts to full-featured platforms like Movavi Screen Recorder to pretty decent and capable CleanShot X and Capto.
  • Each snipping tool for Mac walks a fine line between simplicity and creative control: LightShot wins on speed, TextSniper on OCR precision, Movavi on versatility.
  • Price, editing options, and workflow integration largely determine the best pick.
  • Want sharper results? Learn how to use the snipping tool on Mac with keyboard shortcuts and annotation tools – they’ll save time and polish every grab.

Need a snipping tool for Mac? Look no further! In this article, we’ll discuss the different options available to you. Some of the tools we’ll be describing also serve as Mac screen recorders.

Comparison table: Best Mac snipping tools

Program

Price

Ease of use

Best for

Download

Free trial; $44.95/year; $69.95/lifetime

★★★★☆

Taking and annotating screenshots; also serves as a screen recorder

Free

★★★★★

Quick screenshots with basic editing options

$11.99

★★★☆☆

Text capture and recognition

Special pick: Movavi Screen Recorder

Movavi Screen Recorder lets you quickly take a snapshot of your screen using a hotkey. You can capture your entire screen, adjust the capture frame to snip the exact portion of the screen, or you can take a scrolling screenshot if the capture area is too long.The app also lets you edit your screenshot – add text and shapes, use a highlighter, draw lines and arrows. In addition to snipping, the program also has a screen-recording feature.

Built-in Mac snipping tool

Yesterday, I was scrambling to prepare a quick visual guide for my team and needed to grab just a sliver of my MacBook screen without fumbling around. I hit ⌘ + Shift + 4, dragged over the area I wanted, and just like that: a crisp snip appeared on my desktop, ready to toss into Slack or a doc. The best part? I can tap the spacebar mid-drag to lock onto a window, move it around if I mess up the selection, and it still snaps perfectly, no extra installations, no-brainer. Sometimes I even end up grabbing a few extra snippets just to highlight tiny details or overlay arrows and text in Preview.

Honestly, this Mac snipping tool shortcut has become my go-to for anything visual. Super quick, intuitive, and just slick enough to make my workflow feel effortless. It’s wild how such a small built-in tool can save a ton of time when you’re juggling deadlines and team updates. So, does Mac have a snipping tool? Yes, and it’s already inborn in your Macintosh!

Capture everything on your screen (⌘ + Shift + 3)

Use this combination to take a screenshot of your entire screen. Click the image in the right lower corner of your screen to edit the screenshot you just took. You can also wait for the screenshot to save to the desktop and then edit it in Preview or any other app of your choice.

Capture a portion of your screen (⌘ + Shift + 4)

Use this combination and select a snippet of your screen with the cursor. Release the button of your mouse to take the shot. While using this combination, you can also do the following:

  • Press and release the spacebar, then use the camera cursor to click on the window you want to take a screenshot of.

  • Press and hold the spacebar before releasing the mouse button to reposition the selected area on the screen.

Call up the screen capture panel (⌘ + Shift + 5)

This combination of keys calls up a panel with options for screen capture. Three options are available:

  • Capture everything on your screen

  • Capture a clipping of your screen

  • Capture a window

The Options menu allows you to change location for storing screenshots and screencasts.

Now you know how to get a shot of your screen in three ways using the pre-installed iMac/MacBook snipping tool. But is there an equivalent with more options? Read on to discover more apps that allow you to snip on your Mac.

disclaimer_person
Here’s what Movavi’s team does to provide you with verified information:
  • When selecting products to include in our reviews, we research both demand and popularity.

  • All products mentioned in this article have been tested by Movavi Content Team.

  • When testing, we aim to highlight the best features of a product and what it’s best suited for.

  • We study user reviews from popular review platforms and make use of this information when writing our product reviews.

  • We collect feedback from our users and analyze their opinions of Movavi software as well as products from other companies.

Best Mac snipping tools

If the built-in app is not enough, you can download a snipping tool for Mac. Below is our selection of apps, in no particular order, with prices, features, pros, and cons. We’ll also provide links to reviews on trustworthy platforms.

Movavi Screen Recorder

Best for: Taking and annotating screenshots

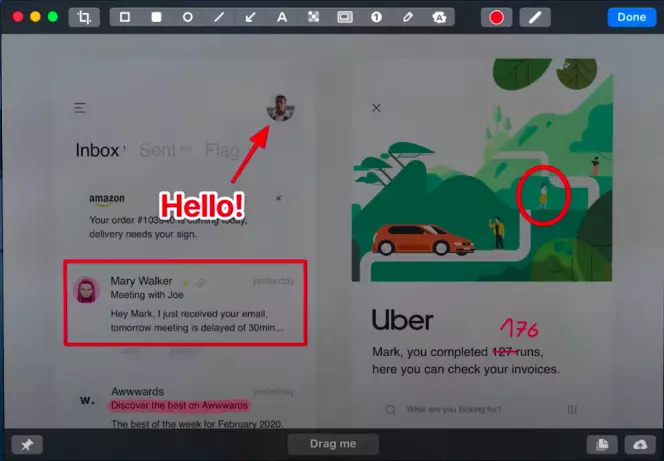
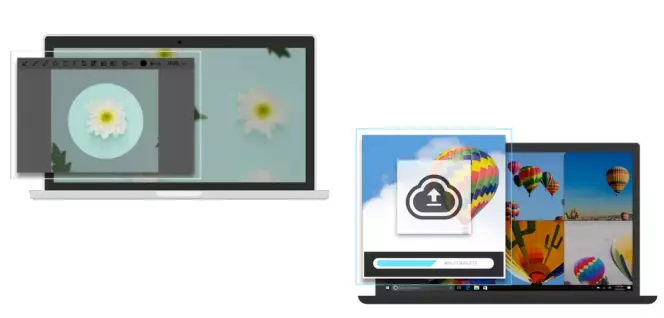
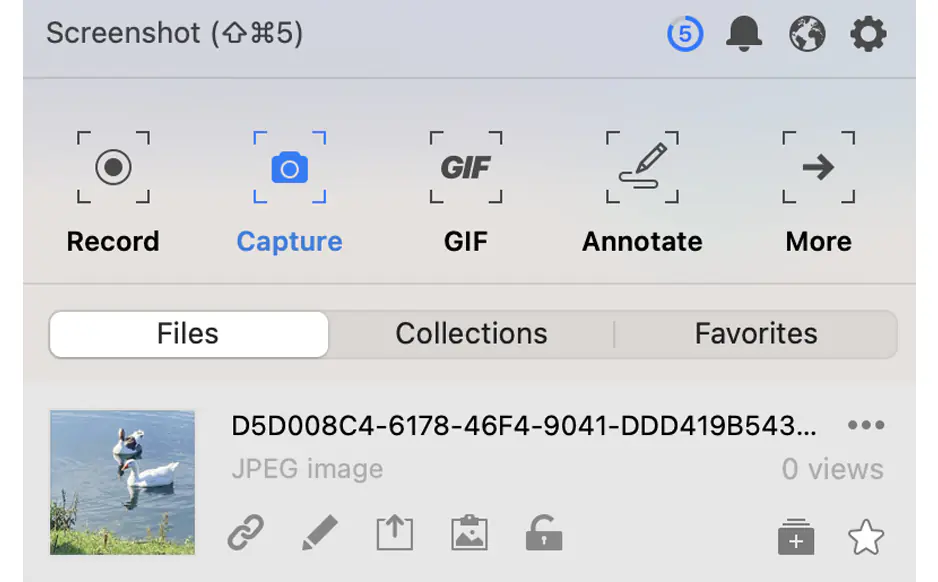
I took this tool through its paces on macOS, experimenting with both screenshot and screen-recording workflows. The interface is designed to please. It’s utterly clean and self-explanatory, as if leading you throughout the snipping process. It enables fast capture of full screen, window, or custom area. Then you can annotate, save, or share.

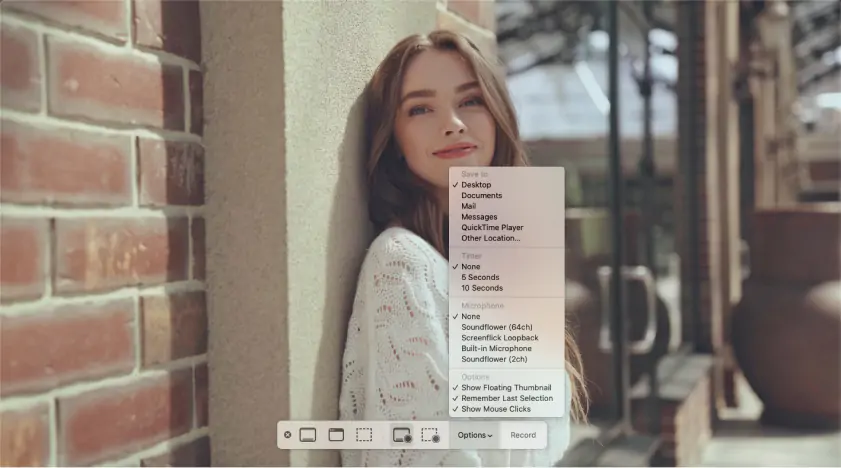
I also noticed that the March-to-May 2025 update introduced a noise-reduction feature. Look, that’s ideal when recording in a noisy environment! Sound-recording controls were also elevated in a newer version.

Key impressions I got when testing Movavi Screen Recorder: it’s great if you frequently switch between “snip” and “full recording” workflows. Unlike simpler screenshot tools, this one requires a download, which may not be very convenient for very occasional jobs.

Features:

  • Take accurate screenshots: capture a single window, a full page, or just a part of it
  • Capture on-screen activity to improve your work process efficiency
  • Edit screenshots you’ve taken – add text, arrows, or highlights
  • Save and share the results with your colleagues

Pros

  • A handy tool to ramp up productivity with digital media capture

  • Taking and editing partial or scrolling screenshots in a few clicks

  • Simple sharing via WhatsApp, email, a direct link, etc. to streamline your work process

Cons

  • You can get full access to all the perks of the software by purchasing the full version

TextSniper

Best for: Text capture and recognition

Features:

  • OCR technology (no Internet connection needed!)

  • Highly accurate recognition

I tested TextSniper on a MacBook Air (M2) by grabbing text from PDFs, video screenshots, and image files. The OCR worked reliably in multiple languages. This snipping tool Mac has received a new update just in October. Enhancements include an “App icon fix” plus “other minor fixes & performance improvements”

From my tests, I can say that TextSniper is best when your workflow is focused on extracting text (rather than full image snipping). It does not offer full screenshot-annotation workflows, but what it does, it does well.

Pros

  • Can process JPG, PNG, TIFF, GIF, and other formats

  • Text-to-speech option

  • Can read links, QR codes, barcodes, etc.

  • Can extract text from ebooks and PDFs

Cons

  • There is no free trial

LightShot

Best for: Fast and easy screen capture

Features:

  • Similar image search
  • Also offers a Firefox add-on and a Google Chrome extension

I decided to try LightShot’s Mac version by doing rapid captures and sharing via the link upload. It’s extremely fast and lightweight, just the ticket for quick jobs. However, I found out that the latest Mac release notes are sparse. The last documented version for macOS (v 2.22) showed “Improved text editor tool” as of July 26, 2019.

How to use snipping tool on a Mac with LightShot? Well, it’s Ideal when you want to take a screenshot, annotate, and share a link in seconds. But if you need deep editing or recent macOS-specific updates, you may hit limitations.

Pros

  • Annotations (frames, text, arrows, etc.)

  • Sharing via direct link to LightShot servers

  • Easy sharing on Facebook and Twitter

Cons

  • You need to have an account in order to access the gallery of your previously taken screenshots

Capto

Best for: Taking screenshots on your Mac, iPhone, and iPad

Features:

  • Is also a powerful screen recorder

  • Has a file manager for quick video/image search

Wonder how to snip on a Mac? Capto is the answer! It is a slick Mac app that lets you capture full-screen or part of my screen, record any app or iOS device, then jump straight into editing (audio, annotations, cropping) and upload to YouTube, Dropbox, or FTP in one go. This nifty snipping tool for Mac is kept well updated, with the latest revamped version being released just in March 2025.

I recently used it to record a live walkthrough of our team’s dashboard. I grabbed the region showing analytics, added commentary with my mic, dropped in a webcam overlay, trimmed out the boring bits, exported as MP4, and shared the link – all within Capto in under 10 minutes.

Pros

  • Instant export and sharing

  • Wide range of editing tools

  • Easy sharing on social networks

Cons

  • Doesn’t offer a free trial version

CleanShot X

Best for: Taking and editing screenshots with annotations

Features:

  • Versatile tool for taking and editing screenshots

  • Quick single-window actions

  • Scrolling capture option

I spent several sessions working with CleanShot X, grabbing everything from long scrolling webpages to horizontal content, then editing in-app with its new color picker and dropping pins and overlays with ease. What I especially like about this snipping tool for a Mac shortcut is that the developers keep it fresh and trendy with lots of frequent updates.

For example, in the version 4.8 update (27 May 2025), the app introduced a custom Color Picker, Editable Window Screenshots (so you can remove backgrounds after capture), horizontal scrolling capture, WebP/HEIC support, and smarter OCR language detection.

Subsequent builds (4.8.1 to 4.8.3) through July-Sept added 5:4 & 9:16 aspect ratios and enhanced compatibility with macOS Tahoe. Very recently, push notifications have been added. You'll now be alerted to first-time interactions (comments/views) on your media."

For anyone doing frequent screenshots with heavy annotation, scrolling content, or combining captures, this tool is outstanding. Though, it carries a slightly steeper learning curve compared to ultra-basic snip screen Mac solutions.

Pros

  • Wide range of sharing options

  • Can cut screenshots and add annotations

  • Can pixelate a selection of your screenshot for better protection of personal data

  • Allows you to draw on screenshots, has seven text styles for annotations

  • Allows you to combine several screenshots into one

Cons

  • Doesn’t have a free trial version

CloudApp

Best for: Effortless visual communication

Features:

  • Also works as a Chrome extension

  • Is available as an iOS app

The CloudApp developers position their tool as a productivity enhancer and means of visual communication. It offers effortless screen capture and editing options including annotation tools. The app is quite efficient for both individual users and businesses. Creating your own CloudApp account saves you the trouble of searching for images on your Mac.

Pros

  • Can annotate with emojis, text, shapes, and arrows

  • Very straightforward app

  • Instant sharing via link

  • Can create a GIF

Cons

  • Might seem too basic for users who need more customization

Zight

Best for: Effortless visual communication

  • Capterra rating

    4.6/5 stars, 167 reviews

  • Price

    Free (up to 50 captures); $9.95 (individual plan)

Features:

  • Also works as a Chrome extension
  • Is available as an iOS app

Zight (which used to be CloudApp long ago) is more than a snipping tool for Mac. It’s a single hub for capturing screens, recording GIFs, and dropping in annotations without switching apps. I use it almost daily to snip screen Mac, clip videos, and instantly share context with my team, which keeps projects moving without endless back-and-forth.

The Mac snipping tool shortcut alone saves minutes on every task; I hit it, select the area, and the cloud link is ready for Slack or email. When I need to show a workflow or highlight an issue, Zight’s annotation and recording tools let me illustrate it clearly in seconds.
Figuring out how to use snipping tool on Mac has never felt this seamless. Even when multiple projects pile up, I stay organized because every capture is tracked, shareable, and easy to retrieve. For anyone asking how to snip on a MacBook efficiently, this app handles it all without extra noise or clutter. And it frequently gets cool updates!

Pros:
  • Can annotate with emojis, text, shapes, and arrows

  • Very straightforward app

  • Instant sharing via link

  • Can create a GIF

Cons:
  • Might seem too basic for users who need more customization

Where to find your saved screenshots on a Mac

You already know how to take screenshots, but where is exactly the folder containing all the images? In fact, screenshots are saved to your desktop by default. If there’s nothing on your desktop, you can try searching for your screenshots by going to Finder > Go > Home > Pictures > Screenshots. If you're using macOS Catalina, then you'll need to go to Finder > Go > Home > Library > Pictures > Screenshots. That's all there is to it!

In macOS Mojave or later, you can change the default directory of saved screenshots in the Options menu (the available options are Desktop, Documents, Clipboard, Mail, Messages, Preview or Other Location). You can also drag the thumbnail to a folder or document.

How to choose the right snip tool for a Mac

So, how to take a snip on a Mac? Choosing a snipping tool for Mac isn’t about checking boxes. It’s about what you actually do with those pixels. For lightning-fast grabs, the built-in Mac snipping tool does the trick: ⌘ + Shift + 4, drag, done.

But when your workflow starts to demand more (stuff like annotations, arrows, trimming, layering), Movavi Screen Recorder, as the ultimate snipping tool for Mac, steps up. The software lets you sculpt your screenshots and screen captures exactly how you want. Designers juggling UI mocks, educators crafting visual guides, or anyone who wants snips that can carry context, comments, and clarity all in one go will find Movavi impossible to beat.

Lighter tasks? CleanShot and Zight handle the basics. So does Capto. LightShot may also deserve your attention, but it is not as modern as the other products on my list.

Use TextSniper if your main goal is to grab text from images or PDFs, it’s quick, precise, and surprisingly slick for extracting words without screwing your brains out.

Summary

Although macOS devices already have a versatile inbuilt screenshotting and screen recording tool, users who need more from software like this might want additional features like taking scrolling screenshots, making annotations, and more. With Movavi Screen Recorder this can be easily done in no time. Try it out for free now!

Movavi Screen Recorder

The perfect way to record anything from your screen

Disclaimer: Please be aware that Movavi Screen Recorder does not allow capture of copy-protected video and audio streams.

<p>Movavi Screen Recorder </p>

Frequently asked questions

Does Mac have a snipping tool?

Yes, all Mac devices have their own snipping tool. To reveal the snipping tool panel, press Cmd + Shift + 5. You can capture your entire screen or a portion of it. To be able to take a scrolling screenshot, annotate, edit, and easily share the result, try out Movavi Screen Recorder. This software can handle any task related to capturing and editing screenshots.

How do you snip on a Mac?

There are three ways you can snip on your Mac:

  • Capture everything on your screen using the following combination of keys: ⌘ + Shift + 3.

  • Use ⌘ + Shift + 4 to capture a selection of your screen.

  • Press ⌘ + Shift + 5 to call up the screen-recording panel and select the desired option.

What happened to Grab on Mac?

If you're used to using the Grab app on Mac, then you'll be disappointed to know that it's no longer available in macOS Catalina. Grab was available as a preinstalled app on macOS until High Sierra (version 10.13). The Screenshot tool replaced it in Mojave (version 10.14). Don't worry, the snipping tool is just as good as Grab!

What is the best snipping tool for Mac?

Here are the best tools that allow you to take screenshots:

Of course, you can also use the pre-installed snipping tool. Just press these hotkeys: ⌘ + Shift + 3, ⌘ + Shift + 4, or ⌘ + Shift + 5.

Movavi Screen Recorder

The perfect way to record anything from your screen

An easy way to record from your screen in HD. Make video footage of any application, record online streaming video, webinars, even Skype calls, and save clips in all popular formats.

Have questions?
Have questions?
If you can’t find the answer to your question, please feel free to contact our Support Team.
Join us for discounts, editing tips, and content ideas

1.5M+ users already subscribed to our newsletter

By signing up, you consent to receive our marketing emails and agree to Movavi using your personal data in accordance with our Privacy Policy. You also confirm that you meet the minimum age requirements.