How to Record a FaceTime Call with Audio [Full Guide]

  1. Download and install Movavi Screen Recorder.

  2. Adjust the recording settings.

  3. Start recording your FaceTime call.

  4. Save the result.

Edited by
Ben Jacklin
35,122

Key takeaways

  • Movavi Screen Recorder quietly delivers the most reliable FaceTime recordings with crisp video and clean audio.
  • QuickTime Player and iPhone’s built-in recorder are great free options, though QuickTime needs extra setup for audio capture.
  • Descript is perfect for professional users who want editing, transcription, and polished post-production.
  • Mobile apps like Record it! (iOS) and Mobizen (Android) handle internal audio well and offer handy extras like reactions or quick edits.
  • For best results, always check your system audio + mic settings before recording, and use drawing/highlight tools to make key moments stand out.

Ever been on a mid-FaceTime call, wishing you could hit a 'rewind' or 'save' button? Whether it's a hilarious anecdote from Grandma, critical work instructions, or a precious moment with loved ones, some conversations are just too good to fade into memory. The good news? You absolutely can screen-record FaceTime with audio!

And trust me, I've dived deep into the trenches, personally testing countless programs across Mac, iPhone, and Android. After putting them through their paces, I've curated a definitive list of the best 8 programs for this job. Want to know, can you record a FaceTime call? Well, it’s time to capture those precious moments properly! Let's dive into how to record FaceTime with audio, no matter your device!

My top picks

After personally testing these 8 tools, I've got some clear favorites. My testing involved everything from ease of setup to actual recording quality, and trust me, some really shine brighter than others. Here are the standouts from the bunch:

Best overall: Movavi Screen Recorder

This one just worked beautifully, right out of the box. Super intuitive, and the video and audio quality from my FaceTime tests were consistently spot-on.

Best free option: QuickTime Player

For Mac users, honestly, you can't beat QuickTime for a no-cost option. Yeah, getting the audio set up takes a tiny bit of fiddling, but for basic recordings, it's a lifesaver.

Best for professionals: Descript

If you're serious about content and need to go beyond just recording, Descript is a game-changer. Its transcription and editing features felt incredibly powerful for more polished work.

Best for mobile users (iOS): Record it!

On my iPhone, "Record it!" was the clear winner for ease of use. It captures calls smoothly and even lets you add your own reactions, which is a neat touch for sharing.

Comparison table: FaceTime recorders

Program name

Ease of use

Main advantage

Our score

Product link

★★★★★

High-quality recordings with audio support

9/10

★★★☆☆

Built-in macOS tool for screen recording

7/10

★★★★☆

Advanced editing features with transcription

8/10

Built-in iOS recorder
4,6/5
Bestseller
Movavi Screen Recorder
4,9/5
AZ Screen Recorder
4,5/5
disclaimer_person

Here’s what Movavi’s team does to provide you with verified information:

  • When selecting products to include in our reviews, we research both demand and popularity.

  • All products mentioned in this article have been tested by Movavi Content Team.

  • When testing, we aim to highlight the best features of a product and what it’s best suited for.

  • We study user reviews from popular review platforms and make use of this information when writing our product reviews.

  • We collect feedback from our users and analyze their opinions of Movavi software as well as products from other companies.

How to record a FaceTime call with audio on your Mac

Can you record a FaceTime call with video and audio at the same time? No problem! Movavi Screen Recorder can capture your screen, webcam, system sounds, and microphone audio simultaneously. Use Movavi's screen recorder for Mac to capture and preserve all your important video conversations.

Follow these simple steps to learn how to record a FaceTime call with audio.

Step 1. Download and install the FaceTime recorder

Download the installation file to your Mac and follow the instructions on the screen. When the installation process is complete, launch the app.

Step 2. Adjust the recording settings

Before you start capturing your FaceTime video, you need to set the parameters for the recording session. Click Preferences on the sidebar. In the dialog box that appears, adjust the settings as you wish: hide the sidebar, pick a cursor, disable the countdown, etc. Once you are happy, click OK. Next, click the Screen recording button and select the area of the screen you want to record.

When the recording panel appears, make sure the System audio icon is green: this option enables the program to record all internal sounds. Don’t forget to turn on the Microphone.

Step 3. Start recording your FaceTime call

Click the REC button to start recording. The process will begin after a short countdown. You can use the Pause and Screenshot buttons during the screen capture. To finish recording, click Stop.

Step 4. Save the result

Click the Export button. In the dialog box that appears, enter a file name and choose the output format, then click Save.

Perfect! Now you know how to use Movavi’s app for screen recording during a FaceTime call.

How to screen-record FaceTime with sound on an iPhone

When you screen-record FaceTime, is there sound? Yes, and if you want to know how to hear and record FaceTime with sound on an iPhone, use the built-in screen-recording feature. This recording feature is available on iPhones running iOS 11 or later.

Follow these steps to learn how to screen-record FaceTime with sound on your iPhone.

Step 1. Enable the screen-recording feature

Open the Settings app on your iPhone. Scroll down and tap on the Control Center option. Locate the More Controls section and tap on the + button next to Screen Recording to add it to your Control Center. Close the Settings app and return to your iPhone's home screen.

Step 2. Start recording

Swipe down from the top-right corner to access the Control Center. In the Control Center, you'll see a circle with a white dot inside it. This is the screen-recording button.

Before initiating the FaceTime call, press and hold the screen-recording button until a pop-up menu appears. In the pop-up menu, make sure the microphone icon is enabled by tapping it. This allows you to record audio on FaceTime from your device.

Tap on the Start Recording button in the pop-up menu.

Step 3. Open Facetime and start the call

Now, open the FaceTime app and initiate or answer the call as usual.

To stop recording, simply tap on the red status bar at the top of the screen and select Stop in the pop-up menu. The screen recording will be saved to your iPhone's Photos app.

How to record FaceTime with audio on an Android device

Can FaceTime be recorded on Android devices? Yes! Even though the FaceTime app is only available for iOS devices, Android users can join FaceTime calls via browsers. For recording calls, try AZ Screen Recorder. It’s a popular screen-recording app for Android devices that allows users to capture their screen activity and audio. It offers a simple and user-friendly interface, making it easy to record FaceTime or any other app's video calls with sound.

Step 1. Download and install AZ Screen Recorder

Download the app using the link below:

Get AZ Screen Recorder

Once the installation is complete, locate the AZ Screen Recorder app icon on your device's home screen, and tap it to launch the application.

Step 2. Specify the settings

Before recording, you can customize the settings as per your preference. To access the settings, tap the gear icon in the overlay menu.

Ensure the Record Audio option is enabled in the Settings menu. You can also adjust the audio source or enable microphone recording if necessary.

Step 3. Start recording your call

Return to the overlay menu by tapping on the AZ Screen Recorder icon. Before starting the FaceTime call, tap the camera icon in the overlay menu. This will start the screen-recording process.

Once the recording starts, you can launch FaceTime and make a video call.

Step 4. Save your recording

To stop recording, open the notification panel by swiping down from the top of your device's screen. You'll find a notification from AZ Screen Recorder indicating the ongoing recording. Tap the Stop button to end the recording. The app will automatically save the recorded video to your device's gallery or a specific folder, depending on your settings.

How to record FaceTime on a Mac with QuickTime Player

QuickTime Player is a built-in application on macOS that can record FaceTime calls. However, you need to install the Soundflower plugin for recording with audio.

Step 1. Download Soundflower

First, download and install the latest release from the Soundflower GitHub page: 

Download Soundflower

Step 2. Specify the recording settings

Open System Preferences on your Mac, then click Sound. In the Output tab, select Soundflower (2ch) as the default output device. This will route audio to Soundflower for recording.

Now open FaceTime on your Mac. Click on FaceTime in the menu bar and select Preferences. In the Settings tab, ensure that Microphone is set to your desired input source (e.g., built-in microphone or external microphone).

Step 3. Record your Facetime call

Open QuickTime Player. In the menu bar, click File and select New Screen Recording. Click the arrow next to the red button to reveal additional options.

In the Microphone section, click on the dropdown menu and select Soundflower (2ch). This will route audio from FaceTime to QuickTime Player. 

Click on the red button to start recording. Switch to the FaceTime window and proceed with your video call or chat as usual.

Step 4. Stop recording

After recording, click the Stop button in the menu bar or press Command + Control + Esc on your keyboard. The recording will be saved automatically.

How to record FaceTime on a Mac using hotkeys

You can also easily record your FaceTime calls using hotkeys on your Mac. Just follow these steps:

Step 1. Start your call

Start a FaceTime call with the desired person or group.

Step 2. Use the hotkeys to start recording

Press ⌘ + Shift + 5 on your keyboard to open the screen-recording utility window. 

Select Record Entire Screen from the list of options in the top menu bar, then select FaceTime from the drop-down menu beside it. 

Click on the red button to start recording your FaceTime call. 

Step 3. Stop the recording process

When you want to stop recording, press ⌘ + Control + Esc to open the screen-recording utility window again, then click the Stop button at the bottom right. Your recording will be saved in your Mac's Movies folder with a timestamp as its name.

Best FaceTime screen-recording programs for a Mac

QuickTime Player
4.5/5
Bestseller
Movavi Screen Recorder
4,9/5
Descript
4.8/5

Movavi Screen Recorder

Why I picked it: I really enjoyed using Movavi because it makes recording FaceTime a joy. The interface is straightforward, so figuring out how to record audio on FaceTime didn’t feel like a steep learning curve, and the video and sound quality came out crystal-clear every time.

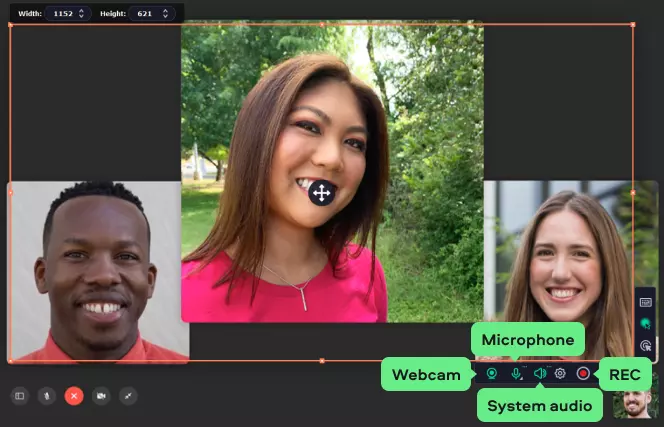
Movavi Screen Recorder is a desktop tool that captures screen video, webcam feed, system audio, and microphone input—simultaneously if desired. You can draw shapes on-screen during recording, schedule recording sessions, highlight cursor or keystrokes, and export to formats like MP4, MOV, AVI, etc.

Besides, it’s designed with user convenience in mind. Ultimately intuitive, you will easily learn how to screen record FaceTime with sound, using Movavi.

I checked Movavi’s “What’s New” page and saw that version 24.6.1 dropped on May 19, 2025, bringing “minor improvements and bug fixes.” Earlier versions already tackled serious annoyances: in version 24.5.0, they fixed crashes at app launch and webcam-startup issues, plus a bunch of stability tweaks.

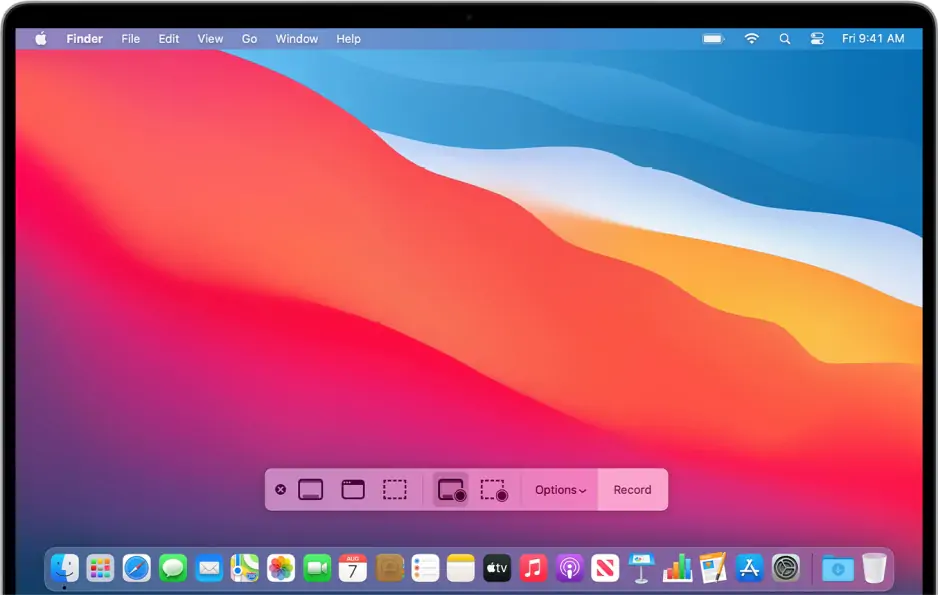
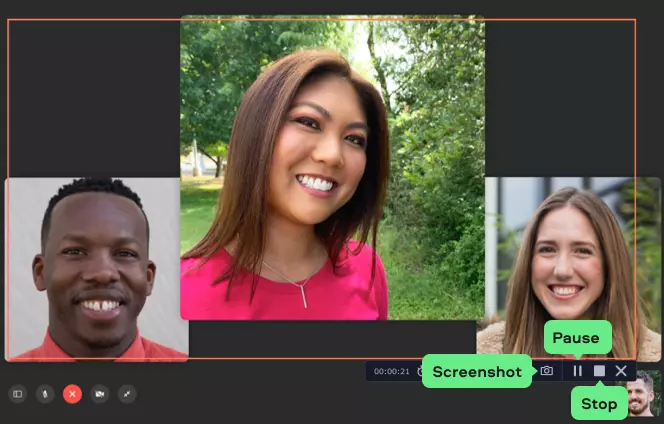
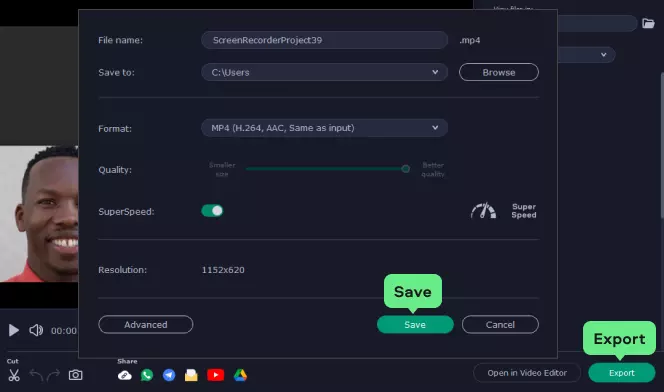
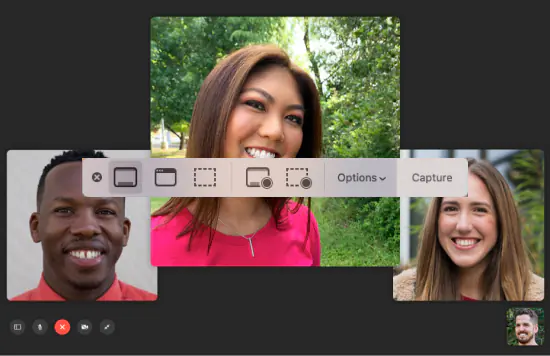
In my hands-on test, I used Movavi to record a FaceTime session on a MacBook running a modern Mac OS. It was pretty painless: I clicked the widget, selected the capture region, toggled system audio + mic, and hit record. The drawing tools worked well mid-session. The output video looked sharp, audio was clean (noise reduction helped), and it handled pausing/resuming without glitching. I saw a bit of CPU strain when I simultaneously used multiple windows, but that’s expected. Among all the tools I tried, Movavi felt like the least fiddly and the most “just works” in this year, so I’d still call it one of the best FaceTime recorder Mac options.

Ratings

Pros:

  • Draw on screenshots and show keystrokes and mouse movement for easier explanations

  • Get clear sound in your videos with AI: reduce background noise from wind, traffic, or stray chatter

  • Customize footage and create videos on the go

  • Save your recordings in popular file formats and resolutions including HD and 4K

Cons:

  • No limits to your creativity in the full version of the program

Why I picked it: A reliable Android app that records in high quality and offers handy editing features.

AZ Screen Recorder is a mobile application (mainly Android) that lets you capture screen video + audio, livestream, edit clips, and use facecam overlays. It supports internal audio (on Android 10 and newer), pause/resume, drawing tools, GIF export, and no time limit. The latest version as of September 2025 is 6.7.6, with updates including a new “Avoid unexpected stop” feature and added support for 120 FPS & 90 FPS frame rates, plus general driver/performance fixes.

When I brought AZ into play on a modern Android gizmo, the overlay UI was intuitive, and recording internal audio worked as expected. The editor is basic but serviceable for trimming and merging.

Occasionally, I saw dropped frames when recording very high resolutions, but for most video-call use, it was fine. I like it for mobile capture, but it doesn’t really help when you need to record a FaceTime call on a Mac.

Ratings

Pros:

  • Easy to use

  • High-quality videos

  • No watermarks

Cons:

  • Not all devices support internal audio recording

Quick summary

  1. Recording without an extra app on iOS: Built-in iOS recorder

  2. Easy way to record on an Android device: AZ Screen Recorder

QuickTime Player

Why I picked it: A built-in macOS gem that’s perfect for quick, no-fuss recordings—just a few clicks and you're set.

QuickTime Player comes built-in with macOS and is pretty capable; you can even use it to record your FaceTime calls. However, getting that recording to include audio adds a significant hurdle. That's because macOS doesn't natively allow you to capture internal system sound. To work around this, you'll need to install a separate tool like the Soundflower plugin. Once Soundflower is set up, it creates a virtual audio device that QuickTime can then use to record both your screen and the audio simultaneously.

In my experience, this whole process of getting QuickTime to record a FaceTime call with audio is quite a hassle. As a starting point, you have to download and install Soundflower (or a similar third-party utility), which isn't always the most straightforward. Then comes the trickier part: you need to dive into your Mac's audio settings and manually route the system sound through this new virtual device. While the end result works well – a smooth screen recording with synchronized audio – the setup is cumbersome and definitely not ideal for casual users or those looking for a quick solution.

Ratings

Pros:

  • Multiple recording options

  • High-quality recordings

  • Native macOS software

Cons:

  • Need to download an external plugin to record internal audio

Hotkeys on a Mac

Why I picked it: With just Command + Shift + 5, you can instantly bring up a recording toolbar, select your FaceTime window, and start recording—no extra clicks needed.

Recording FaceTime calls on your Mac with hotkeys is utterly easy. Just hit Command + Shift + 5, and a recording toolbar pops right up. You can then pick your FaceTime window, hit Record, and make sure your mic's on for audio.

From my own testing, these hotkeys really deliver. On Mac, that Command + Shift + 5 interface is super intuitive. You quickly set the recording area around your FaceTime call without digging through menus. Instant start and stop are incredibly handy, saving you precious seconds.

Pros:

  • Built-in tool, no need to download

  • Quick save and share

Cons:

  • Limited editing features

Why I picked it: Beyond recording, its transcription and editing tools make refining your FaceTime sessions a walk in the park.

Descript has become an incredibly powerful tool for screen recording and editing, especially for Mac users. Its intuitive interface lets you effortlessly record your screen, webcam, or both, and jump straight into editing. Recent updates, including real-time upload progress, improved reliability, and a smart retry mechanism, guarantee your recordings are always secure and accessible – even when your internet connection is less than perfect.

My own experience putting Descript to the test was a delight. Recording a FaceTime call on my Mac couldn't have been easier. I launched the screen recorder via the menu bar, selected the FaceTime window, and hit record. The audio and video quality were crisp, and the editing features made trimming and enhancing the footage seamless. This smooth integration with the editor truly made post-production a breeze. And the ability to instantly share the recording via a link was a huge plus.

Ratings

Pros:

  • Easy to set up and use

  • Multitrack recording for more editing flexibility

  • Transcription feature for easy script-editing

Cons:

  • May require additional setup for remote interviews

Best FaceTime recorders for iOS and Android

Built-in iOS screen recorder / iPhone’s built-in recording feature

Why I picked it: No downloads needed—just swipe and tap to start recording your FaceTime

This is Apple’s native screen recording tool, no extra app software needed. You just enable it in the Control Center, swipe down, tap & hold the recording button, hit “Microphone” if you want voice, then start. It captures whatever’s on your screen (apps, video calls, etc.) and saves the recording to your Photos. Apple just enhanced this in iOS 26: now recording is higher quality and more faithful to what you see.

When I tried it on a recent iPhone, it was seamless: opened Control Center, enabled mic, tapped record, and off I went. I tested it during a video call (with sound on speaker), and while the mic picked up my voice clearly, the other party’s audio came through the speaker, not the system pipe. It’s perfect for quick, casual captures, but not as clean when you want “internal” audio only (other side’s voice).

Ratings

Pros:

  • No need to download

  • Easy to use

Cons:

  • Lack of editing tools

Why I picked it: This iOS app lets you capture FaceTime calls and add your own reactions—ideal for sharing moments with friends.

Record it! is essentially your dedicated, on-the-go FaceTime recorder for iOS, truly making it a cinch to capture those important, or simply memorable, video calls. For any iPhone or iPad user looking to easily archive their digital conversations, this app is a standout solution, seamlessly handling the core function of recording your video calls.

Beyond just recording, Record it! empowers users with a robust suite of post-capture capabilities. You're not just saving a raw clip; you can inject dynamic video reactions to personalize your content, perform basic edits to refine it, and then effortlessly share your polished recordings with friends or family. It's a complete package for transforming fleeting video chats into lasting digital memories.

Ratings

Pros:

  • Easy to use 

  • Share recordings with friends and family quickly 

  • Add reactions while recording for added effects 

Cons:

  • Some features may require a premium subscription 

Why I picked it: On Android, Mobizen stands out with its high-quality recordings and user-friendly interface.

Mobizen is a versatile screen recording app designed for Android devices. It offers high-quality video capture up to 1080p at 60fps. With this software, users can record both internal and external audio. Creating things like tutorials, gameplay videos, and similar on-screen content becomes straightforward.

The app comes with a floating control button called AirCircle, which provides quick access to recording functions. Also, Mobizen includes basic editing tools, such as trimming and adding background music, and supports live streaming via RTMP for real-time broadcasting.

The latest version of Mobizen Screen Recorder is 3.10.14.3, released on September 11, 2025. This update improved performance by addressing app slowdown caused by ads, enhanced drawing features with new colors, and refined the reward ad UI/UX.

In my testing, I found Mobizen to be a reliable tool for recording high-quality videos. The setup was straightforward, and the interface was fun to use. I could start recording with just a tap. The video quality was pretty decent, with clear visuals and synchronized audio. The built-in editor was handy for making quick adjustments, and the live streaming feature worked as it should.

Ratings

Pros:

  • Supports various content recording on the phone

  • High-definition video and audio recording

Cons:

  • Limited editing capabilities

How to choose the best FaceTime recorder

So, can you screen record FaceTime? From my hands-on experience, if you want a recording that “just works” with crisp video and audio, Movavi Screen Recorder quietly takes the crown—everything from setup to playback felt smooth and reliable. That said, QuickTime Player or the iPhone’s built-in recorder are lifesavers for quick, no-download captures, especially when you just want to save a funny chat or a quick tutorial.

For anyone looking to polish their footage, Descript’s editing and transcription features make post-production a breeze. Mobile users shouldn’t be left out either: Record it! on iOS and Mobizen on Android both handle internal audio and give you handy extras for sharing. And if speed is your game, Mac hotkeys get you rolling in seconds. Bottom line: I’ve tried them all, and while Movavi quietly leads the pack, the others still have their moments depending on what you need.

Movavi Screen Recorder

The perfect way to record anything from your screen

Disclaimer: Please be aware that Movavi Screen Recorder does not allow capture of copy-protected video and audio streams.

Movavi Screen Recorder

Frequently asked questions

How do I tell if someone is screen recording FaceTime?

There is no built-in feature to determine whether someone is screen recording during FaceTime. Screen recording typically does not generate any notifications or alerts for other participants.

Is it possible to record a FaceTime call on an iPad?

Yes, you can record a FaceTime call on an iPad using the built-in screen recording feature. Follow the same steps as mentioned for the iPhone to enable and use the screen-recording function.

Are FaceTime calls recorded?

By default, FaceTime calls are not recorded or saved. However, users can manually record FaceTime video calls using the methods described in the article.

Why can't I hear my screen recording on FaceTime?

If you cannot hear the audio in your screen recording of a FaceTime call, ensure that you have enabled microphone access for the screen-recording feature on your device. Additionally, check that the microphone icon is enabled during the call.

Is it illegal to record a FaceTime call?

Laws may vary depending on the jurisdiction. Familiarizing yourself with the legal regulations regarding recording conversations without them knowing in your location is advisable. It is recommended to inform all parties involved in the call if you plan to record it.

Have questions?

Have questions?

If you can’t find the answer to your question, please feel free to contact our Support Team.

Join us for discounts, editing tips, and content ideas

1.5M+ users already subscribed to our newsletter

By signing up, I agree to receive marketing emails from Movavi and agree to Movavi's Privacy Policy.