Movavi Video Editor makes it easy to burn subtitles into a video to ensure that everyone can enjoy your videos, with or without audio. With this robust video editing software, you can add and customize subtitles and captions to get the look and feel you want without a lot of hard work. And you can do it all in just a few steps.

Detailed Tutorial on How to Hardcode Subtitles
Try Movavi Video Editor:
Edit and enhance videos easily
Add stylish transitions, titles, and filters
Stabilize and reverse video, equalize sound, and more
By clicking the download button, you're downloading a free version of the program.*

Edited by Joey Edits
26,818
If you’ve been following video trends on social media, you’ve likely noticed that subtitles are becoming more and more prevalent. Some platforms auto-generate captions to increase inclusivity, but these are often inaccurate or incomplete. That’s why a lot of video creators are interested in how to add subtitles permanently to their videos.
Why do you need to hardcode subtitles?
Before we discuss how to hardcode subtitles, let’s talk about what hardcoded subtitles are and why you might want to take this step for some or all of your videos. Hardcoding subtitles or captions into a video or movie means that the subtitles are permanently embedded in the video and cannot be turned on or off. Softcoded subtitles, on the other hand, can be turned on or off by the viewer. While this might seem like the preferred option, consider that not all formats will give the user the option to turn subtitles on. So, if you have softcoded subtitles on an Instagram or TikTok video, your viewers may not be able to see them. Let’s talk about a few of the big reasons to hardcode your subtitles.
Improved syncing between your video and your subtitles. Auto-generated subtitles tend to lag video content, which can be especially frustrating for viewers who have a hearing impairment or who simply don’t have the option to watch with audio. With hardcoded subtitles, you can control when the subtitles appear and how long they stay on the screen – thereby improving your audience’s overall experience with your video.
Better accessibility on all platforms. Consider all of the people who want to watch and understand your videos, but who may not be able to listen to them. As we mentioned above, you may not always have the option to let your viewers turn subtitles on or off. While viewers who are not hearing impaired and viewers who have the liberty to watch your videos with sound may not prefer subtitles, including hardcoded subtitles is a great way to engage more people, no matter how you share your videos.
Increased engagement on social media. Studies have shown that viewers engage more with videos that have closed captions or subtitles. When your subtitles are accurate, synced well, and look good, you’re very likely to see more engagement with hardcoded subtitles than without them.
More accurate subtitles. You want your audience to hear (or read) what you say in your videos, right? You want to give them the best possible experience, and that means ensuring that all viewers hear (or read) the same content. However, there’s no way to guarantee that level of accuracy and inclusion with auto-generated subtitles. Worse, you can’t guarantee that every platform will even automatically include subtitles on videos that don’t have them hardcoded into the video file. Don’t leave people out – use hardcoded subtitles to ensure that everyone gets the best experience with your videos.
How to hardcode subtitles with Movavi Video Editor
Step 1. Download and install Movavi Video Editor
First, download Movavi Video Editor for Mac or PC. Then, follow the prompts to install the program and launch it on your computer. This should only take a few moments.
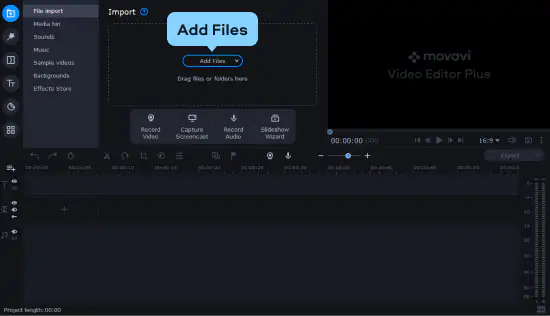
Step 2. Add your video file
Once you have Movavi Video Editor Plus installed, launch the program and click the Add Files option in the main panel of the application. This will open a browser window. Browse for your video file and select it. Your file will automatically be added to the Media Bin. From the Media Bin, drag and drop your video into your Timeline.
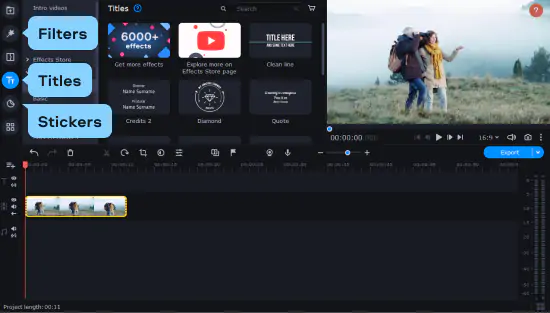
Step 3. Select and add the subtitles
From the menu bar on the left, choose the Titles tab. A selection of static and animated caption styles will appear. Choose the style you like best and drag it into your Timeline. You can preview any of the styles in the media player window before making a choice, and you can always change styles or add different subtitles in different scenes, too.
At this point, you can also add other enhancements from the Stickers and Filters tabs on the left.
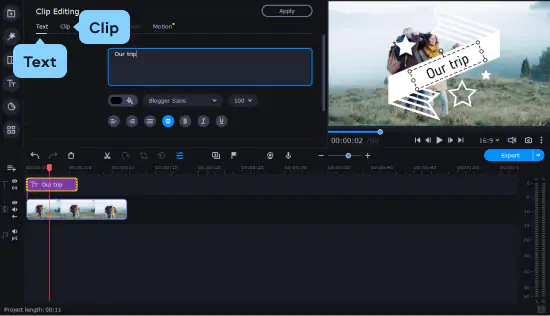
Step 4. Customize your subtitles
Customizing your subtitles can make them more legible and enhance the look and feel of your video. To do this, double-click the title in your Timeline and open the Text tab in the upper left corner of the application. Here, you can enter the text, choose its font, text size, and how it appears and aligns on the video. Next, open the Clip tab next to the Text tab to adjust how long your captions appear on the screen. This tab will also allow you to change the text and background color for your captions, and you can make edits to specific words or parts of the subtitles, as well. For example, if you want to change the color of the subtitles to visually differentiate between two people speaking in your video, you can do that here.
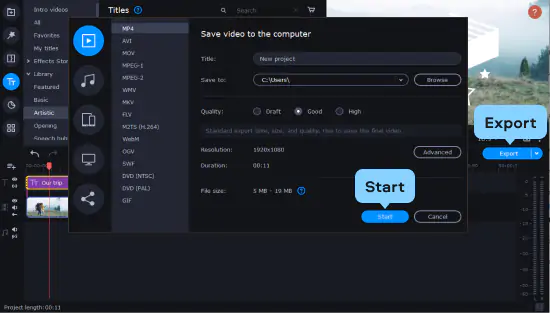
Step 5. Export and save your video
When you’re happy with your video’s subtitles, it’s time to export and save your video file. Click the Export button. From here, choose your preferred video file format, check the presets and make any changes that you want, and then click Start to save your video. Now, you have a video with hardcoded subtitles that will play with captions on any platform or media player.
Movavi Video Editor
Create awesome videos easily
*The free version of Movavi Video Editor may have the following restrictions depending on the build: watermark on exported clips, 60-second video or 1/2 audio length limit, and/or some advanced features unavailable when exporting videos.

How to hardcode subtitles online
In some cases, you may not be able to download video editing software to burn subtitles into a video, or you may need to have access to editing tools on different computers without downloading and saving your video files. If you need to figure out how to add subtitles permanently online for any reason, we recommend Fastreel. With this online video editing tool, you can hardcode your subtitles in just a few easy steps.
Step 1. Get started with Fastreel online
First, make sure that you can access your video on the computer or device you’ll be using to add your subtitles. In a compatible browser (such as Chrome or Firefox), go to Fastreel’s website. Next, either drag and drop your video file into the indicated area or tap the + Add Your File button to browse for your video. If your video is saved in Dropbox or Google Drive, you can click the blue dropdown arrow next to the + Add Your File button to retrieve it.

Step 2. Upload your subtitle file
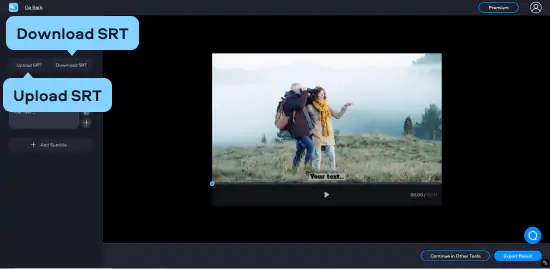
Next, click Upload SRT to add a subtitle file to your video. From here, the program will allow you to edit your subtitles, and you can change fonts, colors, sizes, and styles to customize your captions. If you want to save your subtitles file for later use, you can also click Download SRT to save it.
Step 3. Save your video with hardcoded subtitles
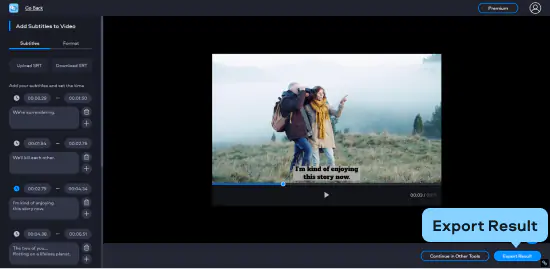
Once you’ve finished customizing your subtitles, just click the Export Result button, choose an export option, and download your finished video file.
How to hardcode subtitles in the VLC player
You can also use VLC to add subtitles to your video. Just follow these steps:
Launch VLC player and import your video into the app.
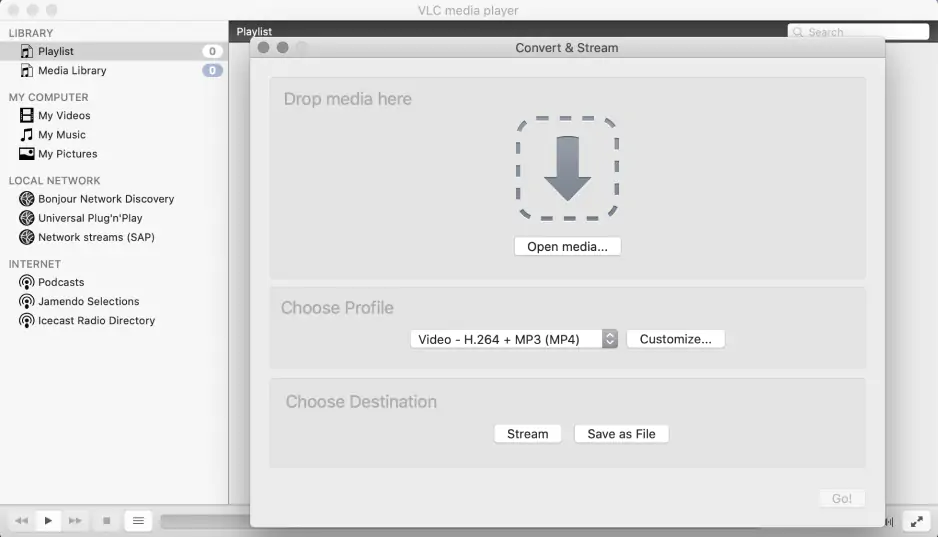
From the Media tab, choose Stream. This should open a media panel.
In the media panel, check the Use a subtitle file box and click + Add to import your SRT file.
Browse for your subtitle file and upload it into VLC Player.
Click Stream and then click Next.
Choose a destination to save your stream file and click Next again.
In the pop-up window in VLC player, check the box next to Activate Transcoding.
A new window will appear. Open the Subtitles tab and select the checkboxes for Subtitles and Overlay subtitles on the video.
Click Save to save your video with subtitles.
Conclusion
While there are a lot of options out there to hardcode or softcode subtitles into a video, hardcoding is usually the easier and more universally useful option for most video creators. It ensures that your videos will be inclusive and engaging for all audiences on most online platforms. And, with the right tools, it’s actually really easy to do. Why not download a free trial of Movavi Video Editor to try it out?
Frequently asked questions
Can I hardcode subtitles online for free?
Can I hardcode subtitles online for free?
Yes, it’s possible to hardcode subtitles online for free with an online video editing tool like Fastreel. Most free tools will include a watermark on your finished video. They may also limit the length of your videos and/or the features that you can use without paying for a premium version.
Can I remove hardcoded subtitles?
Can I remove hardcoded subtitles?
Hardcoded subtitles are integrated into the video file and cannot be removed unless you have the original raw video and SRT file(s). If you have a video project that you’ve hardcoded subtitles onto, you may be able to remove or modify your subtitles in your video editing program, but you won’t be able to remove the subtitles from a finished, exported video file. Permanent subtitles are good for platforms that don’t have auto-generated subtitles, such as most social media sites.
How can I hardcode subtitles without losing quality?
How can I hardcode subtitles without losing quality?
You can add hardcoded subtitles to a video without losing video or audio quality by utilizing a professional-level video editing program. With a program like Movavi Video Editor or Fastreel, you can hardcode professional subtitles that don’t change the quality or resolution of your video.
See other useful how-to guides
How to add subtitles to a movie
How to add subtitles to an MP4 video
Free video-editing software with no watermark
How To Compress A Video For Discord Online and on a PC
How to Use Picture-in-Picture | How to Make a PiP Video
Best SD Cards for GoPro | Best Memory Cards for GoPro
Wondershare Filmora Review: Features, Price, & More [2025]
18 Best Free Movie Makers for Windows 10/8/7 [2025]
Your iMovie Keeps Crashing? [OFFICIAL FIX Options 2025]
Best Video Formats for YouTube | Movavi

Have questions?
If you can’t find the answer to your question, please feel free to contact our Support Team.
Join us for discounts, editing tips, and content ideas


1.5M+ users already subscribed to our newsletter