How to Use DaVinci Resolve: Complete Beginner's Guide in 2026

Edited by
Ben Jacklin
9,209

Blackmagic Design's DaVinci Resolve packs professional-grade features into both free and paid versions. While it's incredibly powerful for color grading and complex projects, the learning curve can feel steep if you're just starting out.

Key takeaways:

  • DaVinci Resolve offers robust free features but requires powerful hardware
  • Seven main workspaces handle different editing tasks
  • Color grading tools are industry-leading, but basic editing might overwhelm beginners
  • Export options are comprehensive once you navigate the interface
  • Alternative tools like Movavi Video Editor provide simpler workflows for everyday projects

Understanding DaVinci Resolve: What you're getting into

DaVinci Resolve for beginners starts with understanding what this software actually does well – and where it might frustrate newcomers. The free version includes professional color grading, multi-camera editing, and visual effects through the Fusion page. That's genuinely impressive for $0.

But here's what the marketing materials don't emphasize: this software was built for post-production professionals. The interface assumes you know industry terminology. Basic tasks like trimming clips involve multiple steps that simpler editors handle in one click.

System requirements reality check

Before diving into any DaVinci Resolve tutorial, check if your computer can actually run it smoothly:

  • Minimum: 16GB RAM, dedicated GPU, multicore processor
  • Realistic for good performance: 32GB RAM, modern graphics card, fast storage
  • MacBook Air users: Expect thermal throttling on longer projects
  • Windows laptops: Integrated graphics won't cut it for anything beyond basic editing

I tested this on a mid-range laptop with 16GB RAM and integrated graphics. Simple color corrections worked fine, but adding multiple video tracks caused noticeable lag during playback.

Free vs. Studio: What actually matters

Feature

DaVinci Resolve Free

DaVinci Resolve Studio

Timeline resolution

Up to 4K 60fps

Up to 32K 120fps

GPU acceleration

Limited

Full multi-GPU support

Noise reduction

Basic

AI-powered advanced tools

Format support

Standard formats

Professional codecs (AVCHD, Sony XAVC)

Collaboration

Local projects only

Cloud collaboration

Price

Free

$295 one-time

For most YouTube creators and social media content, the free version handles everything you need. The Studio version becomes essential for professional workflows or when you're working with multiple team members.

What users say:

Reddit users consistently praise DaVinci Resolve's color grading capabilities and professional features at no cost, but frequently complain about system crashes, steep learning curve, and performance issues on lower-end hardware.

Getting started: Installation and first project

DaVinci Resolve basics: Begin with proper installation

For Windows:

1. Download the installer from Blackmagic Design's official site.

2. Run the EXE file as administrator.

3. Follow the installation wizard (allocate at least 3GB disk space).

4. Launch and complete the initial setup tutorial.

For Mac:

1. Download the DMG file from blackmagicdesign.com.

2. Drag DaVinci Resolve to Applications folder.

3. First launch triggers system permissions requests – allow all for full functionality.

4. Complete the welcome tutorial (don't skip this).

Creating your first project

When learning how to use DaVinci Resolve, project setup determines your entire workflow:

1. Name your project descriptively – you'll thank yourself later.

2. Click Project Settings (bottom right gear icon).

3. Set timeline resolution under Master Settings tab:

  • 1920x1080 for standard HD
  • 3840x2160 for 4K (if your system can handle it)

4. Choose frame rate based on your source footage:

  • 24fps for cinematic look
  • 30fps for standard video
  • 60fps for smooth motion/gaming content

Pro tip:

Match your timeline settings to your source footage. Mixed frame rates cause playback issues and export complications.

The seven workspaces: Your navigation map

DaVinci Resolve's interface splits into specialized workspaces. Each handles specific tasks, and understanding their purposes saves hours of confusion.

Media page: Import and organization

Your starting point for every project. Here you'll import footage, browse files, and organize media bins. The thumbnail preview helps identify clips quickly, though large 4K files can slow down browsing significantly.

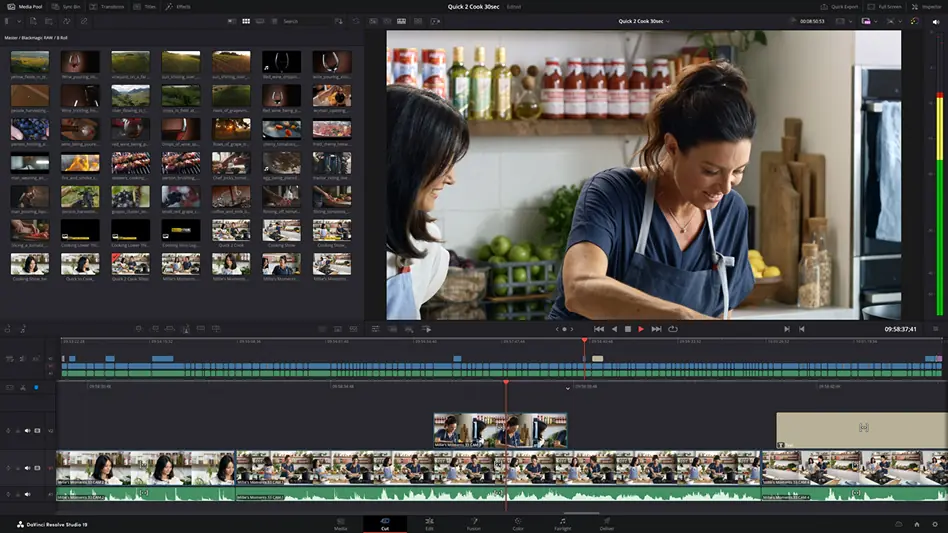
Cut page: Quick assembly

Designed for fast-paced editing with a streamlined timeline. Perfect for simple cuts and basic assembly. However, advanced editing features are limited compared to the Edit page.

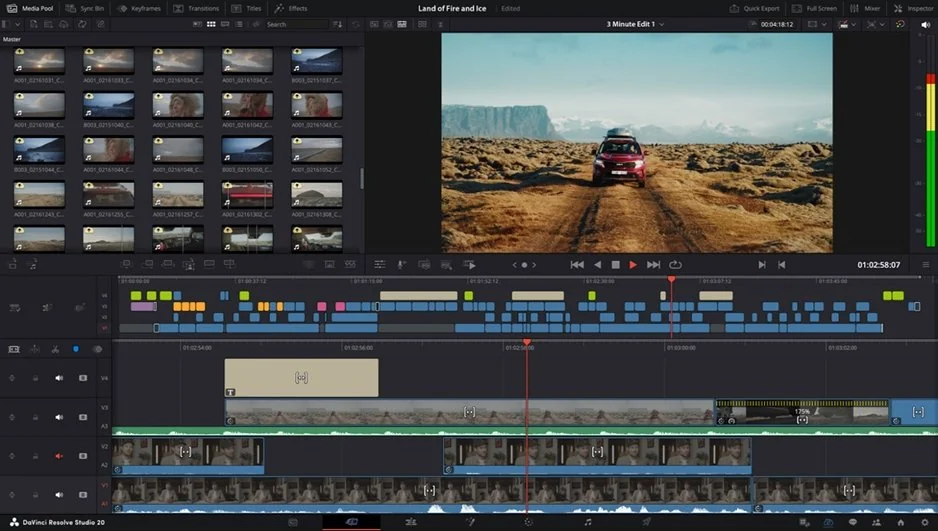
Edit page: Detailed control

The traditional timeline workspace where most editing happens. Track management, detailed trimming, and complex edits all happen here. This page offers the most flexibility but also the steepest learning curve.

Fusion: Visual effects

Node-based compositing system for motion graphics and VFX. Powerful but completely different from layer-based editors. Expect significant time investment to become proficient.

Color: Industry-leading grading

Where DaVinci Resolve truly shines. Professional colorists use these exact tools. The learning curve is substantial, but the results rival $50,000 color grading systems.

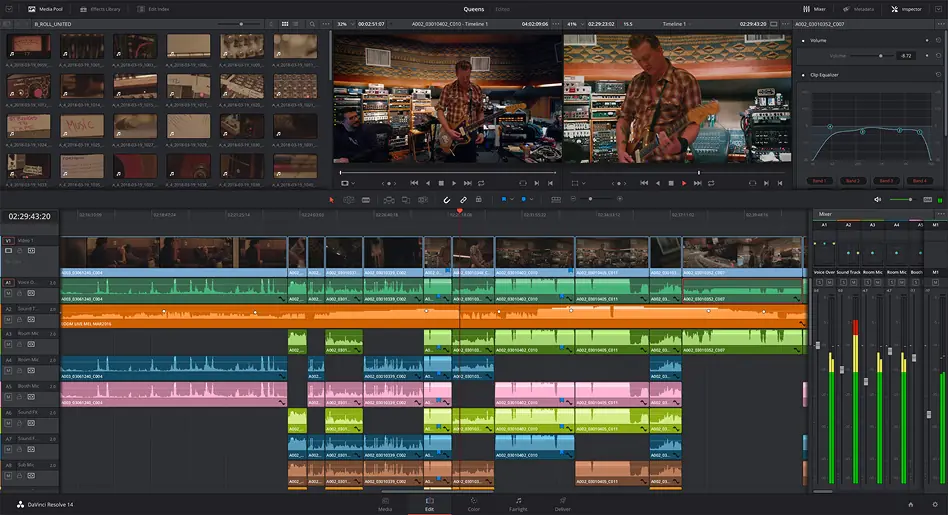
Fairlight: Audio post-production

Comprehensive audio editing with professional mixing tools. More complex than basic audio needs require, but excellent for detailed sound design.

Deliver: Export control

Final rendering and export page. Offers precise control over output formats, but the extensive options can overwhelm beginners looking for simple export presets.

Basic editing workflow

Importing and organizing media

1. Switch to Media page (bottom tab).

2. Navigate to your footage using the file browser.

3. Select clips and right-click → Import Media.

4. Create bins (folders) to organize different types of content.

5. Use thumbnail scrubbing to preview clips without importing.

The import process handles most standard formats automatically. However, some smartphone footage (especially variable frame rate clips) may cause sync issues later.

Timeline editing fundamentals

Switch to Edit page for detailed work:

1. Drag clips from Media Pool to timeline tracks.

2. Use Blade tool (B key) for cutting clips:

  • Click exactly where you want the cut
  • Cuts affect all selected tracks simultaneously

3. Trim clip edges by dragging the beginning/end points.

4. Delete unwanted sections with Delete or Backspace.

The timeline can feel sluggish with multiple 4K clips. Proxy media generation (Media page → right-click footage → Generate Optimized Media) improves playback performance dramatically.

Adding transitions and effects

1. Switch to Effects Library (top left panel).

2. Browse transition categories (Dissolve, Wipe, etc.).

3. Drag transitions between clips on timeline.

4. Adjust duration by dragging transition edges.

5. Modify parameters in Inspector panel (top right).

Basic transitions work smoothly, but complex effects can slow down preview playback on moderate hardware.

Color grading: DaVinci's signature strength

The Color page showcases why professionals choose DaVinci Resolve. These tools match what colorists use for Hollywood films.

Basic color correction

1. Switch to Color page.

2. Select clip on timeline.

3. Use Color Wheels for primary corrections:

  • Lift: Shadows/blacks
  • Gamma: Midtones
  • Gain: Highlights/whites

4. Adjust Offset for overall brightness.

5. Fine-tune with Curves for precise control.

Color matching between clips

1. Select reference clip (your target look).

2. Choose clip to match.

3. Use Color Match feature in Color page.

4. Manual refinement with wheels and curves.

This is where DaVinci Resolve's power becomes obvious. Achieving similar results in basic editors requires multiple plugins and significantly more time.

Audio enhancement in Fairlight

Basic audio editing

1. Switch to Fairlight page

2. Audio tracks appear as waveforms

3. Adjust levels using track faders

4. Cut and trim audio independently from video

5. Apply basic effects (EQ, compression) from Effects Library

Noise reduction and cleanup

1. Select problematic audio clip

2. Navigate to Inspector panel

3. Enable Voice Isolation for automatic background noise reduction

4. Fine-tune with manual EQ if needed

The Voice Isolation feature works surprisingly well for removing consistent background noise, though it can introduce slight artifacts with heavily processed audio.

Export settings and delivery

Choosing the right export format

Switch to Deliver page for final output:

1. Select format preset from render queue

  • YouTube: H.264, 1920x1080, 30fps
  • Instagram: H.264, 1080x1080 (square), 30fps
  • High quality archive: H.264, original resolution, high bitrate

2. Customize settings if needed in video/audio tabs

3. Set output filename and location

4. Add to Render Queue and click Start Render

Export performance tips

  • Use hardware acceleration (GPU) when available
  • Close other applications during rendering
  • Render overnight for long projects – exports can take hours
  • Check available disk space – 4K exports generate large files

Export times vary dramatically based on project complexity and hardware. A 10-minute 1080p video might take 20 minutes on modest hardware, while 4K projects can require several hours.

When DaVinci Resolve might not be right

Despite its professional capabilities, DaVinci Resolve isn't always the best choice:

Consider alternatives if you need:

  • Quick social media edits without learning curve
  • Reliable performance on older computers
  • Simple drag-and-drop editing workflow
  • Immediate results without technical setup

Movavi Video Editor handles these scenarios more efficiently. The streamlined interface focuses on common editing tasks without overwhelming beginners. You can trim clips, add titles, apply effects, and export videos within minutes of opening the program.

You’re almost done with this DaVinci Resolve beginner's guide! Here, we'll explore the optimal export settings tailored for major platforms like YouTube, Instagram, and TikTok. Here’s a table to help you know the best export settings for different platforms: 

Task-based tool selection

Your goal

Best tool

Why

Professional color grading

DaVinci Resolve

Industry-standard color tools

Quick social media clips

Movavi Video Editor

Fast workflow, social presets

Complex VFX work

DaVinci Resolve + After Effects

Professional compositing needed

Family video projects

Movavi Video Editor

Simple interface, quick results

Multi-camera editing

DaVinci Resolve

Advanced sync and switching tools

Beginner learning

Movavi Video Editor first

Gentler learning curve

Color correction happens through intuitive sliders rather than professional color wheels. Automatic features like silence removal and background noise reduction work with single clicks. For most YouTube creators and social media content, this approach saves significant time.

Trouble­shooting common issues

Playback stuttering: Generate optimized media or lower playback resolution to 1/2 or 1/4 quality during editing.

Crashes during export: Close unnecessary applications, check available RAM, and try rendering in smaller segments.

Audio sync problems: Variable frame rate source footage causes this. Convert to constant frame rate before importing.

Missing codec errors: DaVinci Resolve free version doesn't support all professional formats. Convert problematic files using a separate conversion tool first.

Movavi Video Editor
Create awesome videos easily

*The free version of Movavi Video Editor may have the following restrictions depending on the build: watermark on exported clips, 60-second video or 1/2 audio length limit, and/or some advanced features unavailable when exporting videos.

Frequently asked questions

Is DaVinci Resolve really free?

Yes, the free version includes professional editing, color grading, and visual effects tools. You only pay $295 for the Studio version if you need advanced features like noise reduction, collaboration tools, or support for specialized professional formats.

What computer specs do I need for DaVinci Resolve?

Minimum 16 GB RAM and a dedicated graphics card for smooth performance. 32 GB RAM and a modern GPU are recommended for 4K editing. MacBooks with integrated graphics can handle basic projects but will struggle with complex timelines.

How long does it take to learn DaVinci Resolve?

Basic editing takes a few days to pick up, but mastering the color grading and advanced features requires weeks or months of practice. The interface assumes familiarity with professional video terminology, which can slow initial learning.

Can DaVinci Resolve replace Adobe® Premiere® Pro?

For many projects, yes. DaVinci Resolve offers comparable editing tools plus superior color grading. However, Premiere® Pro integrates better with other Adobe apps and has a larger community for troubleshooting and tutorials.

Why does DaVinci Resolve keep crashing?

Most crashes stem from insufficient RAM, overheating, or incompatible footage formats. Try generating optimized media, closing other applications, and ensuring your computer meets minimum system requirements before starting complex projects.

Should beginners start with DaVinci Resolve?

Only if you're committed to learning professional video editing and have adequate hardware. For casual editing, social media content, or learning basics, simpler alternatives like Movavi Video Editor provide faster results with less frustration.

Have questions?
If you can’t find the answer to your question, please feel free to contact our Support Team.
Join us for discounts, editing tips, and content ideas

1.5M+ users already subscribed to our newsletter

By signing up, I agree to receive marketing emails from Movavi and agree to Movavi's Privacy Policy.