Step 1. Install the Movavi video aspect ratio changer
Download the installation file for Movavi Video Converter and install the software on your computer. It will take just a few minutes.
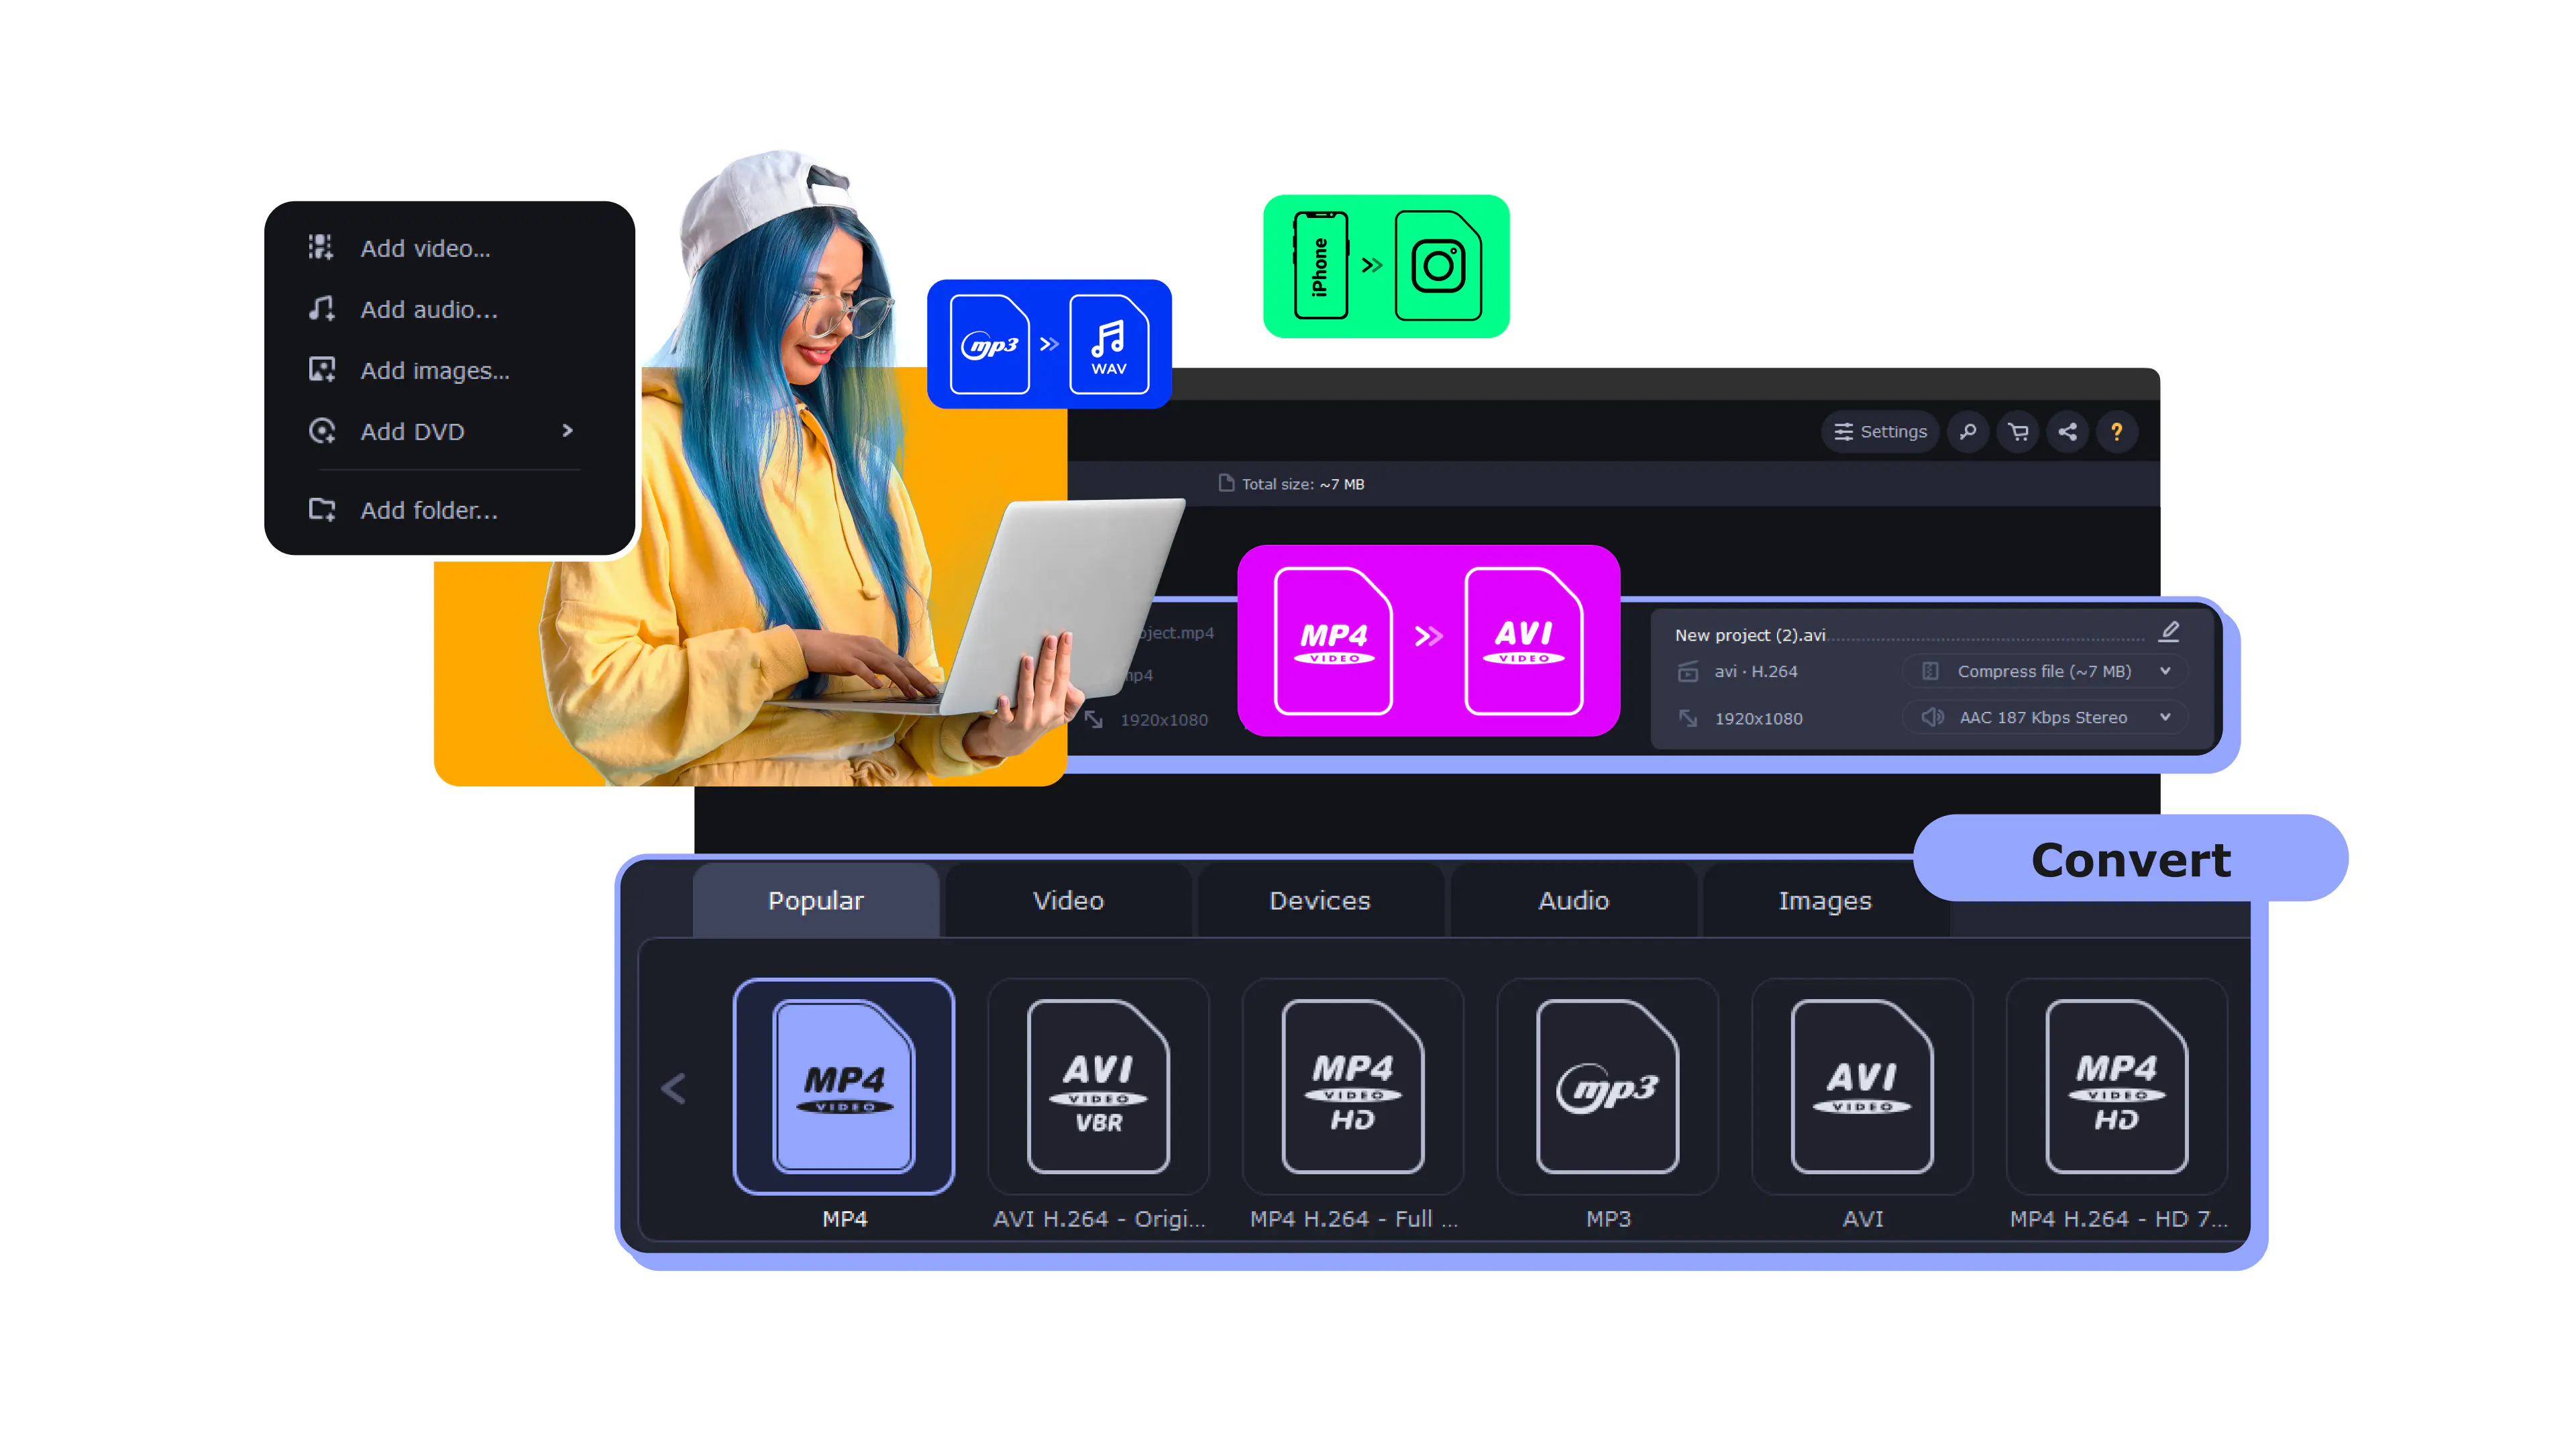
How to Change the Aspect Ratio of a Video (16:9/4:3/5:3/3:2)
To change the aspect ratio, follow these steps:
1. Download and launch Movavi Video Converter.
2. Add your file, choose a format.
3. Click the Edit button and go to the Crop tab. Choose an aspect ratio, click Save and Close.
4. Click Convert.

Choosing the correct aspect ratio for your videos is key if you want them to display correctly on the right platform. But it can be a pain if you’re not familiar with what aspect to use and when.
This article provides a clear description of aspect ratios, lays out why they’re important when posting and what ratios to use on social media, and tells you how to use the video aspect ratio changer functions within Movavi Video Converter.
Movavi Video Converter lets you make sure that the results of your video conversion will have the correct aspect ratio. You can use this program as a video aspect ratio converter to permanently change the aspect ratio of your video to meet the needs of your target device when you want to prepare a video.
Just download the version of the program that's compatible with your OS and follow these step-by-step instructions to learn how to change the aspect ratio of a video.
Download the installation file for Movavi Video Converter and install the software on your computer. It will take just a few minutes.
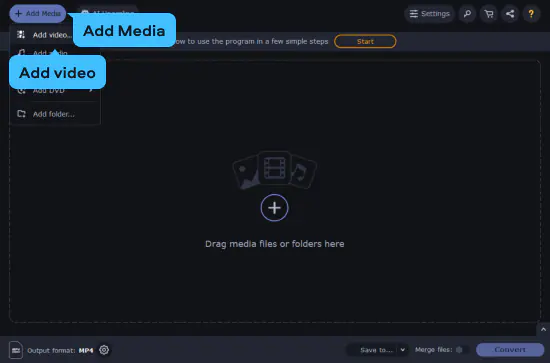
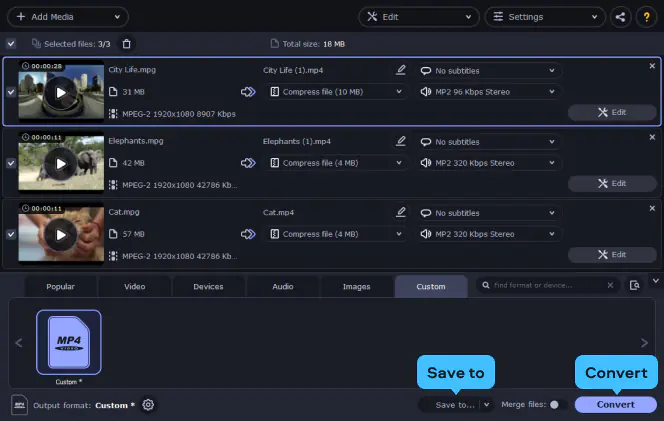
Click the Add Media button and select Add Video. In the dialog box, locate the folder with the file(s) you want to convert. Choose the necessary file(s) and click Open. You can also drag and drop files into Movavi Video Converter right from the folder they're stored in.
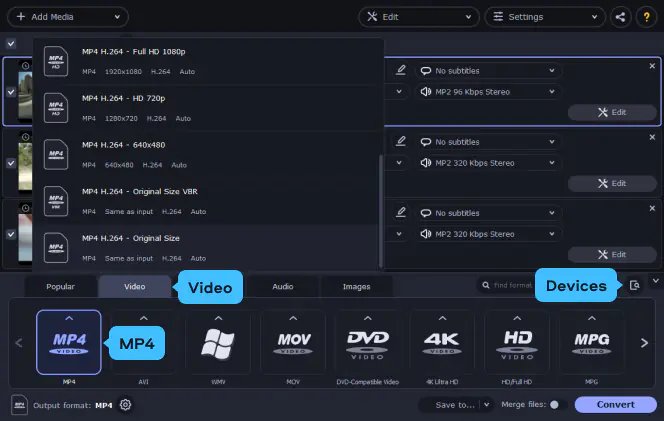
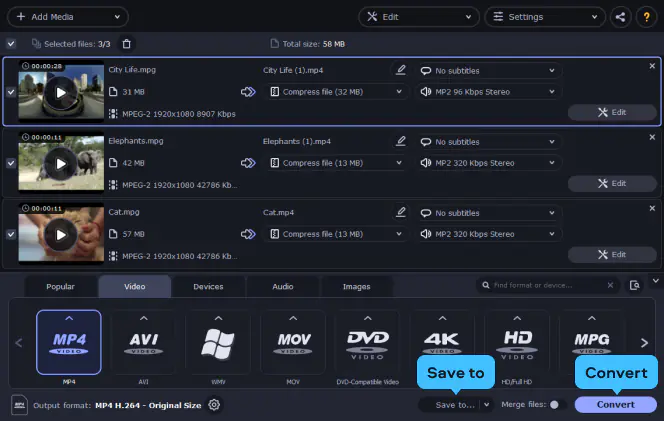
Open the Video tab to see the list of video formats, including MP4, AVI, WMV, and many others. To convert your video to a specific format, hit the name of the desired format. You’ll see a list of presets with different resolution options. If you want to keep the original resolution and aspect ratio, select the option with Original Size in its name. Want to change the aspect ratio of your video? For your convenience, we matched the most popular presets with corresponding aspect ratio values.
Also, Movavi Video Converter includes dozens of ready-made presets for various devices, including iPod, iPhone, iPad, PSP, Xbox One, and many others. Just click Devices and find your device in the list. If you choose a ready-made preset, you don’t have to specify any additional options, because your video will be converted with the optimal settings for playing on the selected device. In this case, you can skip the next step and jump to Step 5.
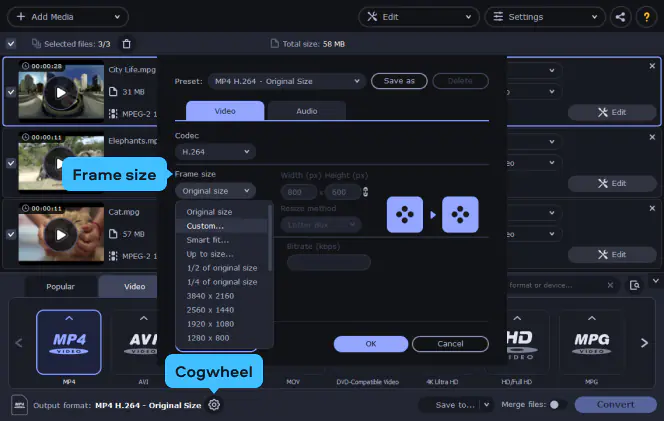
If you want to set the width and height for your video manually, click the Cogwheel button next to the Output format field. In the format settings window that appears, choose the appropriate video and audio codecs and specify various video parameters.
As Movavi Video Converter uses square pixels only during the conversion (except when converting to DVD), the aspect ratio of an output video is always set automatically according to its width and height proportions. So, open the Frame size list and select the right resolution option or pick Custom and enter the required width and height values into the corresponding fields. And don't forget to select the appropriate resize method!
After all the parameters have been set, hit OK, and you’ll be returned to the main program window, where you can finish transforming your video.
A note on saving video in a DVD-compatible format (VOB): all VOB files made in Movavi Video Converter contain non-square pixels so, after choosing the appropriate size preset, you can select the required aspect ratio – 16:9 (widescreen) or 4:3 (full screen) – in the format settings dialog.
Now you need to choose the folder where the converted files will be saved. If you want to change the default “Movavi Library” folder, click Save to and specify a new folder in the dialog box that opens.
Click the Convert button to initiate the conversion process. The folder with the finished files will open automatically upon completion, unless you disabled the feature in the program settings.
If you want to keep the original aspect ratio of a video you convert, use Movavi Video Converter. Just follow the instructions below.
Download the installation file for your OS and install the program.
To upload your video to the program, click Add Media, then Add Video and locate your file.
Open the Video tab and select the output format for your video. To keep the original aspect ratio, select a preset with Original Size in its name.
If you want to change the output folder, click the Save to button before the conversion. To launch the process, hit the Convert button.

Here’s what Movavi’s team does to provide you with verified information:
When selecting products to include in our reviews, we research both demand and popularity.
All the products covered in this article have been tested by our team.
When testing, we compare key characteristics, including supported input and output formats, quality loss when converting, and other significant features.
We study user reviews from popular review platforms and make use of this information when writing our product reviews.
We collect feedback from our users and analyze their opinions of Movavi software as well as products from other companies.
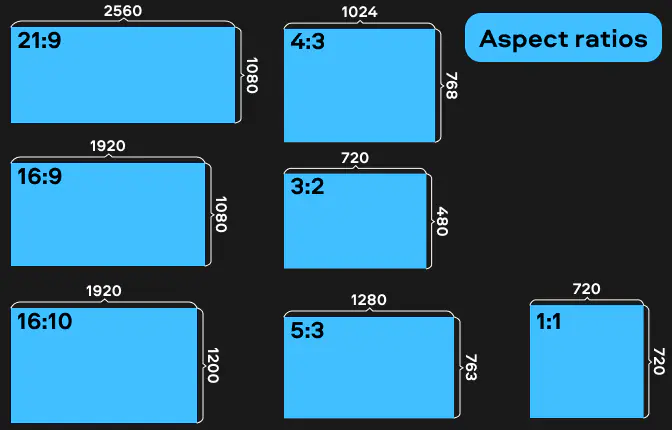
The aspect ratio of videos and pictures is the ratio of the measure of pixels from width to height. This ratio relates directly to the display on which a video is being played as well as the shooting ratio of the camera – you can shoot something in 16:9 and display it in 4:3 if you want.
The aspect ratio doesn’t represent the actual pixel size in terms of height and width. So 16:9 doesn’t have a pixel size of 16 × 9 – that would be very small.
A more common pixel size is 1920 × 720px – high definition resolution – which has a 16:9 aspect ratio.
Often when trying to post on social media, people have difficulty finding the right size for their videos. No matter how much they edit and resize the video, it appears to stretch and is obviously not acceptable for posting.
The problem lies in trying to directly adjust the dimensions of the pixel size to fit into the platform when the editor should instead focus on the aspect ratio.
Ultimately, the platform is going to crop your video into the shape of the aspect ratio no matter what, so it’s important to understand what ratio you need to use for what platform and in what situation.
You may need to use a video aspect ratio converter or resizer software in order to get the right fit. Just remember it’s not a good idea to make a video widescreen if it wasn’t shot in the proper format.
The list below identifies the available aspects and pixel sizes for the most common social media platforms. It will help you choose between different ratios to post a video without stretching.
Feed posts. To start, Instagram feed posts support video aspect ratios in 16:9, 4:5, and 1:1 with varying pixel sizes.
But just because a platform allows you to post in different sizes, it doesn’t mean you should increase and decrease without discernment. No matter what, the platform will automatically adjust the size to fit those ratios.
Instagram is an app geared toward mobile use as opposed to a desktop computer or a TV and feed posts will not flip horizontally. Because of this, it’s best to post videos in a 4:5 ratio at 1080 × 1350 for optimal viewing, or at least go with a 1:1 square ratio at 1080 × 1080.
Stories, Reels, and Instagram live. There’s less flexibility when it comes to stories, They all play in a vertical video format of 9:16 and while you can adjust your stories down to 1080 × 608 and there are hacks to make them horizontal, uploading at 1080 × 1920 is best for optimal viewing without borders.
Reels and Instagram live are both locked at the 9:16 ratio and at 1080 × 1920.
IGTV. Things get a little more complex when trying to figure out what ratio to use for Instagram’s video app that allows for longer videos outside of the feed. It’s again optimal to opt for the 9:16 ratio and at 1080 × 1920 for mobile viewing.
However, if your video was originally shot for another platform like YouTube geared for 16:9 at 1920 × 1080, you can still post the video in this format via IGTV. It’s the one place on Instagram where a viewer can flip the clip horizontally, but you may want to put a message indicating that viewers rotate the video.
With IGTV you also need to be aware of the preview – the first 15 seconds – that plays in a viewer’s feed at 1080 × 1350. Fortunately, Instagram allows you to align the video, so you can show exactly what you want.
You can also upload an image instead for the preview, and if you choose this option, opt for the 1080 × 1350 resolution.
Last, the preview in your profile grid will show at 1:1 and at 1080 × 1080. For this preview, you can either take a snapshot from the video or upload it from your camera roll.
Carousel. Like videos in your feed, carousel posts offer portrait (1080 × 1350), landscape (1080 × 608), or square (1080 × 1080) viewing. But once you select a ratio and size for the first video, all other videos will crop and adjust to the same ratio and size and maintain that ratio for the rest of the sequence.
Instagram recommends a 1:1 ratio for all carousel videos.
YouTube
All YouTube videos play in a 16:9 ratio, but you have the option of adjusting the resolution from the YouTube minimum all the way up to 4K. Here’s a breakdown of the default resolutions with their pixel sizes:
4K UHD – 3840 × 2160
2K QHD – 2560 × 1440
Full HD – 1920 × 1080
HD – 1280 × 720
SD – 854 × 480
Normal website – 640 × 360
YouTube minimum – 426 × 240
Those are the ratios that YouTube will play, but you have the option to upload videos in any aspect ratio you want as long as you stay within the minimum or maximum resolution.
Some popular ratios include 1:1, 4:3, and 9:16. In this case, YouTube will put black or white bars to fill in space based on the viewer’s settings instead of cropping or stretching the video.
For example, you may want to convert from 16:9 to 4:3 for a video to give it an older feel. YouTube will still play the video in a 16:9 display, but it will add black or white bars to the sides of the video.
Videos on Facebook are available in ratios ranging from 16:9 to 9:16, but they must be a resolution of 1920 × 1080 or less. Facebook also accepts videos in any format, but they recommend uploading them in the MP4 format.
Also, for Facebook videos, it's important to consider your audience. If you have more of a mobile following, you may want to opt for a 1:1 or 4:5 ratio, especially if you’re paying for an advertisement. This will allow viewers to see the video on desktop or mobile platforms.
Twitter offers a very wide range of available ratios and pixel sizes. You can upload videos in any aspect ratio you want. However, the platform only supports a pixel size up to 1920 × 1200 or 1200 × 1920 based on whether the video is horizontal or vertical. The minimum pixel size for Twitter is 32 × 32.
Vimeo
Vimeo offers the widest range of options for uploading videos. As long as you’re willing to pay for the online storage, you have the ability to upload videos in literally any aspect ratio and in pixel sizes up to 8k UHD at 8192 × 4320 with no minimum.
Summary
With this guide, you now have a better understanding of aspect ratios and how to use them to effectively present your videos on different platforms. Remember to always research the display ratio and pixel size requirements anytime you want to upload. Changing the ratio is an easy process with Movavi Video Converter.
Movavi Video Converter
Although widescreen is a relative term, the international standard for the widescreen aspect ratio is 16:9.
The aspect ratio on a Windows 10 PC isn’t permanently fixed. Like Windows 8 and other previous versions, Windows 10 has a minimal range of aspect ratios you can select within the operating system that are all tied to the resolution capabilities of your graphics card.
To change the aspect ratio, you’ll need to change the resolution using the following steps:
Right-click on your desktop and select Display Settings from the dropdown menu.
Scroll down until you see Display Resolution and click the dropdown menu.
Click to select any of the preset display resolutions that come in a range of aspect ratios and keep your screen on one that works with your monitor size.
Here are some processes you can use to find the aspect ratio of a video in Windows, or on a Mac, Android phone, iPhone, or iPad.
Windows
Right-click on a video file and select Properties from the menu. Then, click the Details tab at the top. Under the section labeled Video there are two labels for Frame Width and Frame Height.
With the width and height of the frame, it’s possible to calculate the aspect ratio using one of the free online calculators listed in the next FAQ question.
Mac
Use Finder on your Mac to locate the video file and open it in Apple QuickTime. Once the video is open, click Window and then Show Movie Info. Look for the label Current Size and that will tell you the dimensions of the video – width and height.
You can then use a pixel calculator listed in the FAQ question below to input the data and get your aspect ratio.
Android
Open the Photos app on your Android phone and tap to open the video. Tap the video once to display the menu and then tap the Menu icon on the top right – the three dots – to open the file details. Scroll down to the section labeled Details and below the file name the dimensions should be displayed in the middle.
Again, the height and width are what show. You can use an aspect ratio calculator listed in the next question.
iPhone or iPad
Note that on an iPhone or iPad, a video file must be saved to the Files app in order to see the details of the file. So if the file isn’t saved and is located in the Photos app, you’ll need to hit the Share icon and save it to the device first.
Once it’s saved, locate the file within the Files app and tap and hold on the video until a menu appears. Select Info from the menu and you’ll be able to see the height and width dimensions of the video file.
Then, use an aspect ratio calculator listed in the next question.
Doing all the math to calculate conversions of the width and height of a video into the aspect ratio isn’t necessary. There are plenty of free video aspect ratio calculators online to help you out. Here are a couple to use:
Again, you don’t need to do the math to convert aspect ratios to inches. There are plenty of online resources to help you out, but you may need to type in the height and width separately. Here are a couple:
All YouTube videos display in a 16:9 aspect ratio.
It’s according to where you’re viewing the video. Feed videos can play in 16:9, 4:5, and 1:1, but Instagram recommends 4:5 for videos.
Stories, reels, and Instagram live videos all play in a 9:16 vertical ratio.
IGTV videos preview in the feed format for 15 seconds and then the viewer can tap to view in 16:9 horizontal or 9:16 vertical on a phone.
Carousel videos also play in the same aspect ratios as the feed, but the first video is what will play for all videos. Instagram recommends 1:1 for this type of video.
Facebook recommends a 4:5 aspect ratio for videos you think will be viewed on mobile only and 1:1 for desktop-oriented videos.
Both problems usually happen when a widescreen video (16:9) is converted to 4:3 or vice versa.
To fix a 16:9 video converted to 4:3 you need to calculate the correct height. Since the converted video is supposed to be 16:9, i.e. W:H = 16:9, the height should be calculated as H = 9 × W : 16.
To fix a 16:9 video converted to 4:3 you need to calculate the correct width. The converted video is supposed to be 4:3, i.e. W:H = 4:3, so the width should be calculated as W = 4 × H : 3.
After making all the necessary calculations, you can use Movavi Video Converter to fix the video.
Add your video to Movavi Video Converter and select the appropriate output preset in the Video tab.
Click the Cogwheel button next to the Output format field.
Open the Frame size list and select the resolution that you've calculated above. If you want to set it manually, pick the Custom item and enter your width and height values into the corresponding fields.
Open the Resize method list and select Stretch if you want to correct stretched video or Crop if you want to remove black bars from the edges of your video.
Click OK then click the Convert button.
See other useful how-to guides
How to convert MKV videos to AVI
How to convert DVD files to AVI
How to shrink video file size
How to compress MP4 video files
How to convert VOB to AVI
12 Best HD video converters [Windows/Mac/Online]
10 Best video compressors for Discord [2025]
15 Best Free Video Converters for Mac [2025]
13 Best Free MKV to MP4 Converters [Windows/Mac] [2025]
AAC vs. AC3 | Which Is Better in 2025?

Have questions?
Join us for discounts, editing tips, and content ideas


1.5M+ users already subscribed to our newsletter