
Step 1. Download the program
Download and install the program.

12 Ways to Fix OBS High CPU Usage [Solved]
Try Movavi Screen Recorder!
Lightweight program suitable for slower computers
No lag
Perfect for recording your webcam and screen
OBS has a tendency to put a heavy burden on your CPU and lag other system functions. Here are twelve ways you can fix OBS high CPU usage.
Movavi Screen Recorder is a solid alternative you need to record your screen or webcam – or both! – without lagging up your system. It’s lightweight and perfect for older, slower computers that can’t handle software like OBS. Plus, it runs on Mac or Windows computers and comes with a free trial.

Our goal is to provide you with only verified information. To ensure this, Movavi Content Team does the following:
When selecting products to include in our reviews, we research both demand and popularity.
The team tests all the products mentioned in this article.
When testing, we compare the key characteristics of the products, which include selecting capture area, schedule recording, showing keystrokes and mouse, and other significant features.
We study user reviews from popular review platforms and make use of this information when writing our product reviews.
We collect feedback from our users and analyze their opinions of Movavi software as well as products from other companies.
If you’re using OBS and having lagging issues, there are a number of factors that could contribute to the problem. However, OBS Studio’s (Open Broadcaster Software) CPU usage is known to be high, so it’s best to check there first. Here’s how to check if there is high CPU usage in OBS on Windows 10 or 11 or on a Mac:
Windows
You can check the CPU usage in windows via Task Manager. Press Ctrl + Shift + Esc to bring up the Task Manager window and then click the Performance tab at the top. The first usage tab is the CPU, so check the percentage in the window. If you already have a high CPU usage warning or the percentage while running OBS is over 50%, then follow the steps below on how to lower it.
Mac
Percentage-wise, Macs aren’t much different from PCs, and it’s just as easy to check your CPU usage. You’ll need to open the Activity Monitor Window application. From there, click CPU, and you’ll be able to see multiple percentages. Look at the one under System.
You can also put your CPU usage in your dock by clicking View and then the Dock Icon. Then, select any Show CPU option you want to display. Again, if your percentage is too high, then follow the steps below regarding how to reduce OBS CPU usage.
Is OBS using too much CPU and causing problems? Follow these steps to learn how to make OBS use less CPU.
The developers designed OBS to record any screen in real-time. Therefore, when recording your screen, the CPU usage will rise based on how many pixels you’re recording in each frame. And based on the power of your CPU, it will only be able to hold this level of usage for so long without issues.
If you see an ‘Encoding overload’ or a ‘High CPU usage’ notification on your screen, then it clearly can’t handle things. You may see some performance issues, or OBS may shut down entirely.
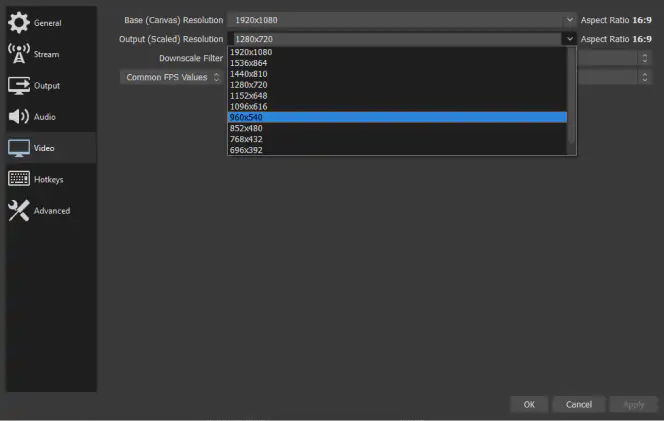
The most common way to solve the high CPU usage issue quickly is by downscaling the output resolution of your screen-recording session. This method will tell OBS it’s okay to send the video to the encoder at a lower resolution – thus taking the pressure off your CPU.
Use these steps to scale things down:
Click the Settings button at the bottom right of your screen – above Exit.
Select the Video tab and either type in a lower resolution or select one from the dropdown menu.
Click Apply and exit OBS Studio.
Restart your computer, open OBS and test your screen capture to see if that fixes the issue.
OBS also has downscale filters for customizing your capture. You can choose from Area, Bicubic, Bilinear, or Lanczos. Remember that the Bilinear filter will reduce the number of resources your system uses, but your video quality will decline significantly.
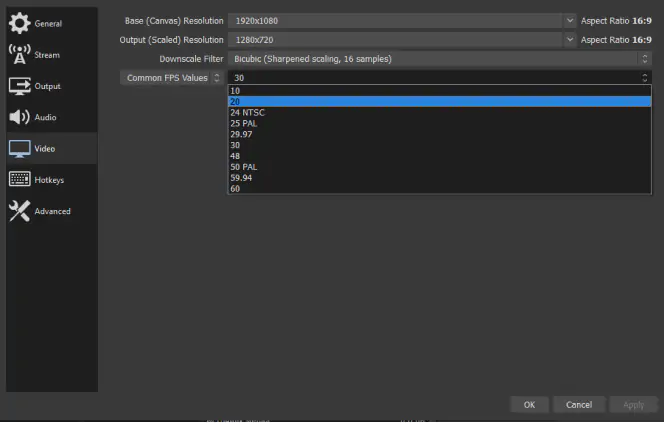
Resolution is the quickest fix for the OBS high CPU usage issue, but frame rate is easily the most significant factor. But you can control the number of frames that OBS captures while recording to reduce the amount of CPU used. Rendering every frame provides the best quality captures, but what’s the point if it’s shutting down your system or freezing during the recording session?
Most gamers and videographers lower their FPS to 30 so everything runs smoothly. But you can even go as low as 24 FPS and still get a solid screen capture. Here’s how you can lower the frame rate in OBS:
Open OBS and click the Settings button on the bottom right.
Click the Video tab and click the dropdown menu next to Common FPS values.
Choose a lower FPS from the menu and click Apply.
Exit OBS and restart your computer. Then check to see if things are running smoothly.
Running additional applications while trying to record your screen can lead to the OBS high CPU usage problem. To save space, it’s best to shut down as many excess applications as possible to avoid any issues while running OBS. Running things like Discord or Game Bar are common background applications to consider closing, disabling, or uninstalling altogether.
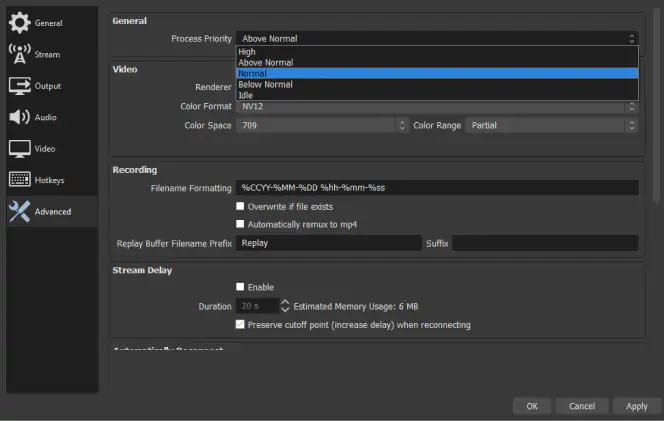
If you have games running in the background of your computer, close them first. But if you’re trying to screen-record your game, you won’t be able to do that. Instead, you can reduce the amount of processing priority dedicated to OBS by your CPU instead of closing it. Follow these steps to do that:
Close all other programs first. Then click the Settings button at the bottom of your screen.
Click the Advanced tab and click the dropdown menu next to Process Priority.
It defaults to Above Normal, but you can reduce it as needed.
Click Apply and test your capture.
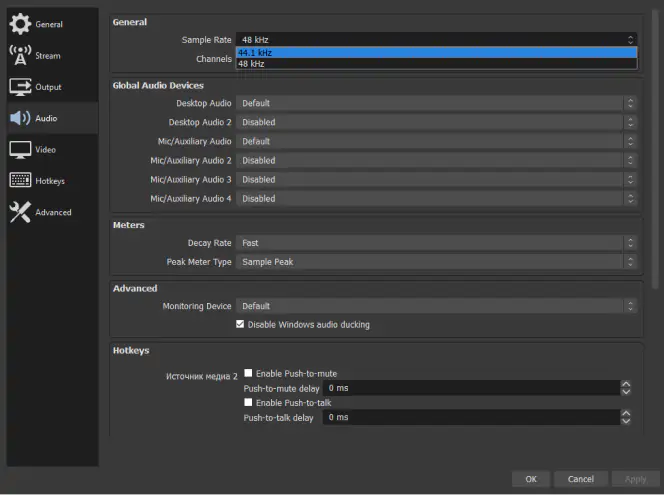
When you run different audio frequencies for screen capturing, it will load more processes onto your CPU – it has to load at each frequency. In order to minimize the amount of work your CPU has to do, it’s best to run each audio device at the same frequency. You don’t want your desktop audio to run at 44.1 kHz and OBS to run at 48 kHz as it will affect the performance of your system.
Follow these steps to check and set your audio sources at the same frequency:
Open the Control Panel app and select Hardware and Sound.
Under Sound, click Manage audio devices.
Double click Speaker.
Click the Advanced tab.
You’ll see a dropdown menu with the Hz level of your speaker.
Open OBS and click the Settings button at the bottom-right side of your interface.
Click the Audio tab.
At the top, click the dropdown menu next to Sample rate.
From here, either alter the OBS settings or your speaker settings to match. Click Apply or OK and see if that solves the problem.
Similar guides
OBS uses an open video source library to encode videos called x264. And within OBS, there are a range of presets you can configure to balance the quality of your video versus the amount of CPU usage. The default setting is ‘veryfast’, but you have a lot of choices available.
Many OBS users think that lowering the preset will take the workload off of their CPU, but this isn’t the case. It actually works in reverse. Encoding at a faster speed is what you need to lessen the burden on your CPU. But doing so sacrifices video quality because the system will skip frames.
This is another quick and common way to deal with OBS high CPU usage. However, you may need to play with the settings a bit to find that perfect balance for your system. Test both ‘superfast’ and ‘ultrafast’ to see what works best for you. Here’s how to change the settings:
Click the Settings tab on the bottom right.
Click the Output tab.
At the top of the screen, check that you’re in the Advanced settings for Output Mode.
Click the dropdown menu next to CPU Usage Preset. You’ll notice it says (Higher = less CPU).
Select a preset that works for your system, restart and test the results.

Along with closing or uninstalling miscellaneous programs and applications that could slow down your system, you can also check the sources you're using to capture your video. For example, capture cards, external encoders, or webcams can add to your overall CPU usage significantly.
It’s worth your time to take actions around these devices to see if you can lower their processing needs. For example, you can reduce the resolution on most webcams. And if you don’t require high functionality for a particular video – usually non-gaming screen captures – then you can also balance devices, like capture cards, by lowering the resolution to match your OBS settings.
And streaming platforms might run additional applications that are unnecessary for their primary function. Check to see if those are running in the background and shut them off where possible.
Along with your overall resolution, this is one of the fastest and easiest solutions on the list. If it doesn’t work, you can move on to more labor-intensive fixes like our next suggestion.
Unfortunately, if you’re working with an older or low-power system, you may not be able to adjust your settings enough to fix a CPU usage issue. There are many AMD and Intel processors out there that developers built for base-line functionality and become outdated within a few years.
At that point, you could lower your settings to get a smooth capture. But the quality could be so low that you wouldn’t want to capture it, anyway. If that’s the case, then it could be time to upgrade your hardware. Replacing a CPU pretty much replaces the whole computer, so it’s often better to replace the graphics processing unit (GPU) instead.
In fact, OBS stands out from other programs because it makes use of the GPU to increase performance. If you’re working with a solid CPU, but an outdated GPU, then the CPU still won’t be able to handle the encoding. The most common issues with GPUs are a low processor core count or a low memory bandwidth. Take those factors into consideration when choosing a new GPU.
If you’re considering a new hardware, a dedicated graphics card can help your CPU usage situation tremendously. Outside of the settings tips listed above, this is the most common hardware solution to take the pressure off a CPU for video capture and streaming.
Dedicated graphics cards can process things faster than an accelerated processing unit (APU), which is a combination CPU + GPU processor. It works to help encode things for the CPU and frees up much-needed processing power.
From there, you can customize your usage on both the CPU and GPU to find the perfect balance that works best for your system. This can also free up your system to make use of a monitoring software that will let you know your percentage usage at all times.
It’s important to stay on top of these analytics as much as possible, so you never lose a frame when capturing or streaming.
OBS requires both a great deal of space on your hard drive and a lot of RAM to run the software. It also requires that your CPU check a variety of output files and configurations to make things capture smoothly. If you don’t have enough storage space for your CPU, then it’s time to delete some files on your hard drive.
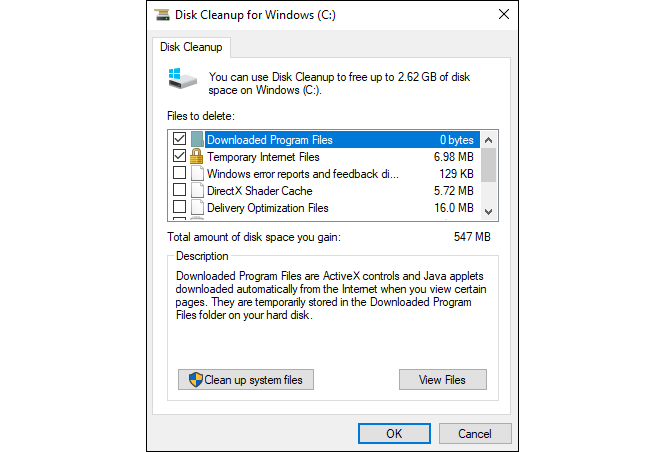
Disk Cleanup is a Windows application that can help you free up that necessary space. It’s a quick and easy solution you can apply with little effort. However, results may vary. Some users claim it helped a lot, while others claim it had no effect at all.
Regardless, you should see an increase in performance on your machine overall, even if you don’t lower your CPU usage on OBS.
To run Disk Cleanup:
Type Disk Cleanup in your Windows search bar (bottom left) and open the program.
When opening, Disk Cleanup will run a calculation to see how much space you can free up.
After calculating, you can customize your clean up as you see fit and continue by selecting OK.
It’s also possible to run an advanced cleanup by clicking the Clean up system files button with the Defender symbol. This will even allow you to delete restore points from previous updates.
Note: This option is not available for Mac users as Macs have a built-in cleanup utility that runs automatically.
Game Mode on Windows can be helpful, but it sometimes gets in the way when you want to capture videos on your screen. If that’s the case, you can turn off this mode with no effect on your gameplay. This will free up even more CPU resources for your game and stream. Here’s how to turn it off:
Type game mode in your Windows search box at the bottom left of the screen.
Select Game mode settings.
Turn off the mode, restart or refresh your device and test to see if it lowers your CPU usage.

One last thing you can do before potentially swapping out your hardware is to check and see if your system is having issues with the OBS software. There are three paths to check and see if this is the issue.
Update to the latest version of OBS – you should do this, anyway.
Uninstall and reinstall OBS to remove any potential bugs in the files and start fresh.
Revert to an older version of OBS if your system can’t handle newer updates.
Which route to go all depends on your situation. This can also apply to any drivers in your system that may also require updates or a refresh.
There are many screen-recording alternatives available, and as stated earlier, Movavi Screen Recorder is our special pick. If OBS is putting out screen captures with inferior quality because it’s overloading the CPU, then here’s how you can use Movavi Screen Recorder to record your screen.
How to record a screen with Movavi Screen Recorder
Step 1. Download the program
Download and install the program.
Step 2. Set your recording parameters
After installation, open the program and click the Screen recording button and specify the area or window where you want to record. Be sure to check that your audio icons are green if you want to record sound.

Step 3. Record your screen
Click REC to begin your recording session. When finished, click Stop.

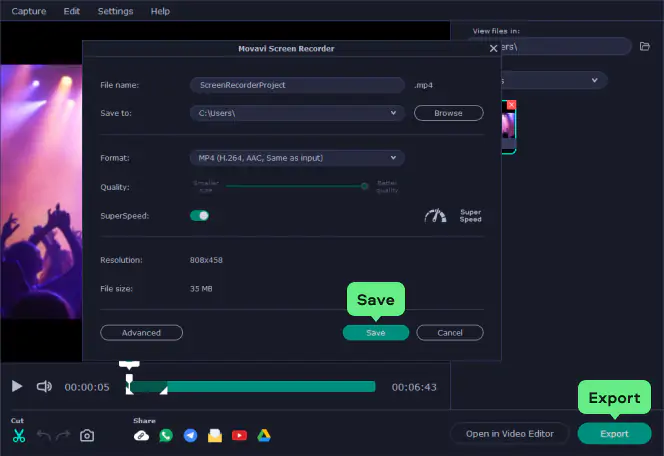
Step 4. Trim and save your file
After recording, you can cut unwanted footage from the timeline and save your video by clicking the Export button. From there, choose your destination path and click Save.
OBS is an excellent video capture program, but it takes a lot of processing power to run the program. If you’re getting lower quality on your recordings, then it could be because of OBS using too much of your CPU. With the steps above, you should be able to fix the issue and increase the quality of your screen captures.
Disclaimer: Please be aware that Movavi Screen Recorder does not allow capture of copy-protected video and audio streams.

There are several reasons, but the most common is that your system simply can’t handle all the processes needed to run the program. For example, if you’re editing video in 1080p, your system is processing twice the number of pixels in each frame than if you were editing in 720p. That’s why the most common fix for reducing your CPU usage is to turn down the resolution.
If your CPU usage is at 100%, then your computer is attempting to run more processes than it is capable of. This happens a lot when editing videos or playing newer games as they’re computationally intensive. It’s fine for the CPU to run at 100%, but other programs will slow or stall at this percentage.
Yes, but with proper cooling it would take several years for it to actually destroy the processor. In fact, unless scientists figure out a way to extend human lifespans by a long stretch, you won’t be alive to see the damaging effects – again, with a solid cooling system.
The process priority setting in OBS defines how much CPU usage will be taken by OBS compared to other running applications on your computer. To change this setting, open OBS and go to Settings. On the Advanced tab, find Process Priority and select the desired option.
Types of training programs
13 best free internal audio recorders in 2026
How to Record a Meeting on Zoom, Skype, and Other Apps
How to Create the Best Training Videos – Movavi
13 Best Zoom Recording Apps for Any Device – Movavi
Best OBS alternatives
13 Best Free Screen Recorders No Time Limit [2026] – Movavi


1.5M+ users already subscribed to our newsletter