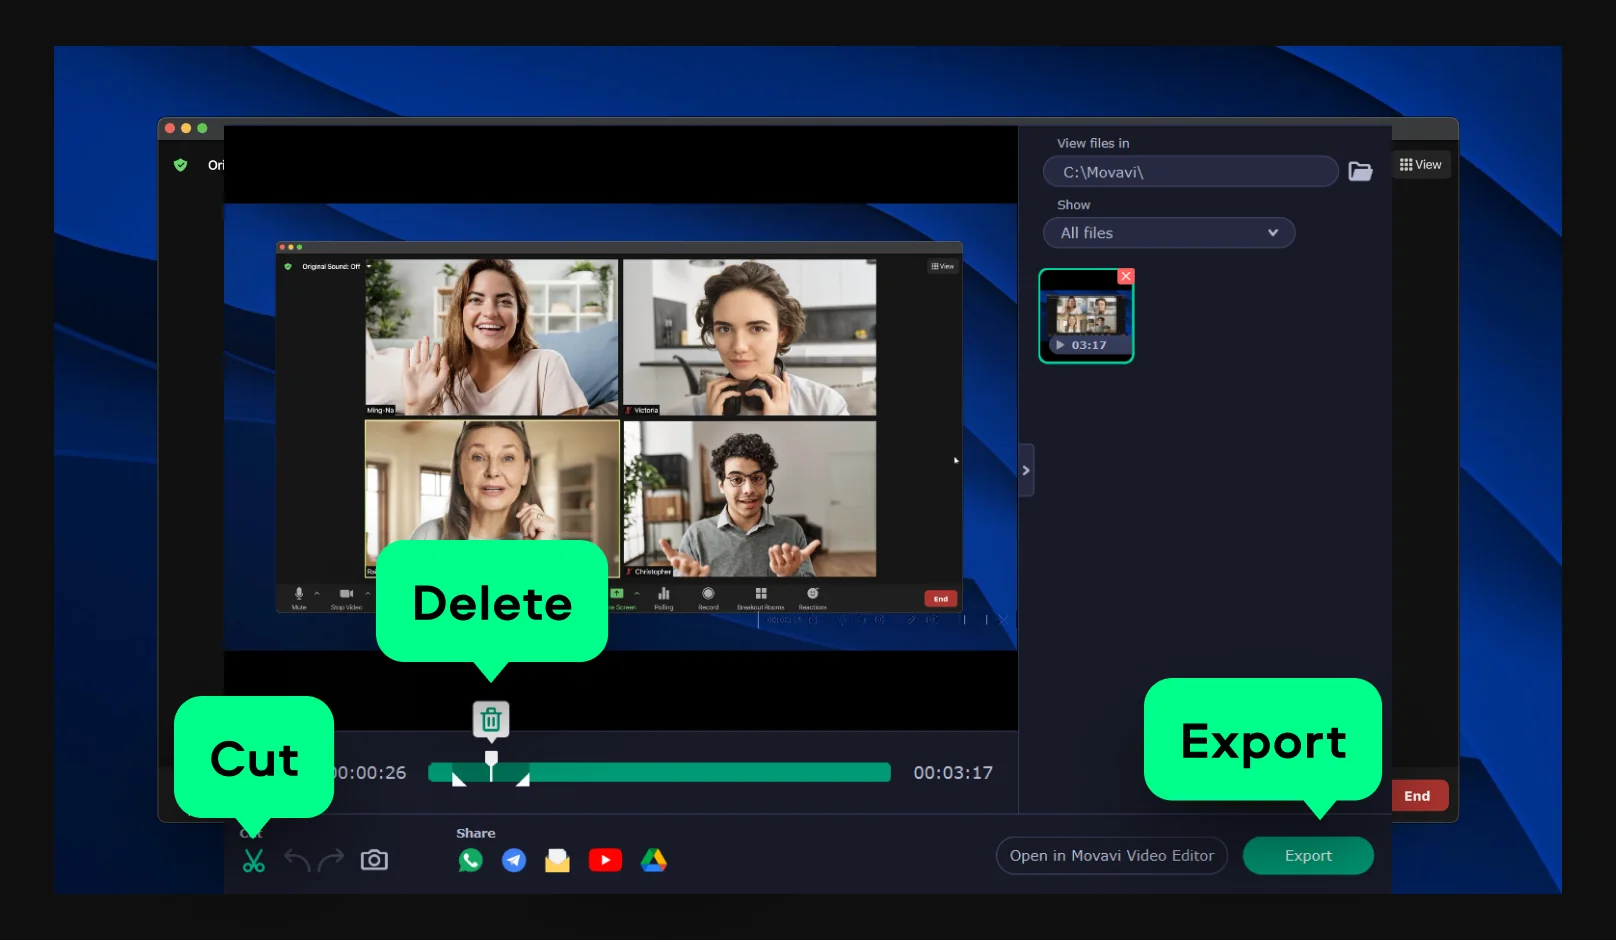
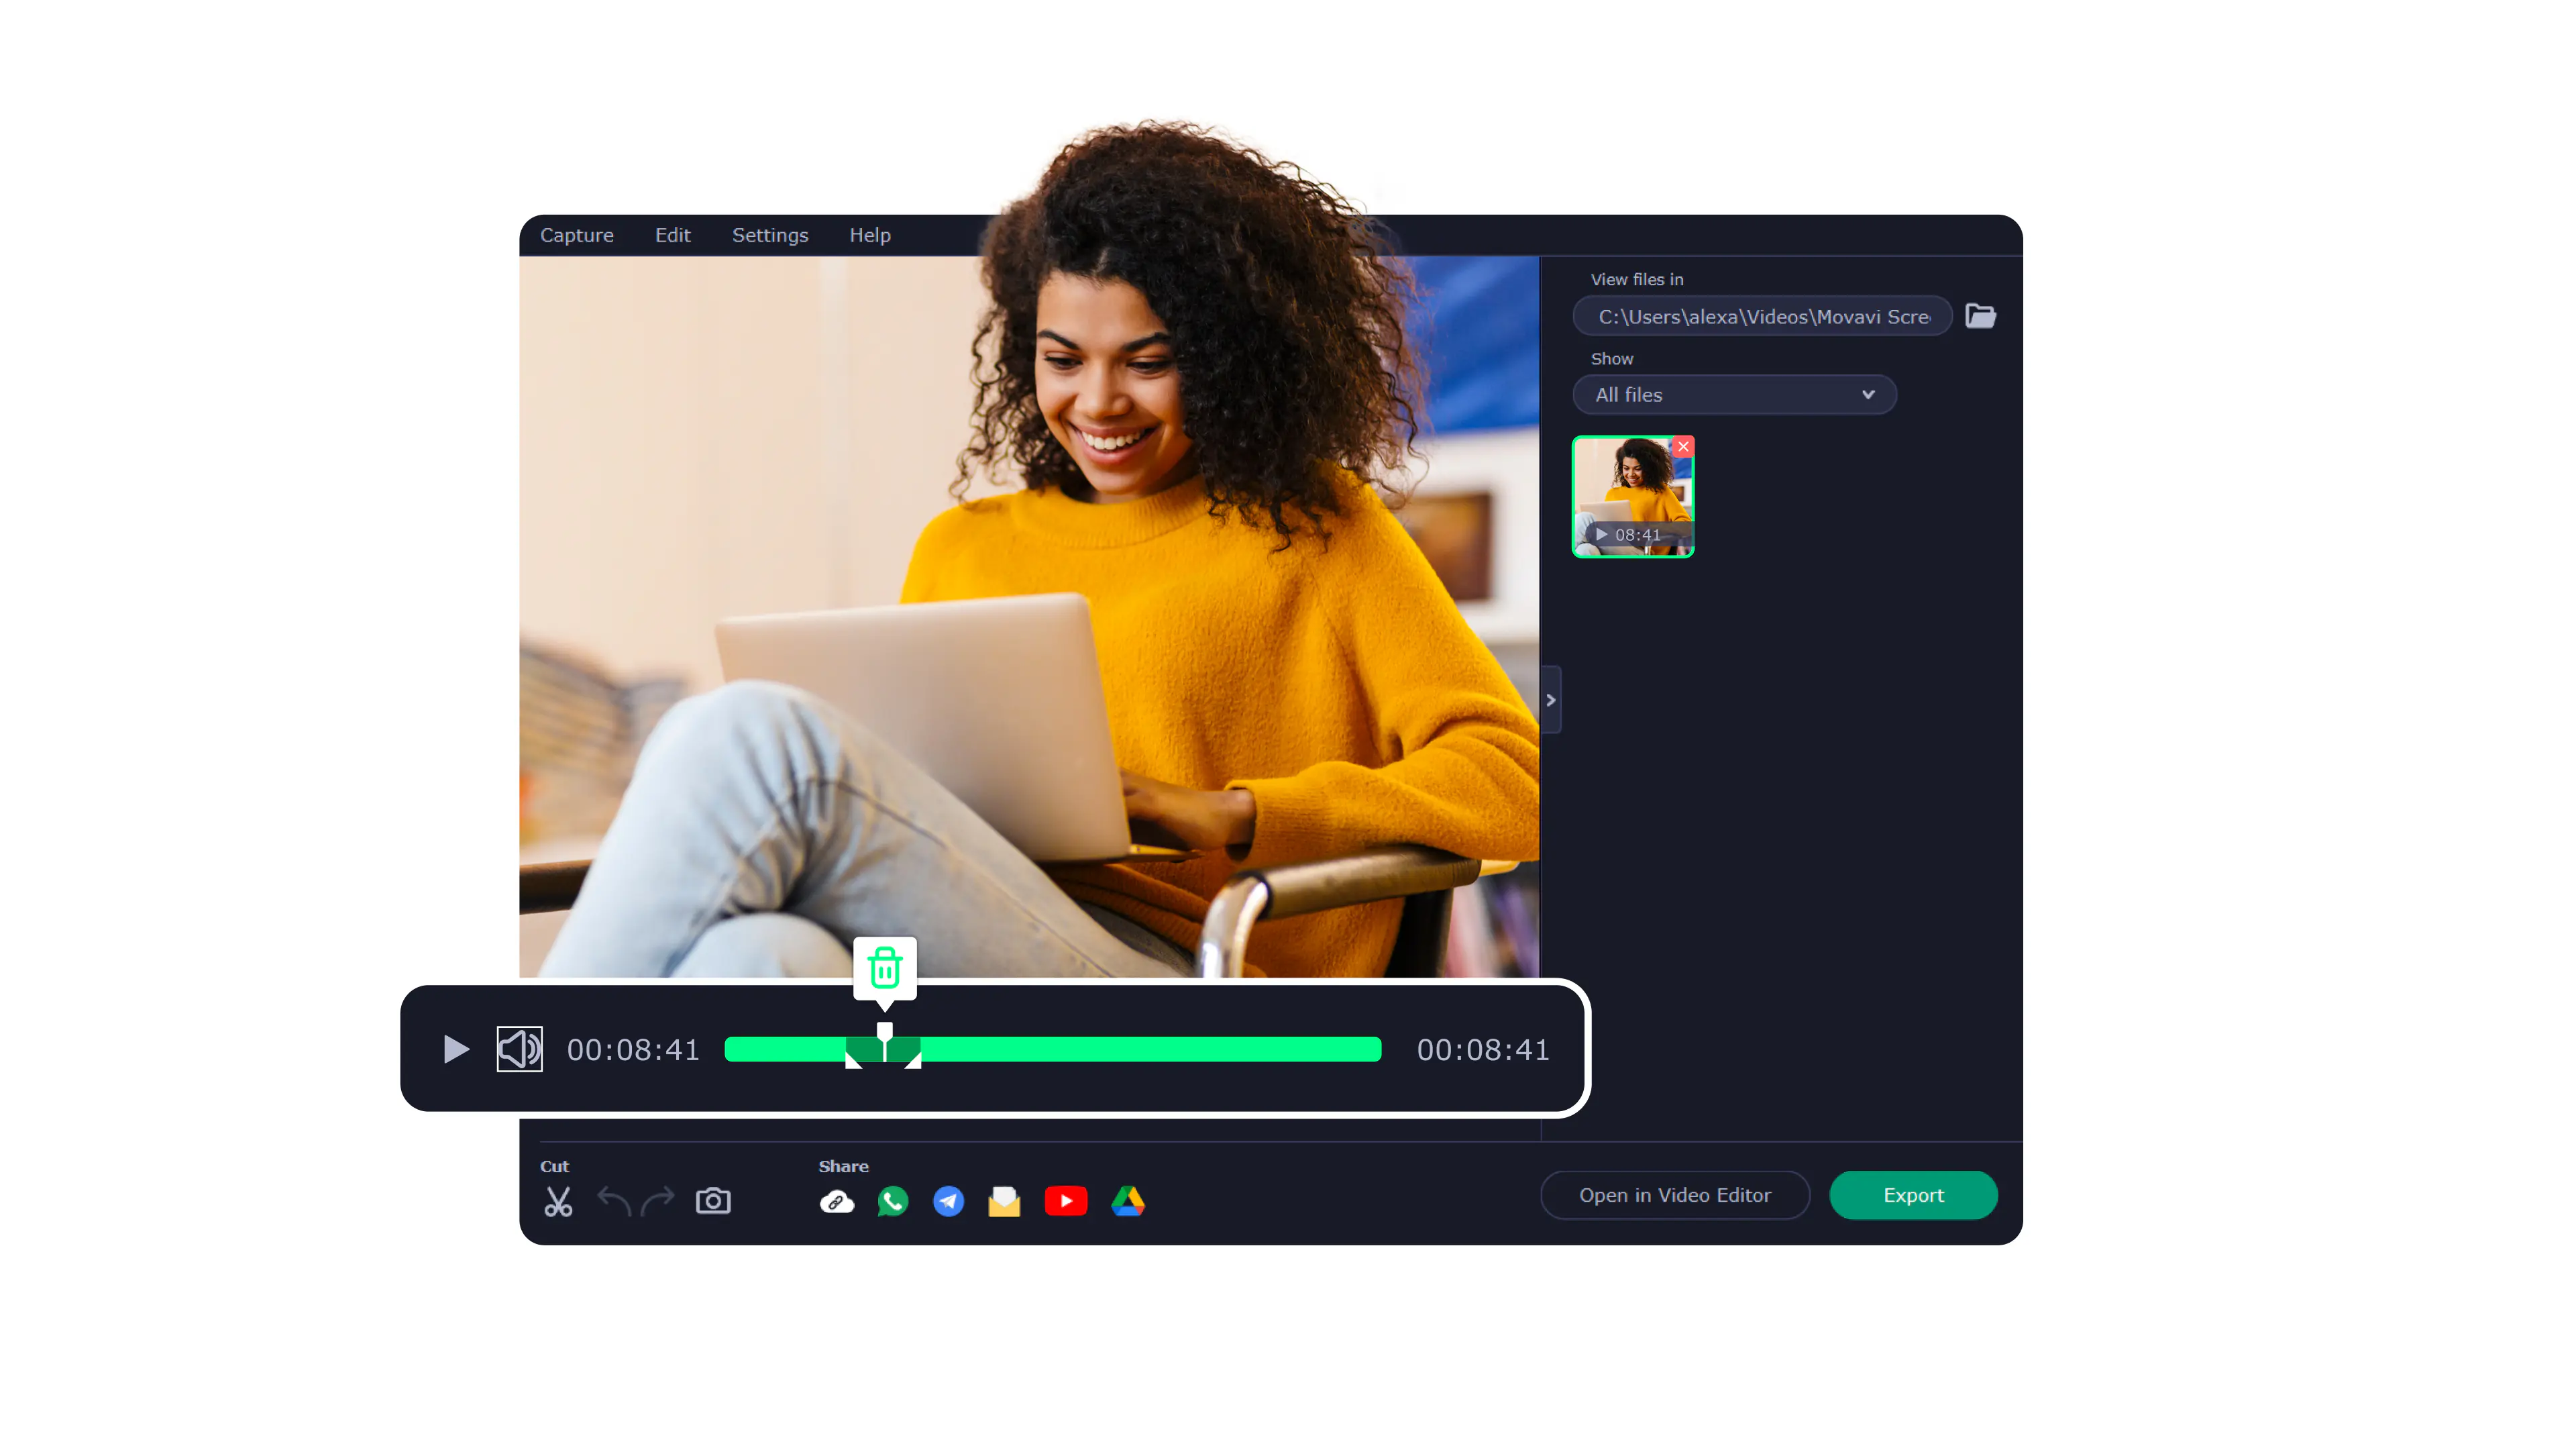
Step 1. Start the Zoom call
Open the Zoom software and click Join or New Meeting.
Try Movavi Screen Recorder:
Make HD screen recordings
Capture Zoom without permission
Draw on your recording
Zoom is widely used for video conferencing today. But can you screen record a Zoom meeting? This article will provide step-by-step instructions on how to record a Zoom call with sound using the built-in feature, desktop and mobile apps.
Editor’s choice: Movavi Screen Recorder
Best way to record Zoom meetings directly to your computer even if you don’t have the consent of all the participants.
Best for Zoom Cloud users: PC built-in Zoom recorder
For licensed users on mobile devices: Mobile built-in Zoom recorder
Movavi Screen Recorder is a handy app for screen recording of Zoom meetings without permission. You can capture video from the screen and webcam or record Zoom meetings in “audio-only” mode. The program also lets you draw on the video while recording and add shapes, arrows, and lines. After you’ve finished recording, you can trim your video and cut out unnecessary fragments.
When selecting products to include in our reviews, we research both demand and popularity.
All products mentioned in this article have been tested by Movavi Content Team.
When testing, we aim to highlight the best features of a product and what it’s best suited for.
We study user reviews from popular review platforms and make use of this information when writing our product reviews.
We collect feedback from our users and analyze their opinions of Movavi software as well as products from other companies.
Best for: Zoom meeting hosts and participants with permission for recording
OS: Windows, macOS, Linux
Using the built-in feature on a desktop is the simplest way for Zoom screen recording. It does not require the user to download any additional programs, and the process is relatively intuitive. The recording function is initiated with a simple process, and the resulting video is automatically saved either locally or in the Zoom cloud.
There are a few drawbacks to recording Zoom meetings with the built-in feature, however. This feature will not provide timestamps, audio transcripts, or participant names. It also requires that permission be granted by the host in order to record. Otherwise, you can use Movavi Screen Recorder, it can record Zoom meeting with no permission, save the recording locally, and you can edit the result right after you’ve finished. Read the full guide to find out how to use it.
Here’s how to record on the Zoom desktop app:
Open the Zoom software and click Join or New Meeting.
Hit the Record button to start recording. Hosts and participants will be visibly notified that the session is being recorded. Dial-in participants will receive an audio notification.
This will show which participants are recording the meeting.
After the meeting ends, the Zoom software will convert the file to make it accessible to the user.
The MP4 file is saved locally and can be uploaded to cloud storage or video streaming services.
Only the host is allowed to record meetings in Zoom by default. Participants can use the recording feature if the host provides permission. So, can you screen record Zoom meetings without permission? Yes, in this case, you can use third-party apps to record Zoom meetings on a computer.
Best for: recording a meeting without host’s permission
OS: Windows, macOS
G2 rating: 4.5/5 stars, 44 reviews
Movavi Screen Recorder provides a recording feature for video as well as screen capture capability and video editing options, all of which can be exported directly to YouTube and social media sites.
The screen and audio can be recorded separately or simultaneously. Recordings can also be scheduled ahead of time, and a time length can be set. The program can also be set to show keystrokes and mouse movements and even offers an option for drawing on the videos.
Key features:
Install Movavi Screen Recorder on Mac or Windows. For the installation, you’ll need just 280 MB of available hard disk space, and 2 GB more for ongoing operations.
First, check the Settings menu to customize the recording parameters. Here you’ll find effects for mouse and keyboard, time scheduler, control panel settings, etc. If you have no preferences and you need just a simple recording, you can skip this step.
If you want to include your face and voice, you need to activate Microphone and Webcam. You’ll find these buttons on the main recording panel. To include voices of other participants, enable System Audio, too.
Start recording by hitting the REC button. The process starts automatically after three seconds. Hit the same icon to stop capturing.
If you want to grab screen captures, use the Screenshot icon.
When the meeting is over and you have the recording, you can edit the video. You can trim it with Scissors and Trash Can.
Click on the Export button and choose the format for saving. If you want to share the recording with other participants, you can do so right in the preview window using the Share icon.
Best for: licensed users recording on a mobile device
Recording a Zoom meeting on mobile devices with Zoom’s built-in features is an easy task. The drawback is that the resulting file is saved in the cloud rather than a folder, limiting your control; it also requires anyone joining the call as a participant to obtain permission from the host to record.
Open the Zoom app and choose Join a Meeting.
Select Record on your Android or Record to the Cloud on an iPhone. This option will begin the recording of the Zoom call. The Recording icon will appear on the screen.
Once the call is ended, the recording can be viewed, shared, and downloaded from the Zoom cloud.
Best for: licensed users recording on an iPad
As with other mobile devices, using the built-in features for recording a Zoom meeting on the iPad is a very simple process. Again, anyone joining the call as an attendee will need to procure permission from the host to record the meeting.
Open the Zoom app and click Join a Meeting.
Click the button to see more options.
This will begin the recording.
Click Recording, then Stop. Your video will be automatically uploaded to the Zoom cloud service.
When made with the built-in features, recordings of Zoom meetings are stored either locally on your desktop’s hard drive or, for licensed users, on the Zoom cloud.
The recording is stored locally for both paid subscribers and free users when the recording is made on a PC. iOS and Android users cannot save locally, however, and Zoom cloud storage space is limited based on the user’s subscription tier.
How to find Zoom recordings saved on the Cloud
Log onto Zoom.
On the left sidebar, click Recordings.
Find your recording listed under Cloud Recordings.
How to find Zoom recordings saved locally
Log onto Zoom.
On the left sidebar, click Recordings.
Find your recording listed under Local Recordings.
How to find Zoom recordings saved on your computer
Click on your Documents folder (Windows) or Finder (Mac).
Type Zoom in the search bar.
A folder entitled Zoom Meetings will appear.
Find the recording you are looking for and double click it.
Open Zoom on your device.
Click on Meetings.
Click Recorded on the left.
A list of recordings will appear.
Select the recording you wish to view.
On the right, choose Play.
If you are the host of a meeting, you can give any attendant permission to record the call.
Open the Zoom website on your browser.
Log into your account.
On the upper right, choose My Account.
On the left-hand side, choose Recordings.
The recordings settings will open with two tabs: Cloud Recordings and Local Recordings.
At the top-right corner of either of these options, click Settings.
Check the boxes that allow hosts and participants to make a recording of the meeting.
Here’s how to enable local recording:
Go to the Zoom web portal.
Select Settings from the menu.
Open the Recording tab.
Switch on the Local Recording slider.
If you have a paid Zoom subscription, the platform will send you a link to your recording after the auto-saving to the cloud is complete. Then, you can share it with anyone who needs to see the recording. If you need to find the link again, you can log into your Zoom account, go to the My Recordings page, and click Share under the video to copy the link to your clipboard.
If you don’t have a paid subscription, we recommend you use third-party screen-recording software. For example, when you’re done capturing the call with Movavi Screen Recorder, you’ll have the option to get a cloud link, upload the video to Google Drive or YouTube, or send it directly via email, WhatsApp, etc.
The paid Zoom subscription gives you the opportunity to store your recordings on Zoom Cloud. If you’re considering whether you should get a paid subscription or not, here are some pros and cons to saving your calls to the cloud.
Ease of sharing (you can get a link in a couple of clicks)
Saving space on your hard drive
Accessing your recordings from any device
The cost of the subscription starts at $14.99 a month
You need an Internet connection to re-watch your recordings
Canceling your subscription will lose you access to all the cloud recordings. They will be permanently deleted from the server in 30 days.
Zoom offers a built-in screen-recording feature, but in order to use it, you have to be a meeting host or a participant with recording permission. If you don’t have permission for recording, you can make use of third-party recording software, like Movavi Screen Recorder.
Disclaimer: Please be aware that Movavi Screen Recorder does not allow capture of copy-protected video and audio streams.
Only hosts and participants to whom they grant permission can record Zoom calls with the built-in features. If you are not the host of the meeting, you can request permission from the host to make a recording. If this is not possible, you can use a desktop screen recorder to record the call like Movavi Screen Recorder – a powerful solution to record your Zoom meeting and edit the result after you’ve finished.
Using Zoom’s built-in recording features is impossible if you do not have the host’s permission. However, a section of this article explains how to record a Zoom meeting without permission by using a third-party desktop screen recorder. You can use Movavi Screen Recorder to record Zoom meetings with no permission and edit them afterwards.
You’ll find an overview of various screen recorders in this article:
A Zoom meeting recording is saved either locally or on the Zoom cloud. Locally stored recordings are saved to your computer’s hard drive and can be found in the Documents folder (Windows) or Finder (Mac). Only licensed users can store on the Zoom cloud.
If you use Zoom’s built-in tool to record the call, it only records the meeting itself. If you use a third-party desktop screen recorder, it may record only the session window or the entire screen, depending on the software’s capabilities and settings. Most desktop screen recorders will capture the whole screen.
The Zoom built-in recording feature is available to the meeting’s host by default. Meeting participants can record a session if they have permission from the host. Note that on mobile devices, the recording tool is not provided in the free version of Zoom – it comes with a paid plan only.
The Record button in Zoom is placed on the control panel. If you don’t see the button there, click More to open additional options.
When the recording starts, all the meeting participants receive a notification that the meeting is being recorded. Participants using the desktop or mobile version of Zoom will see a recording disclaimer on the screen. Users joining by phone will hear an audio notification.
Yes, you can record Zoom meetings. However, make sure to adhere to the recording consent rules of your state. In some states, one-party consent is enough to record the meeting; in others, you need all the parties to consent.
Sure, there is. You can use Zoom’s built-in tool or a third-party app to save your video calls. To learn more about how to screen-record on Zoom, read the instructions linked below:
,The Record button will only appear if the host of the meeting permits the recording. If you cannot find the button, it means that you have no technical permission to record the call. So, to record the meeting in Zoom, you’ll have to ask the host of the call for their permission.
1.5M+ users already subscribed to our newsletter