[Best Bitrate Converters!] 5 Best Ways to Change Bitrate of Audio File in 2025

To change the bitrate of your audio, follow these simple steps:

  1. Download and install Movavi Video Converter.

  2. Add your files to the program and choose the desired output and bitrate.

  3. Start the conversion.

Edited by
Ben Jacklin
32,711

Key takeaways

  • The hottest picks for how to change audio bitrate: Movavi Video Converter, CloudConvert, MiniTool Video Converter, Audacity, and Notta. Each with its own flavor of speed, control, or AI smarts.
  • Benefits swing from batch conversions and MP3 bitrate converter capabilities to AI-powered note-taking and seamless cloud integrations. Drawbacks revolve around CPU load, internet dependence, and monthly limits on free tiers.
  • Your choice hinges on whether you crave raw control over BPS, a clean 320kbps output, or an all-in-one AI transcription sidekick.
  • Quick wins: always peek at sample rate (44100 kHz) before hitting convert, and don’t sleep on batch processing – it saves hours when juggling multiple tracks.
  • Lean on AI features in Notta and MiniTool (Intelligent Subtitle, auto notes) to cut down manual work, seriously, your future self will thank you.

Bitrate… that sounds technical. But really, it’s just the number of bits per second that dictates how crisp your audio or video will sound. Higher bitrate means richer, fuller sound or sharper video, but also heavier files.

Curious, how to change bitrate of audio file? Well, I’ve rolled up my sleeves, tested a bunch of software programs, both web-based and desktop. Trust me, some apps make this a breeze while others are a headache waiting to happen.

After experimenting with Movavi Video Converter, CloudConvert, MiniTool Video Converter, Audacity, and Notta, I’ve rounded up the top brands that actually get the job done. Fun fact: in my tests, cranking a 128 kbps MP3 up to 320kbps sometimes made it sound like a whole new track, almost like magic. Below, you’ll find step-by-step guides to changing audio bitrate across these apps, plus tips I picked up along the way.

My top picks

  • Best overall: Movavi Video Converter
    Cuts through audio and video like it’s slicing birthday cake – bitrate, sample rate, channels, all dialed in with zero hassle and lightning speed.
  • Best free / budget software: Audacity
    Totally free, fully loaded, and sneaky powerful; you can trim, convert, and mess with effects until your ears cheer.
  • Best for professionals: MiniTool Video Converter
    Over 1,000 formats, batch processing, AI-powered Intelligent Subtitles; an indispensable tool for serious creators.
  • Best for mobile users: Notta Audio Converter
    Turns meetings into searchable text, highlights action items, and spits out 320kbps audio while you’re on the move, like having a tiny PA in your pocket.
  • Best cloud / online tool: CloudConvert
    Drag, drop, convert, done; over 200 formats, cloud storage support, and full control over audio settings without installing a thing.

Comparison table of the best tools to change bitrate of audio files

Program

Main Advantage

Download

SuperSpeed mode, full control over audio parameters like bitrate, channels, sample rate

AI-powered Intelligent Subtitles, batch processing, supports 1,000+ formats

Free, open-source, multi-format support with deep audio analysis tools

Best MP3 bitrate converters

  • Why I picked it

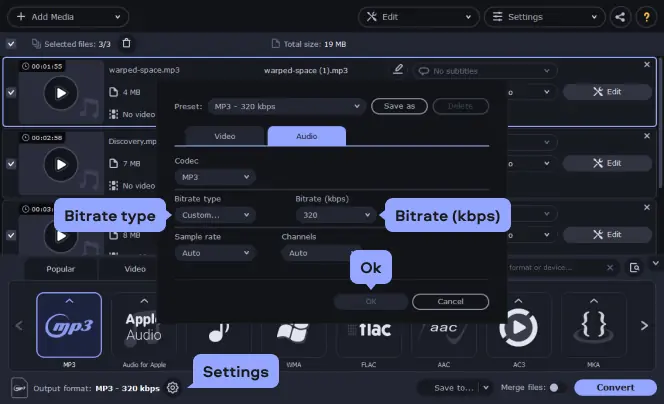
    This one just works. and surprise. A clean UI and solid control over audio/video settings. I liked how utterly easy it was to dial in a custom bitrate.

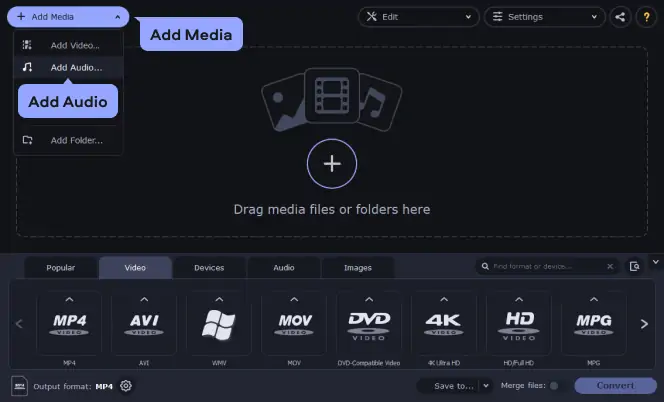
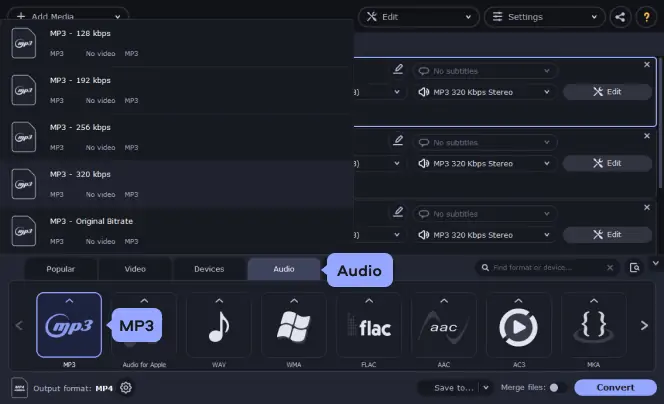
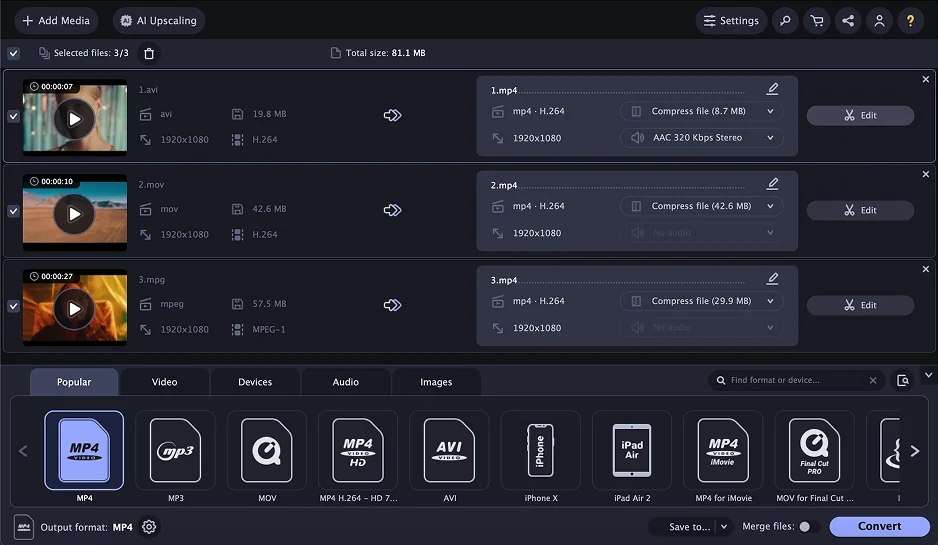
Movavi Video Converter is a well-known media conversion tool that has earned a lot of accolades for its immeasurable capabilities. Namely, it handles video, audio, and image formats with support for over 180 codecs. Need an exquisite answer on how to increase bitrate of MP3? Try Movavi Video Converter!

More than that, it is equipped with a SuperSpeed mode, which is absolutely indispensable for speedy conversions without quality loss. With this mode, you can also control audio parameters like bitrate, sample rate, and channels.

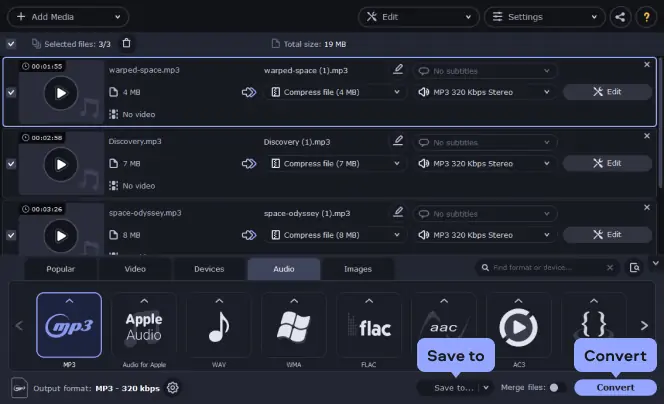
Another greatness is that Movavi Video Converter also supports batch conversion, subtitle embedding, and automatic format detection. Oh, that saves a ton of time when handling mixed media! You can even trim, merge, or normalize sound before conversion without leaving the app. The latest update (version 24.3.0) took place in March 2025, where they fixed DVD conversion issues.

When I dropped in a batch of MP3s that were 128 kbps and needed 320 kbps for some audio tests, I fired up Movavi Video Converter, picked Custom under Bitrate, set 320 kbps, and hit Convert. The results held up pretty well (given the source). I also tried converting a WAV to MP3 at 44,100 Hz using it – worked smoothly.

Ratings

Pros:

Cons:

  • You can’t always increase quality above the original: bad source = bad output

How to change audio bitrate with Movavi Video Converter

Step 1. Install Movavi’s bitrate converter

Download and run the installation file for Movavi Video Converter. Follow the instructions on your computer screen to install the software.

Step 2. Add the files you want to convert

To add audio files to the program, click the Add Media button and choose the Add Audio option. Locate the file(s) you want to convert on your computer and click Open. You can also drag and drop the files into Movavi Video Converter right from the folder they're stored in.

Step 3. Choose the audio format

Open the Audio tab and click on your desired audio format. Now select the preset with the desired bitrate from the list (this option is not available for FLAC, OGG, WAV, and M4A files). If you chose a preset with a specific bitrate and don't want to customize it, you can skip the next step and proceed to the conversion (Step 5) right away.

Step 4. Specify the new bitrate value

Click the Cogwheel button next to the Output format field. In the window that opens, you have the option to change audio parameters such as sample rate, number of channels, and bitrate (settings vary depending on the format you choose). Here we describe how to change bitrate for an MP3 file.

To set a specific bitrate, select the Custom option under Bitrate type. Then specify the bitrate in the Bitrate (kbps) box and click OK to confirm the changes.

Step 5. Change the bitrate of your MP3 file

Before launching the conversion, specify the folder where your converted files should be saved. Click the Save to button and choose an existing folder on your computer or create a new one. You can also stay with the default destination folder.

  • Why I picked it

    I was on the hunt for a tool that could handle everything. From converting audio to video, compressing large files. Never losing quality, and, surely, downloading videos from social platforms. MiniTool Video Converter checked all those boxes.

MiniTool Video Converter is a versatile multimedia solution with ample capabilities. It supports over 1,000 video and audio formats - impressive, really? It allows users to convert, compress, download, and record videos effortlessly. The software definitely receives a lot of TLC from its developers - updates arrive pretty frequently!

The recent one, for example, introduces an AI-powered Intelligent Subtitle feature. It now enables automatic transcription of speech to text with adjustable accuracy levels. The latest version also supports batch compression of up to five videos and handles files up to 8K resolution.

I was particularly intrigued by the Intelligent Subtitle utility. The idea of having AI transcribe and edit subtitles automatically seemed like a game-changer for content creators and professionals alike. I decided to give it a try and see if it lived up to the hype.

How to change audio bitrate via MiniTool Video Converter

  1. Open MiniTool Video Converter and click on the Convert tab.
  2. Add your audio file by clicking the Add Files button.
  3. Choose the output format and click on the Settings icon.
  4. Adjust the bitrate to your desired value (e.g., 320kbps).
  5. Click OK to confirm and then hit Convert to start the process.

Ratings

Pros:

  • Supports over 1,000 formats

  • AI-powered Intelligent Subtitle element

  • Batch processing capabilities

  • Handles up to 8K resolution files

  • No watermarks or ads

Cons:

  • The free version limits downloads after the first five videos

  • Advanced features require a paid version

  • Be ready for occasional lag during batch processing

  • Why I picked it

    I wanted something free, sharp, and no-nonsense for audio tinkering, and Audacity just clicks. It manages everything from quick trims to full-on multitrack madness without bogging you down.

Audacity is a cross-platform, open-source audio editor that’s been around forever, and it shows. Supports WAV, MP3, FLAC, Ogg, you name it. Allows you to convert tracks, tweak levels, or mess with effects. The plugin support is huge: VST3, Nyquist, and a ton more to extend your sound toolkit.

New drops like OpenVINO AI Plugins now run on macOS for music separation, noise suppression, and transcription. It’s not bloated; the UI is clean, quick to navigate, and gets out of your way while you focus on the music. You can even visualize frequencies in the Spectrogram view or analyze audio scientifically using Vamp analyzers.

I dove in to see how clean I could make a podcast. Dragged in WAV files, fired up the effects chain, and suddenly I had clear, professional-sounding audio. Adjusting bitrate and trimming tracks is almost fun, really. It feels like the software anticipates what I want to do next. It's fast, flexible, and doesn’t annoy you with pop-ups.

How to change audio bitrate via Audacity

  1. Drop your audio in, click File > Export > Export as MP3, and the Options button opens the Quality menu.
  2. Here you can select Bit Rate Mode and punch in a 320 kbps target, or tweak Sample Rate to 44100 Hz.
  3. Hit Save, and it converts the track exactly how you dialed it in. Boom, your music now has the right bps, ready for any playlist or project.

Ratings

Pros:

  • No cost, fully open for tweaks

  • Multi-format Support: WAV, MP3, FLAC, Ogg, you name it

  • Plugin-Friendly, supports VST3, Nyquist, and more for infinite sound shaping

  • Special features for deep audio analysis

Quick summary: Best tools to change bitrate of audio file

  1. Top choice for speed and precision; dial in 320kbps, 44100 Hz, batch convert, and crush any audio project.

  2. Free, plugin-packed, multi-format; trim, tweak, convert – your budget-friendly audio lab.

  3. AI-powered, transcribes & converts; perfect for meetings, podcasts, and clean MP3 output fast.

  • Why I picked it

    This tool slices through file conversions like a champ on game day. Quick, intuitive, and crazy flexible with formats, it operates handsomely, and I love that.

CloudConvert is your go-to MP3 bitrate converter, built for anyone who deals with audio daily. Want to know how to change the audio bitrate without headaches? It handles that like a pro. From WAV to MP3, M4A to WMA, you can tweak every BPS detail, hit 320 kbps for high-quality music, or dial in 44.1 kHz for crisp clarity.

Need batch convert for a bunch of tracks? Done. They even added direct uploads to S3 & Google Cloud Storage in 2024. So large projects don’t choke your workflow. Integration with Google Drive, Dropbox, OneDrive – all there. The user interface is slick, drag-and-drop simplicity meets advanced control.

Giving it a try, I dragged a set of rough WAV files onto the platform, set MP3 output, tweaked bitrate to 320kbps, hit Convert, and bam – crisp audio ready in minutes. The wrench icon opens Audio Options, where you can adjust every little parameter (sample rate, bps, channels) it’s all right there. For a project with voiceovers and music tracks, I cut file sizes without losing quality. Slick, fast, zero fuss.

How to change audio bitrate via CloudConvert

  1. Go to the CloudConvert site.
  2. Click Select File or drag and drop your audio.
  3. Pick MP3 as the output format.
  4. Hit the wrench icon and then select Audio Options. Set bitrate (320 kbps) & sample rate (44100 Hz).
  5. Click Okay and Convert. Download the finished file.

Ratings

Pros:

  • Supports over 200 formats: audio, video, even docs

  • Full control over audio: bitrate, sample rate, channels

  • Batch conversion & cloud integration

  • Browser-based, no install needed, works anywhere

Cons:

  • Free tier limits size & number of conversions

  • Needs stable internet, no offline work

  • Conversion speed fluctuates with file size & server load

  • Why I picked it

    I had to grab this one because I needed something that actually keeps up with my chaotic schedule and doesn’t drown me in boring manual note-taking. Notta’s AI transcription was screaming “easy life” from the first glance, plus it handles multiple languages like a pro.

Notta is an AI-driven audio-to-text converter that flips meetings, interviews, and recordings into instantly searchable text in 58 languages. It’s got a meeting recorder, real-time transcription, AI notes that highlight decisions and action items, and seamless integrations with Slack, Notion,

January 2025 updates include the addition of AI writing tools to improve blog writing efficiency, custom labor cost settings for precise cost management, and semantic segmentation to enhance AI’s understanding of conversation structure.

This isn’t just a recorder. It’s an audio bitrate converter companion, helping you convert, process, and even prep audio for editing or storage at 320kbps or 44100 Hz for clean bps quality music files.
I jumped in and immediately started feeding Notta my sales calls and podcast snippets. Honestly, it feels like having a smart PA in your pocket. I loved seeing the AI pull key action items automatically, saving me the headache of scribbling while trying to focus on the conversation. Makes me wonder how I ever survived with plain MP3 bitrate converter apps.

How to change audio bitrate via Notta

  1. Start by opening Notta’s web or mobile app, hit Upload Audio, select your file, then tap Convert.
  2. Next, choose Export Settings, pick your desired bitrate (like 320 kbps or 44100 Hz), and click Export as MP3.
  3. That’s it: your audio is now optimized.

Ratings

4.4/5

Pros:

  • Converts audio to text fast, supports 58 languages

  • AI notes capture decisions & action items automatically

  • Integrates with Slack, Notion, Salesforce, Zoom, Google Calendar

  • Exports as TXT, Word, PDF, SRT

  • Quick processing, 1-hour audio in ~5 minutes

Cons:

  • Free tier limits monthly transcription minutes

  • Needs an internet connection for AI processing

  • Limited offline functionality; can’t run full AI locally

How to use an audio bitrate converter online

If you don’t want to install desktop software, you can change the bitrate of your media file online. Try videoconverter.com – a free online bitrate converter. It’s a good option if your media file is not too large, since the file size is limited. One other thing to mention is that this online converter can process only one file at a time, so you can’t convert a batch of files simultaneously. Read our short guide below to learn how to change the bitrate of MP3 online.

To upload your audio file, click Add Your Media, choose the file, and click Open. The default output format is MP4, so click that to open the list of formats and select Audio. Pick MP3 and click the Settings icon on the right. Open the list of bitrates in the Audio quality field and pick the bitrate you need. Hit Convert; when the process is complete, you will be able to download the file to your computer.

Popular reasons for making the bitrate lower

You may sometimes need to change the audio bitrate in a media file, most likely to a lower rate. Here are the most popular reasons for making the bitrate lower.

Files taking up too much space

Files with a high bitrate can be very large. To reduce the size of your file, convert it to a lower bitrate, but remember that this will lower the quality. The best solution is to find a balance between size and quality that gives you the best of both worlds.

File transfer is too slow

When you upload a large file to your mobile device, the transfer can take a long time. Lowering the bitrate of the media file will reduce the file size, and you will be able to upload it much faster.

Uploading files to a website takes too long

You can upload your audio to a website faster if you reduce the file size. To make the file smaller, try lowering the bitrate with special bitrate alteration software.

How to choose the best audio bitrate converter

Picking the right tool isn’t rocket science, but it’s a little like picking the right cleats for the field. If you want speed, control, and zero compromises, Movavi Video Converter stomps the competition, it’s perfect for anyone juggling a ton of tracks and demanding pristine 320 kbps audio.

On a shoestring budget or just tinkering, Audacity jumps in with free, open-source flexibility and multi-format chops. MiniTool Video Converter is your go-to if you crave batch processing and AI-assisted subtitling while juggling mixed media projects.

For note-taking ninjas or podcast creators, Notta Audio Converter nails it with real-time transcription and clean audio output. And if you live in the cloud and hate installs, CloudConvert keeps you flying with fast browser-based conversions across 200+ formats.

In the end, it all boils down to your workflow, patience for installs, and how fancy you want your audio to sound – the field’s wide open, and each of these apps can score big if you play your cards right.

Movavi Video Converter

The ideal way to get your media in the format you need!
Movavi Video Converter

Frequently asked questions

What is bitrate in audio?

Bitrate in audio refers to the amount of data processed per second in a digital audio file, typically measured in kilobits per second (kbps). A higher bitrate generally means better sound quality but also larger file sizes, while a lower bitrate reduces file size but may compromise audio clarity.

If you need to adjust the bitrate of your audio files, Movavi Video Converter makes it easy to customize settings to balance quality and file size according to your needs.

What is a good audio bitrate?

A good audio bitrate depends on the desired balance between quality and file size. For high-quality audio, 320 kbps is ideal for MP3 files, while 256 kbps offers a good compromise between quality and storage space. For streaming, 128–192 kbps is typically sufficient, while lossless formats like FLAC or WAV maintain the highest quality at much higher bitrates (usually above 1000 kbps).

No matter the option you prefer, Movavi Video Converter will provide an easy way to adjust the bitrate whether for high-fidelity listening or efficient storage.

Is higher bitrate better for audio?

Yes, a higher bitrate generally results in better audio quality, as it allows for more detail and clarity in the sound. However, this also increases the file size. The best bitrate depends on your needs – if you prioritize sound quality, a higher bitrate is ideal, but if storage space is a concern, a lower bitrate may be more practical.

The whole process might sound overly technical, but with Movavi Video Converter you will be surprised how easy it actually is to adjust the bitrate to suit your preferences.

Have questions?

Have questions?

If you can’t find the answer to your question, please feel free to contact our Support Team.

Join us for discounts, editing tips, and content ideas

1.5M+ users already subscribed to our newsletter

By signing up, I agree to receive marketing emails from Movavi and agree to Movavi's Privacy Policy.