
Movavi Screen Recorder
The perfect way to record anything from your screen
Disclaimer: Please be aware that Movavi Screen Recorder does not allow capture of copy-protected video and audio streams.

Best OBS Settings for a Low-End PC or Laptop
Try Movavi Screen Recorder:
Low system requirements
Simultaneous screen and webcam capture
Basic editing features and annotations
In this guide, we explore the best OBS settings for low-end PCs. You don’t need to have a state-of-the-art PC with a lot of processing power to make simple recordings or to stream videos over the internet.
Special pick: Movavi Screen Recorder

If you need to record your screen output, then OBS is not the only option. Movavi Screen Recorder comes with a variety of different features for capturing your screen, as well as the option to change numerous settings so that you can get the exact look and feel you’re hoping for, and that even a low-end device can handle.
Movavi Screen Recorder is also a great option for those who want to capture in a variety of different formats and styles, as you can choose to include a webcam feed or even to capture a specific area of your screen. Once you’ve finished, it is possible to do some basic edits. You can also use Movavi Screen Recorder on both Mac and Windows devices to capture high-definition recordings.
Features:
Best OBS recording settings for low-end PCs
First, let’s look at the best OBS recording settings for low-end PC videos, such as gameplay from Valorant, Minecraft, or a variety of other games. OBS Studio is a free option for those who are ready to record their screen, and there are a wide variety of different settings. Remember that everybody has a slightly different definition of a low-end PC. For the purposes of this post, we’re exploring computers that are either right on the limits of the recommended system settings for OBS or even those that are below this.
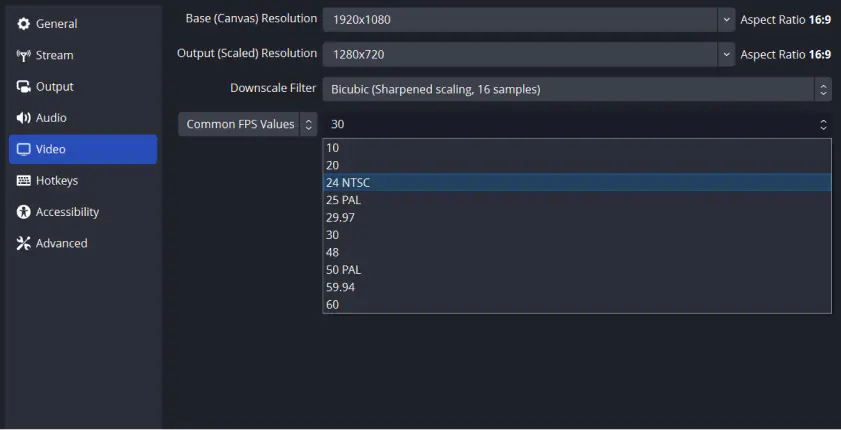
24 or 30 FPS
The best OBS settings for recording on a low-end PC are usually 30 or 24 FPS. These are both industry standards that have been used at times for professional video production, and the quality is enough so that the videos will still look good enough when watched back. 60 FPS or even higher can be demanding for a slow computer.
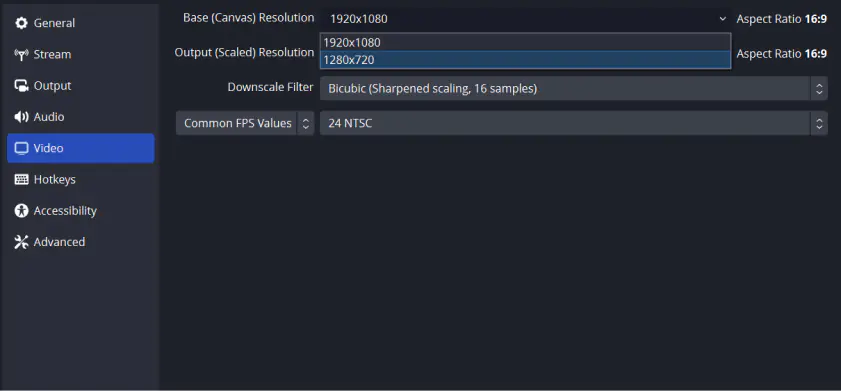
1280 × 720p or 1920 × 1080p
1280 × 720p is not the highest setting for canvas resolution, but if you are worried you have a bad computer setup that won’t be up to standard, then it might be necessary. The best OBS settings for recording on a low-end PC may be able to push to 1920 × 1080p. This provides a higher quality, but it doesn’t necessarily present the easiest option for a poor computer.
Experiment with both of these settings and see if there are any errors with 1920 × 1080p. This will also look far better if you are showing a video on an HD screen so it is worth trying to achieve this quality.
44.1 kHz or 48 kHz audio sample rate
The best options for audio recording are 44.1 kHz or 48 kHz. While 44.1 kHz requires less processing power, making it one of the possible OBS settings for low-end laptop users, it is also not as high in detail as the alternative. This means that you might lose some sounds in the process. It is still perfectly functional. If you are recording a lecture, for instance, you will still be able to hear pretty clearly at 44.1 kHz. The higher settings tend to be good for capturing games or videos where the audio is particularly important.
It isn’t a huge difference when switching between the two settings. For example, if you were to change the frame rate from 30 to 60, it is much more demanding and a low quality computer might struggle with the higher quality.
Another audio setting is whether you are going to use stereo or mono recording. Stereo means that the audio has a full stereo field and varies between left and right speakers. Mono audio is lower in quality and not recommended for music, but for simple videos where there is just one person speaking, for instance, this might work.

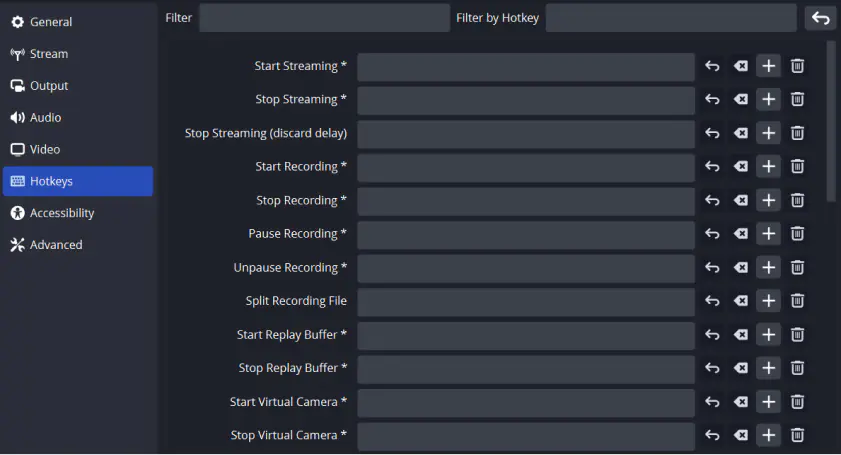
Hotkeys
A quick note on hotkeys. These won’t change the quality of the video or greatly impact on the performance of your machine, so it is not as important as some of the other settings. However, setting up the hotkeys to assist with your recording helps you to ensure that you are able to control OBS Studio properly and start and stop recordings as well as make other changes.
The hotkeys are totally customizable within the software, and you can set them to control the exact way you want to capture your screen, giving quicker and simpler controls.
Best OBS streaming settings for low-end PCs
Next, let's look at the best OBS streaming settings for a low-end PC. Streaming adds an extra element to the process, which means it can be more of a challenge to stream when you have a low-end PC. When you are looking to find a way to stream on Twitch, Facebook Live, or other streaming platform, you will find that there may be minimum settings in order to stream. Don’t be too ambitious with your settings when it comes to streaming, and make sure you perform some tests. It can help to ensure that when it’s time to do your live Twitch stream, you don’t make any mistakes, and your computer doesn’t crash as a result.
24 or 30 FPS
The same applies when choosing the FPS for streaming, and you should definitely ensure that you don’t use an FPS that is too high. 30 or 24 FPS is enough for the video to look decent and ensure that the streaming remains reliable. It is better that you manage to stream a video, even if it isn’t in HD. If you try to stream in higher definition than the computer is capable of, then it is likely that it will fail or even crash your computer.
1280 × 720p (unless your computer can handle more)
This is the lowest setting that will still look decent and passable on a platform like Twitch. It is not perfect, and this kind of resolution will start to look poor quality on UHD screens, but that doesn’t mean you should stretch your computer too much.
If you only have 2 GB of RAM, for instance, then your computer will probably struggle to capture the video at a higher definition, and it will definitely struggle to stream in high definition. This is because there is an extra function your computer is having to perform at the same time.
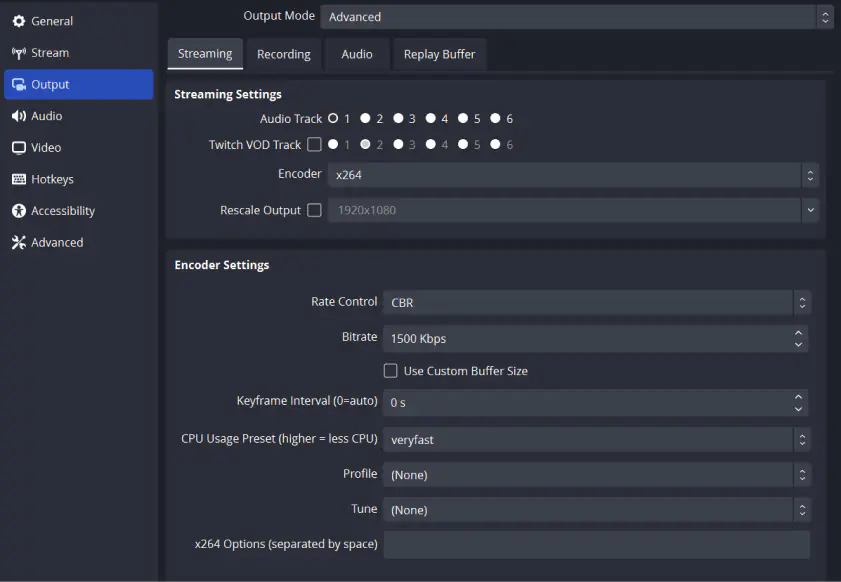
Streaming bitrate
It is important that you consider the bitrate if you are going to stream through OBS Studio. Your processor will need to be capable of streaming in a higher bitrate, and you will need an excellent internet connection, too.
The optimal video bitrate is around 4000 kbps for video and 320 kbps for audio. These are very high and can put a lot of demand on your stream.
If you are streaming in lower definitions, then it is possible that you may get away with less, and some streams may work in as low as 1500 kbps for video. And if you don’t need crystal clear audio, then you might be able to get away with 96 kbps, though much more is required if you want the audio to sound great, and if you are streaming music. This is one of the areas that really needs users to experiment.
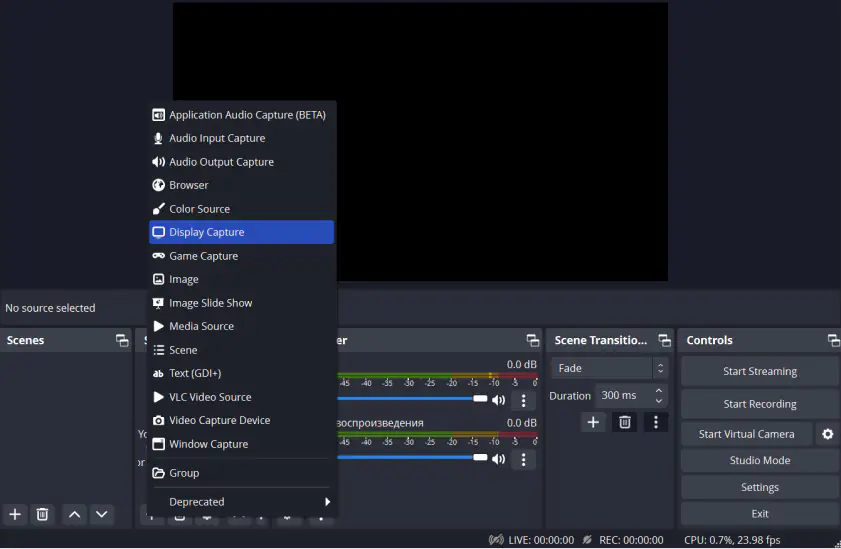
Audio and video sources
Just like when capturing the video, make sure you have used OBS Studio in order to set up the audio and video sources. Simple settings allow you to change the audio and video inputs. If you want to use a webcam or external audio source, make sure this is set up beforehand. This is necessary if you are going to overlay your webcam stream over the video to show your reaction, or even use an external microphone for your commentary.
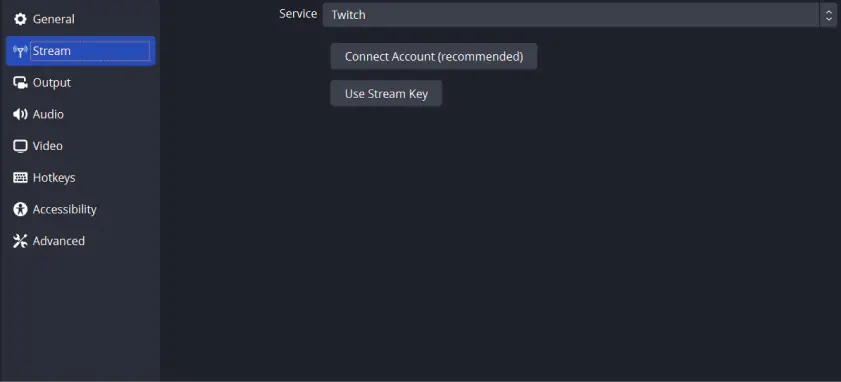
Using the Stream menu
Within the OBS layout there is a Stream menu that has the names of popular streaming servers, including YouTube, Facebook, and Twitch. This has some of its own settings within and has presets for these services, and an option to sign in.
Alternatively, there is also a setting for streaming on a server, where you can enter the details required to connect and start streaming.
Summary
People who use low-end PCs to record or stream with OBS Studio may have some success, but it is not always easy. Users need to be aware of the best OBS settings to make sure they don’t risk the recording or streaming cutting out. Hopefully, trying the settings discussed above will help you have the best experience with recording or streaming on your PC.
Disclaimer: Please be aware that Movavi Screen Recorder does not allow capture of copy-protected video and audio streams.

Compared to a lot of other video capture software, OBS is quite demanding when it comes to CPU. There are a lot of options and processes within OBS, and this can lead to a huge amount of processing power getting used. There are options for screen recording and streaming that use a lot less CPU.
The official OBS guidelines say to only use the software if you have 4 GB of RAM available. Computers that do not have this available will struggle, but by using the best OBS settings for recording on a low-end PC you may be able to make some recordings using the software, just don’t push it too hard.
Popular
OBS Studio review
Best screen recording software
Apowersoft review | Apowersoft Screen Recorder review [2026]
How to Record Google Meet [Complete Guide] – Movavi
12 Best GIF Recorders for Mac in 2026 - Movavi
13 Ways to Record a Part of a Screen in 2026 – Movavi
Best OBS alternatives
12 Ways to Fix OBS High CPU Usage [Solved] – Movavi
12+ Best Free Screen Capture Software in 2026 – Movavi


1.5M+ users already subscribed to our newsletter