Movavi Video Editor

  • Add media files to the program

  • Apply artistic effects to videos and photos

  • Split video into parts, delete unwanted segments

  • Join fragments with smooth transitions

The Best Way to Crop a Video in VLC: Full Guide

Edited by Ben Jacklin
13 385

If the main subject of your video is a bit off center or you simply want to eliminate some of the background space in order to better highlight what you are filming, cropping the video is the perfect solution. VLC is a common media player that can also be used to edit your own videos. Windows, Linux, and Mac OS X can be used to crop a video in VLC, and videos can be exported in MP4, MPJPEG, WAV, and a wide variety of other formats. However, cropping and saving a video in VLC consists of several steps that can be complicated for those who are new to the program. Here is a step-by-step guide for how to use VLC to crop a video, as well as an overview of one of our programs that may interest you if you are interested in trying a more user-friendly alternative to VLC.

How to crop a video with VLC

Cropping a video in VLC requires several steps that must be followed in the proper order in order to make sure that your finished file is saved correctly.

Cropping your video

One of the main drawbacks of VLC is the fact that it does not offer a way to visually preview what you are cropping. To learn how to crop a video in VLC, follow these steps:

  1. Follow the link below to download VLC from the official website.
    Download VLC
    Install the player and open it.

  2. Open the Media menu and click Open File to choose a video you want to crop.

  3. Click the Effects and Filters button under the Tools menu.

  4. Click the Video Effects tab and then the Crop tab to open the cropping editor.

  5. Enter the specific pixels that you want to use to crop the video.

  6. View the preview that you receive after entering pixels and repeat the previous step as needed to adjust your cropped video before saving.

Saving your video

The steps that you have taken until this point only create your preview, and you will need to finish the process in order to properly save your cropped video. To save your finished your video for future use, you will need to:

  1. Click the Preferences tab under the Tools menu.

  2. Click All under the Show Settings selections. On the page that comes up, type "Croppadd" into the search bar to find and save your previous pixel settings. Click Save.

  3. Click the Video Cropping Filter checkbox under the Filter tab. Click Save.

  4. Click the Convert / Save button under the Media menu.

  5. Drag and drop your cropped video to the File box. Click Convert / Save to select your file format and codecs.

  6. Click the Video Codec tab under the Edit Selected Profile menu. Click the Video Cropping Filter under the Filters tab.

  7. Save settings. Choose the destination where you would like to save your cropped video file and click Start.

Common VLC video cropping issues

Although VLC allows users to create perfectly acceptable final products, many video editors have found that the platform is less user-friendly than other common options. Here are three of the most common issues that VLC users experience when cropping videos.

Cannot preview effect while cropping

VLC requires you to crop your video clips by entering the pixels you want to use, which makes getting your cropping exactly where you want it much more challenging than it would be if you were able to simply see where you want to place it. However, VLC does not include a way to visually preview your cropping.

Missing the "Video Cropping Filter" box

Saving your cropped videos in VLC can be challenging because there are multiple steps that are easy to miss or do in the incorrect order. Forgetting to check the "Video Cropping Filter" box before saving your changes is a particularly common mistake that will cause your cropping to not be saved.

Batch video cropping is impractical

Cropping multiple video clips at once is impractical because the exact size and position of cropping that work best for each clip are likely to vary significantly.

How to crop a video using Movavi Video Editor

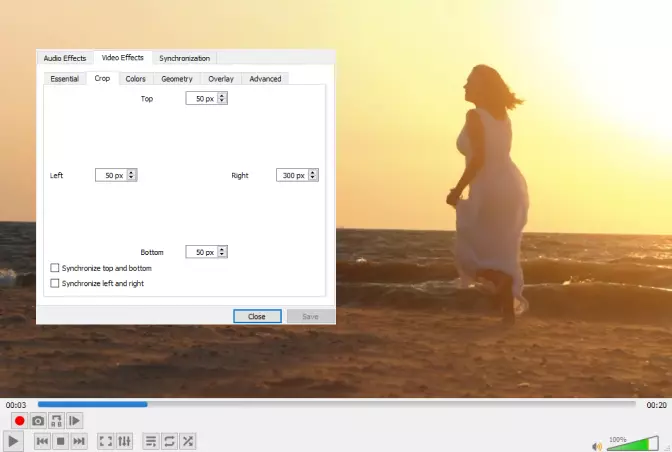
Although VLC is an adequate tool for cropping and editing videos, it may not be the most efficient choice if you are new to editing videos and do not have much time to learn how to get the most out of using the software. Movavi Video Editor is the perfect alternative for both beginners that are searching for a program that is easy to use and experienced video editors that are interested in switching certain projects to a faster and simpler program.

1. Download Movavi Video Editor for Windows or Mac by following the link below.

Download Movavi Video Editor

2. Add your video files. Creating the perfect video starts with adding your footage to Movavi Video Editor. Once you have successfully installed the program, click the Add Files button to move all of the audio and video files that you want to include in your project to the program. Next, drag and drop your video from Media Bin to the Timeline in the lower part of the program window.

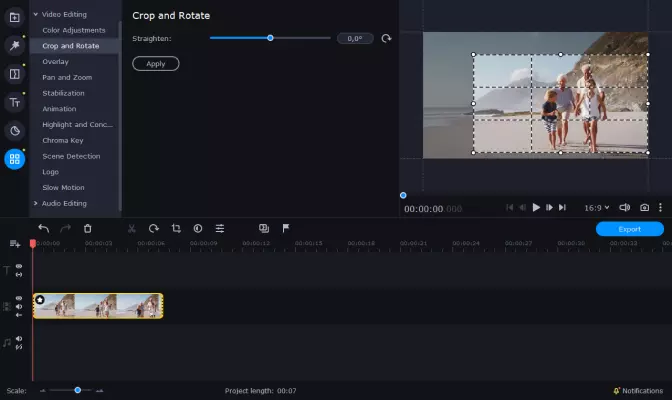
3. Crop your video. Click the Crop button, which opens the rectangular Crop and Rotate tool, and adjust the size and position of your original video that is shown in the Preview Window. Once you have chosen the size and position you want, click the Apply button to save the changes you made to your video.

5. Save your finished video. Once you have finished cropping your video, click the Export button to prepare it to be saved on your computer. Adjust your desired formatting settings if needed, then press the Start button to download your cropped video to your computer. You will then be able to upload your finalized video to an online platform to share with your audience, such as YouTube, Facebook, Vimeo, or your personal or company website.

Frequently asked questions

How do you trim a video in VLC?

Trimming is another technique that helps you showcase exactly the right parts of your finished video. Rather than adjusting the pixels of the picture that is seen in your video, trimming allows you to select precisely where you want to begin and end the video clip. After generating and saving a video file that is compatible with VLC, you will need to play the original file to trim it. Follow the link below to check out the full guide on video trimming using VLC.

How do you compress a video in VLC on a Mac?

Compressing your video involves converting your original raw file, which is generally quite large, into a smaller file. To compress a video in VLC on a Mac, begin by opening the Media menu and clicking Convert / Save. You will then need to:

  • Click the Down Arrow mark and then click Save.

  • Select the Profile menu to enter formatting details.

  • Click Start to convert the file.

At Movavi, we provide our customers with a variety of video and photo editing tools that make creating quality personal and business projects easier than ever. We know that mainstream programs can be challenging to navigate, and we are proud to offer our series of how-to guides for well-known programs, as well as user-friendly alternatives, such as Movavi Video Editor, to make digital editing more manageable for both beginners and experienced editors.

Movavi Video Editor

Сreate awesome videos easily

*The free version of Movavi Video Editor may have the following restrictions depending on the build: watermark on exported clips, 60-second video or 1/2 audio length limit, and/or some advanced features unavailable when exporting videos.

Have questions?

Have questions?

If you can’t find the answer to your question, please feel free to contact our Support Team.

Join for how-to guides, speсial offers, and app tips!