
Step 1. Launch the program
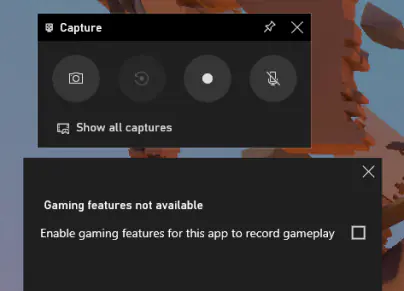
On your laptop, press the Windows key + G shortcut to open Game Bar.

How to Screen-Record on Any Laptop with Audio
Try Movavi Screen Recorder:
Capture screen and webcam simultaneously
Record both microphone and system audio
Edit your videos and add annotations
You might want to capture your screen and audio to record a presentation, show off a gaming session, or create a review video. If you want to know how to screen-record on a laptop, you’re in luck – there are a lot of programs out there to help you do it.
Quick summary
Editor’s choice for high-quality screen recording on a PC and Mac: Movavi Screen Recorder
For recording gameplay videos: Game Bar
For recording videos on Linux: SimpleScreenRecorder
Special pick: Movavi Screen Recorder

Movavi Screen Recorder is a powerful program for capturing your screen with both video and audio. It gives you the ability to capture two audio streams at once, mic and system audio, as well as the screen and your webcam at the same time. You can also record in full HD or even flawless 4K quality.
Features:

When selecting products to include in our reviews, we research both demand and popularity.
The team tests all the products mentioned in this article.
When testing, we compare the key characteristics of the products, which include selecting capture area, schedule recording, showing keystrokes and mouse, and other significant features.
We study user reviews from popular review platforms and make use of this information when writing our product reviews.
We collect feedback from our users and analyze their opinions of Movavi software as well as products from other companies.
How to record a screen on a laptop with Game Bar
Xbox Game Bar is an app that’s integrated into Windows 10 and up for PC laptops. This app allows users to capture their screens and share their gameplay with others. If you want to know how to record a screen on a laptop with this app, it just takes a few easy steps.
Step 1. Launch the program
On your laptop, press the Windows key + G shortcut to open Game Bar.
Step 2. Capture your screen
From the menu that you call up, click on the red circle (Record from now) button to start recording your gaming.
To stop recording, click the Stop recording button.
If you’re playing your game in full-screen mode, you can also start and stop video recording by pressing Windows + Alt + G at the same time.
Step 3. Locate and edit your video
When it’s time to edit your clips, you can call up your captured video by pressing Windows + G to call up the Game Bar menu. Then select Captures to open up your videos for trimming and more.

How to record a laptop screen with audio using Movavi Screen Recorder
Movavi Screen Recorder is an excellent tool for quick, easy, and high-quality screen recordings. This program is intuitive and simple to use, even for the complete beginner. But it’s also powerful, giving you the opportunity to record multiple audio and video channels all at once. You can also record your full screen or only a part of it, depending on your needs.
Here’s how to screen record on a laptop with audio using Movavi Screen Recorder.
Step 1. Download and install the program
Download the installation file for your OS and install the program.
Step 2. Adjust the recording settings
Launch Movavi Screen Recorder and select Preferences from the control panel that pops up to adjust your recording settings.
In Preferences, you’re able to control a lot of features, like where your file output will go, whether to record your mouse and keystrokes or not, cursor settings, video quality, choice of webcam and microphones, and much more.

Step 3. Record the screen
Click on the Screen recording button and then use your mouse to select the capture area you wish to record. You can select the whole screen or just a part of it. Once you select your capture area, a recording panel will pop up that allows you to tailor your recording. You can turn your microphone or system audio on or off, and also choose whether to record from your webcam at the same time as your video capture.
When you’re ready, click on the REC button to start your laptop recording. You can pause your recording and then restart it again. When you’re finished, click the Stop button.

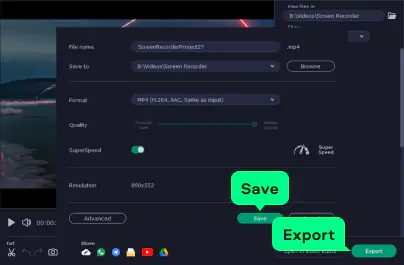
Step 4. Edit and save your video
Your video will open as a file in a new pop-up window. You can choose where to save the file and also trim out unwanted parts using the simple editing controls.
How to record on a laptop with Snipping Tool
If you’re using a Windows laptop that runs on Windows 11, you’ll find that you have a built-in screen-recording tool. This is Snipping Tool, which you’ve probably used for screenshots in the past. But now, this little app can also be used for screen recording. You’ll need build number 22621.1344 or higher, so if you’re running an older version, first update your OS. Then you can get started.
If you’re wondering how to do a screen recording in a laptop with Snipping Tool, here’s how it works.
Open up whatever window you want to record.
Open Snipping Tool by clicking its shortcut or by pressing the Windows button + Shift + S.
Select a video recording by clicking on the video camera icon in the toolbar that pops up.
Click on New to call up the video-recording toolbar. Drag your cursor to highlight the area you want to record.
When you’re ready, click the Start button. You can click Pause to temporarily stop recording at any time. When you’re finished, click the Stop button.
A window will pop up displaying your finished video. You can save or share the video directly from this window.
That’s it – simple and straightforward. However, if you are trying to do a laptop screen recording with audio, you might be disappointed. Microsoft still hasn’t got the Snipping Tool geared up to record with sound, so you only get video recording here.
How to do a screen recording in a laptop with macOS
If you’re using a Mac, you probably want to know how to start screen recording in a laptop. Are there any built-in tools, or do you have to download something?
Apple loves to keep things native as much as possible, so in fact, you’ll find that there are actually 2 built-in tools to use for screen recording. Both the Screenshot Toolbar and QuickTime Player can help you capture video on your laptop. Keep in mind that QuickTime Player has a couple of limitations. First, it only records microphone audio, but it can’t also record screen or system audio. Also, this program only records one video stream. You can only capture your screen video but not a webcam video stream at the same time.
How to record a laptop screen with audio using Screenshot Toolbar
Press Shift + Command + S to open up the toolbar.
There are two icons in the toolbar for recording a video. The solid rectangle with a gray circle over top will record your entire screen. If this is what you want to do, click it.
The dashed rectangle with a gray circle over top will let you record only a part of your screen. If you click this icon, you’ll then be able to click and drag your mouse to delineate the part of your screen you’ll record.
When you’re ready, click Record. Pause or stop when you’re done, and then save your file at the end of your recording.
How to record on a laptop with QuickTime Player
Open QuickTime Player from your Applications folder.
In the menu bar at the top, click File and then New Screen Recording.
You’ll see a control bar pop up, which lets you adjust audio controls. The slider at the bottom controls your input volume. The downward-pointing arrow next to the central red recording button lets you choose whether to record audio from your internal microphone or an external mic if you have one attached. If your external mic doesn’t come up in this pop-up menu, you may have to give QuickTime permission to use it in Settings.
When you’re ready, click the Record button. When you’re finished, click the Stop button.
Your video will then pop up automatically in a player window. That will let you save your video, edit it, or share it with others.
How to record a screen on a Linux laptop
For recording on Linux, we recommend SimpleScreenRecorder. This program was created by Maarten Baert originally as a simple recorder. However, over time, he added more and more controls and options until the program was actually quite powerful and not so simple at all. It lets you choose between recording your whole screen or part of the screen only, or you can record from OpenGL apps directly. You can also capture audio from a webcam or a microphone, though it still can't record screen audio.
Here’s how to take a recording of your screen using SimpleScreenRecorder.
Download and install the recorder.
Download SimpleScreenRecorder
Open up SimpleScreenRecorder in your Show Applications menu.
First, choose whether to record your whole screen, an OpenGL app, or part of your screen. If you choose part of your screen, you can then use your cursor to drag a rectangle to show the area to be captured.
Next, choose whether to record your cursor or not during your recording. If you’re doing a tutorial, you may want to show the cursor so others can see what you are clicking on.
Select whether to record audio and indicate the source device, whether that be an internal mic, external mic, or your webcam’s microphone.
Finally, select an output file name to save your recording.
Now click Start Recording or use Ctrl + R as a shortcut. You can pause anytime by using the same shortcut or by clicking Pause Recording. When you’re finished, click Save, and your screen recording is complete.
How to record a screen on a Chromebook
If you’re using a Chromebook from Google as your laptop, you’ll be happy to know that it has shortcuts to help you record your screen when you need to make a tutorial video or share an intense gaming session.
Use the hotkey command Shift + Control + Show Windows.
A menu will show up at the bottom of your screen. From that menu, choose Screen Record.
You can then choose whether to record your full screen, part of your screen that you can select with your mouse, or choose a window to record.
Start recording to capture your screen. When you’re done, simply click Stop Recording.
How to record a laptop screen using an online app
We’ve given lots of suggestions for how to screen-record on a laptop using different built-in and downloadable apps. But you may be wondering, “How do I do a screen capture video without downloading any new software?”
The answer is recording your screen using an online application, like Screen Capture. This online app is robust and quite easy to use once you get the hang of it. It also gives you a full range of recording, letting you record screen video and your webcam together, plus both system and mic audio, all at once.
Here’s how to use Screen Capture to record your laptop screen.
Open up the website in your browser.
Go to Screencapture.com
Choose your options for audio. You can tick the box for Microphone and Sound on or off, so you can capture one or both audio streams.
Tick the box for Webcam if you also want to record your webcam video stream.
Click Start Recording. This will open up a new dialogue box where you can choose to capture either a browser tab, your whole screen, or a specific window.
When you’re finished, click Stop Recording in the browser window. You’ll then be able to download your video.
Summary
Whether you’re making a tutorial video, talking to friends through a gaming session, creating a presentation for work, or even capturing video conference calls, there are lots of tools out there to get the job done. The best lets you capture your screen plus a webcam feed, while also giving you the option to record system audio and a mic simultaneously. So choose wisely, and good luck with your screen recordings!
Disclaimer: Please be aware that Movavi Screen Recorder does not allow capture of copy-protected video and audio streams.

Yes, you can. You can use a built-in program like QuickTime Player if you’re on a Mac, choose an online app or download powerful screen-recording software like Movavi Screen Recorder. There are lots of options!
The main reasons why you might not be able to record successfully include:
Not having enough free memory to save a recording
Not having given permission to the program to access webcam or microphone feeds
Using an outdated graphics card
The short answer is yes, as long as your laptop isn’t a total dinosaur. Whether you’re using macOS, Windows, or even Linux, there are options for screen recording available. It’s just video quality and functionality which sets them apart.
Popular
Screenflow for a PC
Screen recorders with a free download
12 best meeting schedulers for maximum productivity
XSplit vs. OBS Studio | Which Is Better for Streaming?
Screen Grabbers for Any Device [2026] | Top 13 – Movavi
7 Best Podcast Recording Software [2026] - Movavi
Best laptop screen recorders
How to screen record on a Dell laptop
13 Best Free Internal Audio Recorders in 2026 – Movavi


1.5M+ users already subscribed to our newsletter