
Movavi Screen Recorder
The perfect way to record anything from your screen
Disclaimer: Please be aware that Movavi Screen Recorder does not allow capture of copy-protected video and audio streams.

How to Use the Snipping Tool on a Mac [Full Guide]
Looking for a great alternative? Try Movavi Screen Recorder:
Easily take and edit screenshots
Use annotation tools: arrows, text comments, and more
Create scrolling screenshots
Copy to clipboard and share instantly
What do you do when you need to take and edit a screenshot on a Mac? Whether you have a MacBook Pro, Air, an iMac, or any other model, let’s walk through how to use the snipping tool on a Mac.
How to snip on a Mac using hotkeys
First, let’s get into how to snip on a Mac using your keyboard shortcuts (also called hotkeys). This method is quick and easy, and there are hotkey combinations available for multiple types of screenshots, including full screen, a specific window, or a custom portion of the screen. Here’s how to do it:
To take a screenshot of your full screen, press Shift + Command + 3 at the same time. Your Mac will automatically capture an image of your entire screen, and you will notice a small preview of the image appear in the lower right corner of your desktop screen. To make edits, copy, or clip the image, click on this preview. If you miss the preview, your screenshot will automatically save to the desktop.

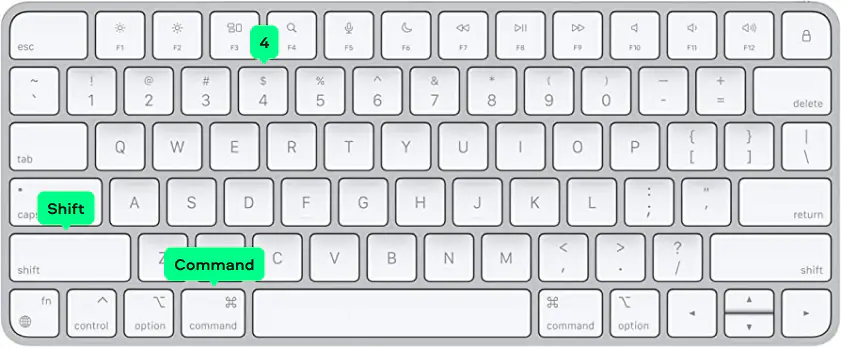
To take a screenshot of a part of your screen, hold down Shift + Command + 4 together. When you do this, you’ll notice that your cursor changes from an arrow to a crosshair. Click on one corner of the area you want to capture and drag it over the full area that you want to include in your screenshot. When you release the button on your mouse (or trackpad), your computer will take the screenshot and save it to your desktop.
To take a screenshot of a selected window, hold down Shift + Command + 4. Then, instead of dragging the cursor over an area of the screen, press and release the Spacebar. The crosshair cursor will change to a camera icon. Hover the camera over the window you want to capture and click on it to take your screenshot.
How to take a snip on a Mac with the screenshot toolbar
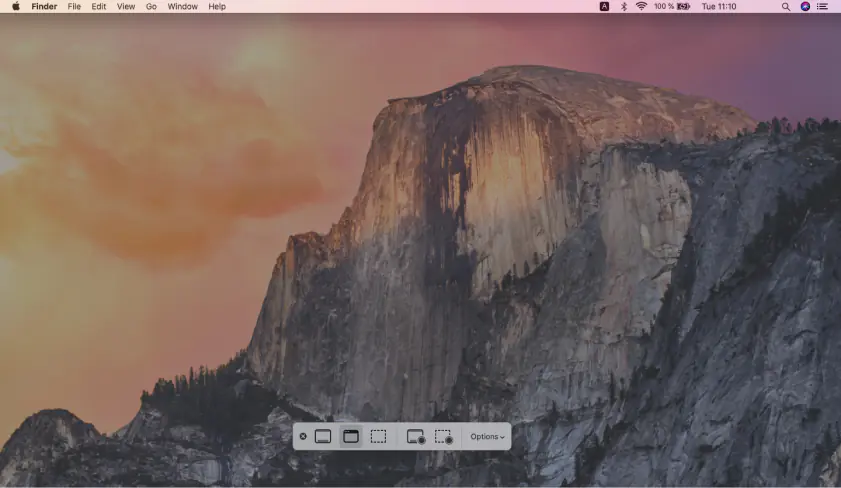
Now that we’ve gone over hotkey combinations, let’s talk about how to take a snippet on a Mac with the screenshot toolbar. To access Apple’s screenshot toolbar, press Shift + Command + 5. This will bring up the toolbar on your screen (and on your Touch Bar if your computer has one). You’ll notice that the majority of your screen is darkened with a highlighted rectangle in the middle of the screen. This is because the toolbar automatically defaults to taking a screenshot of part of the screen. To capture your full screen or a specific window, just click on the appropriate icon on the toolbar to fit your needs.
Bringing up the screenshot toolbar also gives you the option to record a video of part or all of your screen. Click on the Record Entire Screen or Record Selected Portion icon to take a quick video of your screen instead of a still photo.
Custom settings: How to get snipping tool on Mac to work better for you
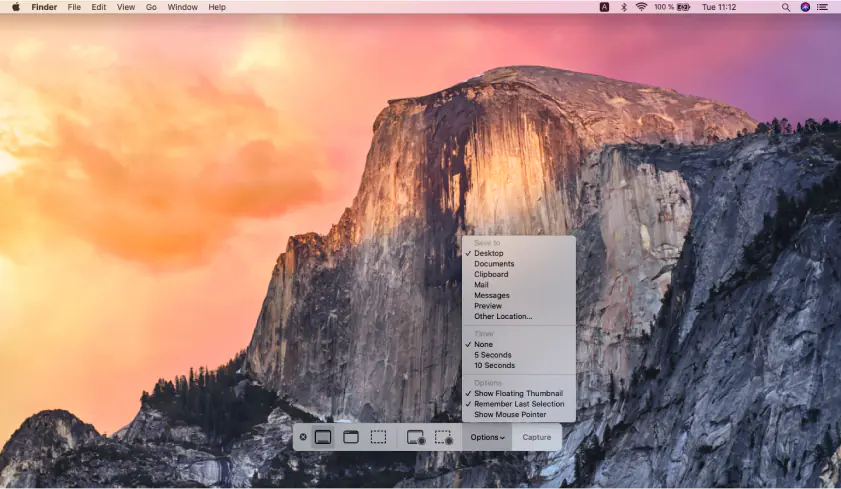
What do you do if you need to take multiple screenshots or if you regularly need to take screenshots with specific settings? Fortunately, the toolbar has an Options menu that lets you get snipping tool on Mac to perform the same kinds of screenshots with fewer steps. So, how do you snip on a Mac with custom settings? Pull up the toolbar by holding down Shift + Command + 5. Then, to the right of the screen capture and video capture icons, click on Options. A dropdown menu will appear, and you can check or uncheck different settings, including whether you want the cursor to show in your screenshot and whether you want a timer to run before you take a screenshot.
Changing the location for your saved screenshots

By default, when you snip on a MacBook or iMac, your screenshots will automatically save to your desktop. To select a different location, pull up the screenshot toolbar by pressing Shift + Command + 5 and then click on Options. At the top of the dropdown menu, you’ll see a Save to section. Here, you can choose from several destinations, including your desktop, documents, clipboard, and mail. You can also click on Other location to choose a custom save location.
How to capture videos using the snipping tool on a Mac
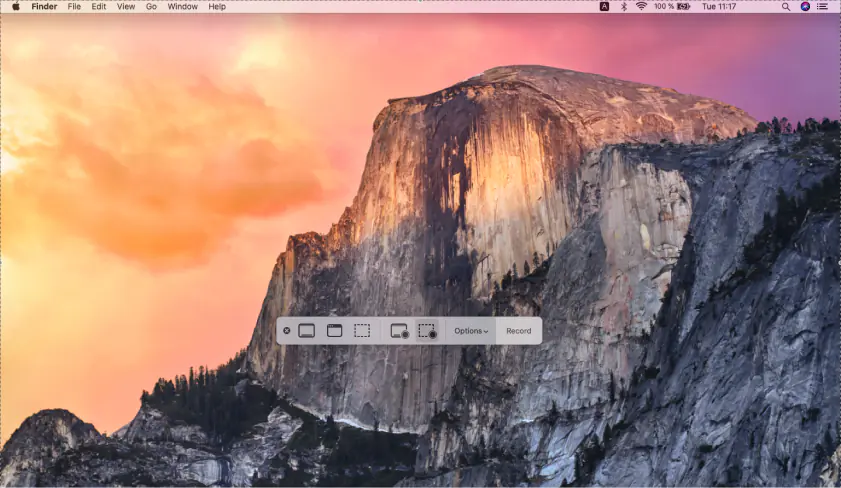
The easiest way to record a video of your screen on a Mac is to bring up the screenshot toolbar by typing Shift + Command + 5. To the right of the screenshot icons, you’ll see two screen recording icons. If you want to record your full screen, click on the Record Entire Screen icon. To capture a custom area of your screen, click on the Record Selected Portion icon. The toolbar will disappear and your recording will begin. When you’re done, press Shift + Command + 5 again and click the Stop icon. Your screen recording will save to the same destination as your screenshots.
How to add the snipping tool to the Touch Bar
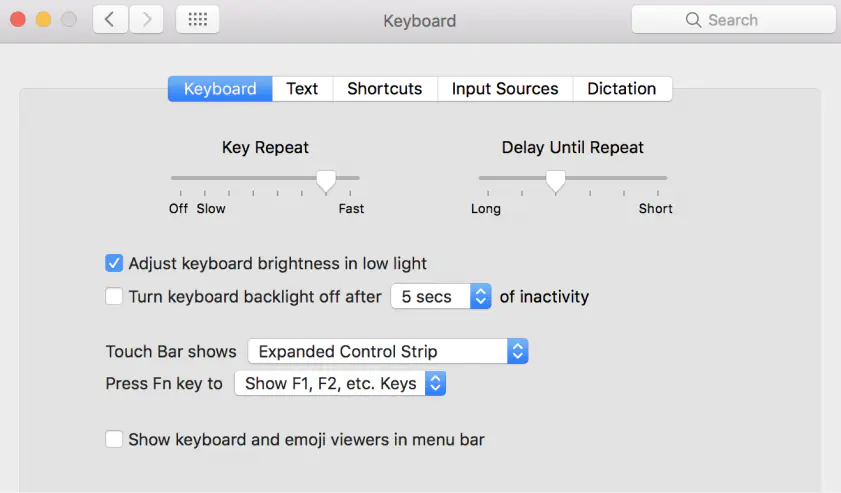
If you have a MacBook with a Touch Bar, you can make screenshots more convenient by following a few simple steps:
Find Keyboard settings in your System Preferences.
Next to Touch Bar shows, click on the dropdown menu and select App Controls.
Select Customize Control Strip.
From the list of available options, click on Screenshot and drag it to the Touch Bar.
Summary: Snip a picture or video on your Mac
Now you should have all the info you need to snip an image or video on your Mac. Something to keep in mind, though: While Apple’s built-in snipping tool is convenient, if you want to snip and sketch, or if you need to include live-drawing and annotations in a screen recording, you may want to choose a more robust app like Movavi Screen Recorder.
Disclaimer: Please be aware that Movavi Screen Recorder does not allow capture of copy-protected video and audio streams.

Yes, Apple includes a built-in snipping tool on all Mac computers. The tool can be accessed via keyboard shortcuts or the screenshot toolbar, and it includes capabilities to capture part or all of the screen, as well as video screen recordings.
To cut and paste screen snippets on a Mac, press Shift + Command + 5 to bring up the screenshot toolbar. Click on Options, and then, in the Save to section of the dropdown menu, click on Clipboard. Your screenshots will automatically be copied to your clipboard and you can paste them wherever you like.


1.5M+ users already subscribed to our newsletter