Movavi Screen Recorder
The perfect way to record anything from your screen
Disclaimer: Please be aware that Movavi Screen Recorder does not allow capture of copy-protected video and audio streams.

To capture the screen of your PC or Mac,
try Movavi Screen Recorder!
Record your screen with one click
Easily save and share your footage

In this guide, we’re exploring how to screen-record on an iPhone 11 and a few different methods that you can use to take reliable screen recordings with audio on your iPhone.

Our goal is to provide you with only verified information. To ensure this, Movavi Content Team does the following:
When selecting products to include in our reviews, we research both demand and popularity.
The team tests all the products mentioned in this article.
When testing, we compare the key characteristics of the products, which include selecting capture area, schedule recording, showing keystrokes and mouse, and other significant features.
We study user reviews from popular review platforms and make use of this information when writing our product reviews.
We collect feedback from our users and analyze their opinions of Movavi software as well as products from other companies.
So, how do you screen-record on an iPhone 11? Before you actually make the capture you need to set up Control Center. Where is the screen-recording button? If you can’t see it, it probably means that Control Center is not properly set up. Within settings on your iPhone, you can include different controls for your phone.
Here’s how to put a screen recording icon. Customize controls to ensure that the Screen Recording app is one of the “included controls”. This means when you pull up your Control Center from the home screen, you will see the screen capture button.
Within the Control Center settings you can also set up the camera, torch, timer, and many other functions of your phone to be available at the swipe of a finger. If you have Screen Record on your Control Center, you are only ever a swipe and a tap away from taking a quick and easy screen recording.
If you are happy to use the inbuilt screen recording functionality on your iPhone, the steps below make it easy to get a high-quality recording:
Make sure your Control Center is set up properly on iOS to start recording.
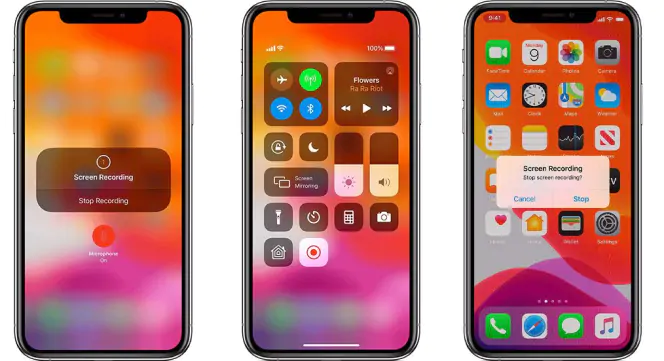
Open Control Center by swiping your finger down from the top of the screen. Tap Screen Recording, this is how to turn on screen record, it will start a three-second countdown before it starts the screen capture.
Make sure you capture the app, video, or message you want to.
Tap the red status bar at the top of your screen when you are ready to stop your iPhone 11 screen record.
Check the video within your Photos app, which is where you can also trim it to size and share it elsewhere if you wish.
Want to know how to get a screen recording on an iPhone 11 including your microphone audio? This can be a way to make reaction videos or record a very simple voiceover from your mobile phone.
You should follow the same steps to use Control Center to set up your screen recording on iPhone 11.
Next:
Before you press the Screen Record symbol, use 3D touch to press down on the button, which will bring you a further menu.
Press the Microphone Audio symbol before Start Recording. This is how to add your voice or other recordings over the top of the video.
Finalize and stop the recording by pressing the red status bar, as before.
Videos will save in your photos app along with the videos and photos you have taken from your iPhone.
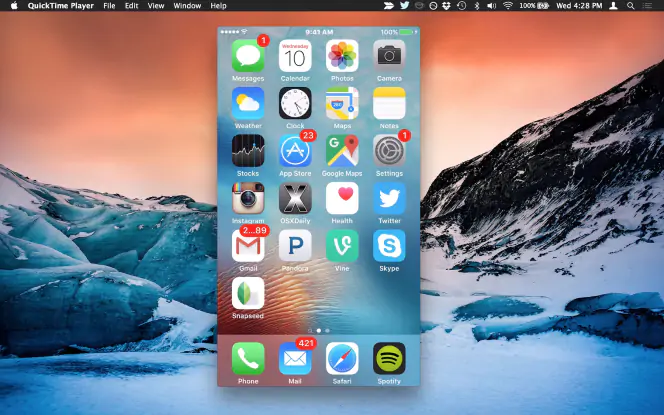
How to use QuickTime Player to capture an iPhone 11
Can you screen-record in any other ways? Absolutely. The inbuilt screen recording app is just one of the choices.
Another option is to connect to a Mac and then run QuickTime Player. This allows you to take screen recordings and save them directly to a Mac rather than on your phone. It does mean that you have to use a lightning cable but it can also allow you to do more with the recording and annotate and edit it more easily using other software.
Connect the phone to your Mac with your Lightning cable.
Open QuickTime Player, which is pre-installed on Mac.
Go to File and then New Movie Recording.
Choose the dropdown arrow on the right of the record button, and select iPhone as the camera.
Press the record button, it will now use the camera’s screen to take a video.
When finished, press the Stop button. You then need to click File and then Save and choose where to save the iPhone screen recording, this doesn’t happen automatically on Mac as it does when you use your iPhone 11 or iPhone 11 Pro to make a screen recording.
How to use a screen recorder for an iPhone 11
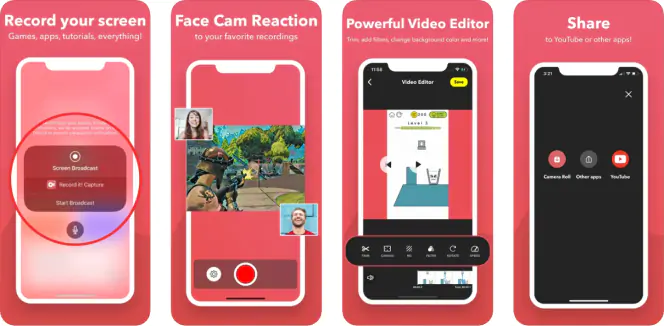
Record it! is a specific app available on the App Store, which has the option to make recordings with more settings and options than the inbuilt screen recording on iPhone 11. Though the full version is a paid app, you can use it to make videos up to three minutes in length free of charge. Here’s how to get to screen-record on your iPhone 11:
Download and install the screen recorder for your iPhone 11 from the App Store.
Open the app, where you can either customize settings or tap the Screen Recording button to begin straight away.
Choose where you want the video to go after recording, such as storing in Photos or adding to Messenger, or straight to Record it! Capture.
Hit Start Broadcast to start the recording.
Tap the Red Button at the top toolbar and then select Stop when your recording is finished.
Either Save the recording or use FaceCam mode to record another picture in picture video of your face, perfect for reaction videos or gaming videos.
Within Record it! Capture you also have the option to make some simple edits and to trim the video to size.
The free version of Record it! does limit the length of the videos to three minutes, if you want to make longer videos, there are paid upgrades.
Best ways to screen-record on an iPhone 11
Once you know how to find the screen recording feature on your iPhone 11 (it can seem hidden in Control Center) then it is easy to make speedy recordings to share with colleagues, friends, or store on your phone. If you want to edit videos in more detail or use additional cameras and footage, either using QuickTime Player or Record it! can be good options to take screen recordings and open up more options to edit easily.
Movavi Screen Recorder
Disclaimer: Please be aware that Movavi Screen Recorder does not allow capture of copy-protected video and audio streams.
Frequently asked questions
Yes, you can use the screen recording feature that is built into your iPhone 11, and there’s no need to install extra software or an additional app if you don’t want to. To use the screen recording feature:
Make sure your Control Center is set up properly with Screen Record visible.
Open Control Center by swiping your finger down from the top of the screen. Tap Screen Recording to start.
Make sure you capture the footage you want.
Tap the red status bar at the top of your screen to stop recording.
The screen record button can be found in Control Center by swiping down from the top of the screen. If it is not there, go to Settings where you can edit the apps that appear on Control Center to ensure the screen recording button is there.
By default, screen recordings are saved in the Photos app on your iPhone, along with pictures and videos. Using Record it! you can choose where the videos are saved after recording, such as attaching to emails or uploading to the cloud.
Popular
XRecorder review
How to record a video on a Mac
How to Mirror an iPhone to a PC [7 Best Ways]
How to Stop Screen Recording on a Mac [5 Quick Ways]
7 Best Screen Recorders with a Timer for Windows/Mac
17 Best Screen Recording Software in 2025 – Movavi
How to Screen Record on iPhone 12 [Easy Way] – Movavi
How to Screen Record on iPad [Full Guide] – Movavi
How to Record a Call on Google Voice [2025] – Movavi
How to Mirror iPhone to Windows 10 [7 Ways] – Movavi
How to screen-record on an iPhone 12
How to record a screen on an iPad
13 Best Webcam Recorders for Windows 10 [2025] – Movavi

Have questions?
Join us for discounts, editing tips, and content ideas


1.5M+ users already subscribed to our newsletter