
Step 1. Download and install Movavi Screen Recorder
First, you need to download the software. Make sure you are getting the version appropriate for your operating system. Once downloaded, follow the installation instructions and launch the program.

4 Ways to Record Your Computer Screen and Audio
Easily record your screen and webcam
Capture system and microphone audio
Save recordings in high quality
Recording a computer screen with audio has become a common task for many professionals working in remote teams. If you're new to this activity and want to learn how to record your computer screen and audio, read our detailed guide below.
Quick summary
Best for Beginner-friendly screen recordings with audio
Best for Quick and easy screen recordings
Best for Lightweight screen recordings on Linux

When selecting products to include in our reviews, we research both demand and popularity.
All products mentioned in this article have been tested by Movavi Content Team.
When testing, we aim to highlight the best features of a product and what it’s best suited for.
We study user reviews from popular review platforms and make use of this information when writing our product reviews.
We collect feedback from our users and analyze their opinions of Movavi software as well as products from other companies.
How to record a computer screen with audio on a PC or Mac

Best for: beginner-friendly screen recordings with audio
If you're a PC or Mac user, the simplest way to learn how to record a computer screen with audio is by using Movavi Screen Recorder.
This is a highly intuitive screen-recording program that gives you the option to record your entire screen or just a specific area of it. You can also record audio from your microphone, system sound, and even both simultaneously.
Capture on-screen activity to improve efficiency with simple, lightweight recordings
Leave no sound behind – snag system audio, record mic and speaker feeds for clean and easy-to-understand soundtracks
Save your recordings in popular video formats
Get crisp, clear sound in your videos: reduce ambient noise from traffic, wind, or stray chatter your mic picks up
Draw right on your videos while recording live
Schedule to record at any time and watch later
To get access to all the features the app has to offer, the full version of the app is necessary
Here are step-by-step instructions on how to screen-record on a computer with sound using Movavi Screen Recorder.
Step 1. Download and install Movavi Screen Recorder
First, you need to download the software. Make sure you are getting the version appropriate for your operating system. Once downloaded, follow the installation instructions and launch the program.
Step 2. Adjust settings and recording parameters
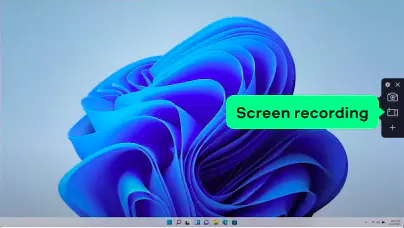
You'll notice a small navigation panel appear when you open the software. Click on the Screen recording button to start the process. Drag your crosshairs to select the area of your screen you want to record.
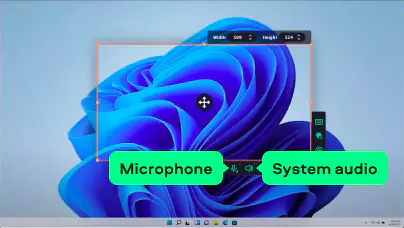
Once the screen capture area is set, you'll see additional options on the bottom right of the frame. Here, you can adjust settings like microphone audio, webcam source, and cursor highlights.
To screen record with computer audio, turn on desktop sounds by clicking the System audio icon. If you want to capture a video with voice, make sure the Microphone icon is on. With those ready, you can move on.
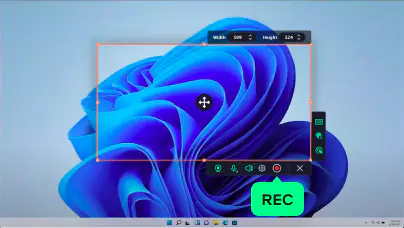
Step 3. Screen-record with computer audio
Just hit the REC button to start the screen-recording process.
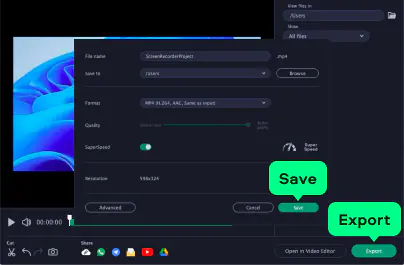
Step 4. Save and share the recording
Click the Stop button when you’re done recording. A preview window will then appear. Here, you can remove sections of your video by dragging the white pointer to them and then clicking the Scissors icon. To cut out the fragment, hit the Delete fragment button.
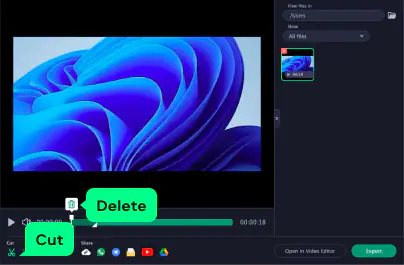
To save the video, click on Export and choose your format settings. You can also directly share the file to platforms, including YouTube and Google Drive.
Then you’re done! You’ve learned how to record your computer screen and audio on a PC or Mac in just a few steps.
How to screen-record with computer audio online
Best for: quick and easy screen recordings
Some situations call for quick screen recordings. If you find yourself pressed for time and are not keen on downloading a recording app, you can use an online screen recorder to do the job. For this purpose, we recommend using Screen Capture by Movavi.
This web-based app allows you to record your computer screen and audio without a hitch. All you have to do is go to the URL, click your settings, and start recording.
No need to download
High-quality video recording
Totally free
High privacy
Limited recording options
Free version comes with watermark
No annotation features
Want to learn how to record your computer screen and audio online? Follow this step-by-step guide.
Step 1. Go to Screen Capture
Open your internet browser and visit the Screen Capture website. Since this is based online, you can access it through any operating system, whether it's Windows, Mac, or Linux.
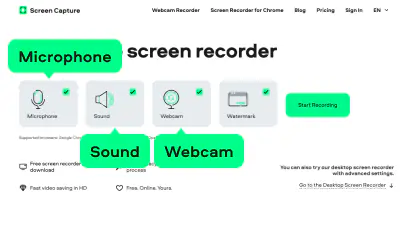
Step 2. Enable your preferred recording settings
On the homepage of the Screen Capture website, you’ll see four checkboxes: Microphone, Sound, Webcam, and Watermark. If you want to screen-record with computer audio, ensure the Sound option is ticked.
If you want to add camera footage with sound, enable the Microphone and Webcam functions. Since the service is free, you’ll have to settle with watermarks on your outputs. To remove them, the site will prompt you to purchase any of their paid plans.
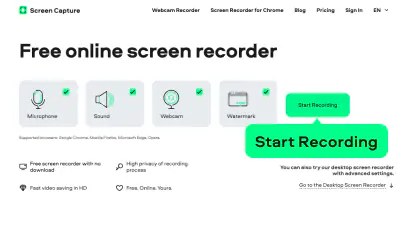
Step 3. Capture audio and video
Ready with your recording parameters? Then press the green Start Recording button. A new window will pop up, asking you to choose which screen to capture. You can record a browser tab, a window, or your entire screen.
Once you’ve selected a capture area, click the Share button to start the screen recording process.
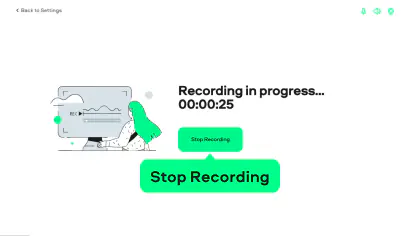
Step 4. Download your screen recording
To finish the recording, click Stop Recording. You’ll get to see a preview of what you just screen recorded. If you’re satisfied with the results, go ahead and hit the Download button to get your file.
If you want to re-record, simply click New Record under the Download button and repeat the process. That’s how easy it is to screen-record with computer audio online!
How to record your computer screen and audio using an extension
Best for: simple browser recordings
Let's say you want to use a screen recorder but are not willing to download an app onto your computer. In that case, you can install a browser extension instead. This is a convenient option since it takes up less storage space and is easily accessible when you want to record browser activities.
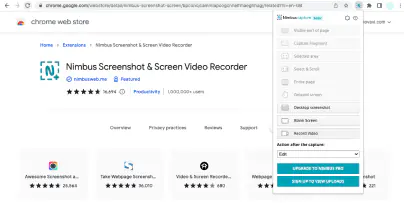
Our pick for browser extension is the Nimbus Screenshot & Screen Recorder. It has extensions for Google Chrome, Microsoft Edge, and Firefox.
Nimbus has various options for your screen-recording needs. You can customize the speed of your videos, add watermarks, and trim or crop right after screen recording. It also has an audio-recording feature so you can record your voice or browser tab sound.
Simple interface
Various screen capture options
Extra editing tools
Annotate and blur functions
Screenshots
Some users report freezing and crashing issues
Collects personal information
5-minute recording limit in the free version
So, how do you use this comprehensive screen-recording browser add-on? Let’s look at these detailed steps.
Step 1. Add the extension to your browser
The Nimbus add-on is free. Go to your browser's web store, search for the extension, and install it. You can also visit Nimbus's official website and download it from there.
Step 2. Select your screen-recording settings
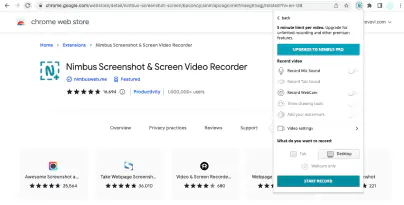
Extensions can be found on the top-right part of your browser. Click on the Nimbus icon to open the settings. To access the screen-recording settings, click on Record Video.
Toggle the sliders shown and enable the ones that will allow you to record both audio and video. You can go to Video Settings to customize further and adjust video quality and recording countdowns.
Step 3. Screen-record with sound
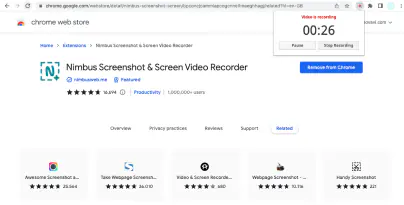
Hit the Start Record button to move on. If you enabled annotation features, you can select an annotation tool while recording. Remember that the free version of Nimbus only allows 5-minute-long videos.
Step 4. Save your recordings
When you’re done, stop the recording and save the file to your disk. With the premium version, you can enjoy additional sharing features, like trimming your video, converting to MP4 or GIF, and direct uploading to Google Drive or YouTube.
That’s it! You finally learned how to record on a computer with sound with a browser extension.
How to screen-record on a computer with sound on Linux
Best for: lightweight screen recordings on Linux
Most screen-recording tools are only available for a Windows PC and Mac, but there are a few options for Linux users as well. One of the best options you can try is Kazam. It is a simple yet powerful tool that allows you to record your screen and audio in just a few clicks.
If you are new to Linux, we recommend getting familiar with the operating system first before adding any new applications. But once you get the hang of it, you’ll find that using Kazam to screen-record with computer audio is simple.
Minimal user interface
Full screen, window, or custom area capture
Advanced video settings (frame rate and bit rate)
Conversion to multiple formats
Requires technical knowledge to install
To record your computer screen and audio, follow the steps below.
Step 1. Install and launch Kazam
To install Kazam, open the Terminal and type the command: sudo apt install kazam. If you want to use the more recent version, which is version 1.5.3, run the command: sudo add-apt-repository ppa:sylvain-pineau/kazam.
Once installed, launch the program through the Application menu.
Step 2. Choose your preferred recording parameters
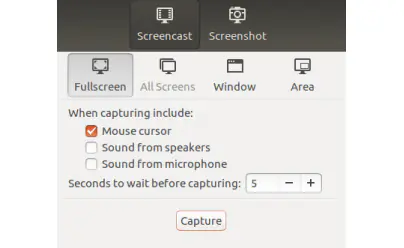
From the main menu, you can pick which area you want to record. Choose from Fullscreen, Window, Area (for custom area), or All Screens. Then, tick the checkboxes you prefer for your recording.
To enable screen recording with sound, check these boxes: Sound from speakers, Sound from microphone. If you want to include all system sounds and webcam footage, include the checkboxes Mouse cursor, Key presses and mouse clicks, and Video from webcam.
Step 3. Capture your screen with audio
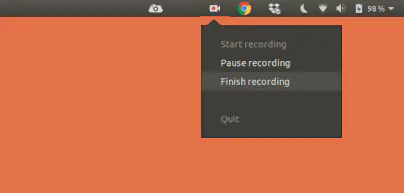
All set? Hit the Capture button to start recording. You can also use the shortcut keys Super + Ctrl + R. If you enabled a countdown, wait for it to hit zero before beginning any activity you want to record.
To pause the recording, press Super + Ctrl + P on your keyboard. If you want to quit the recording entirely, simply hit the keys Super + Ctrl + Q.
Step 4. Stop recording and save your video
To finish recording, you may use the shortcut Super + Ctrl + F. Your recorded video will then be saved to your computer or laptop.
Congratulations! You know now how to record your computer screen and audio on Linux.
Features to consider when choosing a screen recorder
Before you start looking for the best software to record your computer's screen with sound, there are several features you should consider.
Usability: depending on your needs, some programs may be more suitable than others. Look for a user-friendly interface that allows you to easily record and edit videos with minimal effort.
Output quality: make sure the program is capable of producing high-quality videos so that viewers can clearly see what's being recorded without any pixelation or lagging issues.
Recording duration: think about how long you want to record – some programs have a limit on the recording duration, while others may offer unlimited screen-recording time.
Extra features: some programs may include additional features, such as the ability to record multiple screens, add annotations and special effects, and even save recordings in different formats.
Compatibility: check if the program is compatible with your operating system and other applications you use.
Security: if you’re using an online tool, make sure that any personal or confidential information you record doesn't get leaked out to third parties.
Price: many programs are free of charge, but if you need more advanced features or better quality output, you'll need to pay for a premium version.
Best screen-recorders with audio
Summary
Creating screen recordings may seem to be difficult, but with the right tools and a bit of practice, you can quickly master it.
You simply need a screen recorder that can record your computer screen and audio. It's even better if it can also record your camera. The best screen recorders also offer additional features, such as annotation functions, editing tools like trimming and cropping, and format-converting capabilities.
To make things convenient, we rounded up some of the most user-friendly apps for a PC, Mac, and Linux. Whether you're making tutorials or creating presentations for remote teams, recording your computer screen with audio is now easier than ever before.
If you're using Windows and the audio isn't being recorded when you screen-record, it's likely because your sound settings are not set up correctly. To fix this issue, go to Control Panel > Sound > Recording tab and make sure that both Microphone and Stereo Mix (or similar) are enabled. Also double-check the recording parameters in your screen-recording software.
You can record your PC screen with audio by using a specialized program, such as Movavi Screen Recorder. Just follow the instructions below:
Download and install the program.
Download Movavi Screen Recorder
Adjust the recording settings.
Hit the REC button to start recording.
Save a video on your computer or share it.
If you don't want to download any software, you can use Screen Capture by Movavi. This online tool allows you to record system sounds, microphone sounds, and your screen. And you don't need to install any additional programs.
Disclaimer: Please be aware that Movavi Screen Recorder does not allow capture of copy-protected video and audio streams.

Popular
Windows Media Player no-sound issue
NVIDIA Shadowplay not recording
9 ways to record TikTok videos on any device
16 Best Free Webcam Software for Windows 10 – Movavi
How to Screenshot on an Acer Laptop [5 Easy Ways] – Movavi
How to record computer audio
Screen Grabbers for Any Device [2026] | Top 13 – Movavi
How to Record a Google Slides Presentation – Movavi


1.5M+ users already subscribed to our newsletter