
Step 1. Install XSplit VCam
Visit XSplit’s official website and download XSplit VCam on your laptop or computer. The software is free, but you may need a license to remove a watermark from your recording.

5 Ways to Record a Video with a Virtual Background
Check out Movavi Screen Recorder:
Capture your webcam and screen
Record videos in 4K
Use Movavi Video Editor to change the video background
Adding a virtual background to your video is a great way to elevate your production value without breaking the bank. If you want to improve your videos, read on to discover how to record a video with a virtual background.
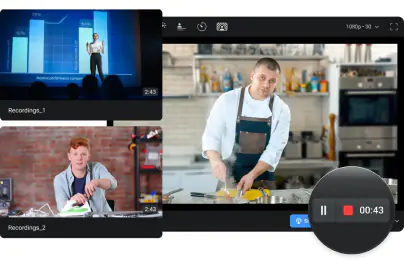
Special pick: Movavi Screen Recorder

Movavi Screen Recorder is an easy-to-use tool that simplifies any screen-recording task. Whether you are on a Windows PC or a Mac, you can use this app to record both your webcam footage and screen activity. And when you are done recording, you can easily cut any unwanted parts of your footage and share your video. Although there is no background changing option in Movavi Screen Recorder, you can use Movavi Video Editor to do the task.
Key features:

Our goal is to provide you with only verified information. To ensure this, Movavi Content Team does the following:
When selecting products to include in our reviews, we research both demand and popularity.
The team tests all the products mentioned in this article.
When testing, we compare the key characteristics of the products, which include selecting capture area, schedule recording, showing keystrokes and mouse, and other significant features.
We study user reviews from popular review platforms and make use of this information when writing our product reviews.
We collect feedback from our users and analyze their opinions of Movavi software as well as products from other companies.
How to record a video with a virtual background on Windows 10
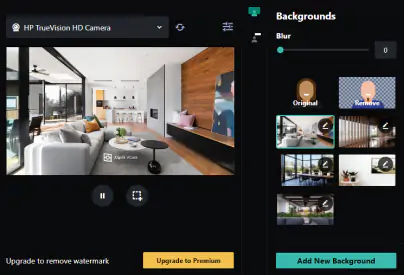
XSplit VCam is an app capable of adding a virtual background for video recording without the need for a green screen. It has background removal features that let you blur your video-recording background or replace it entirely with an image or a webpage.
Here’s how to record a video with a virtual background on Windows 10 using XSplit VCam.
Step 1. Install XSplit VCam
Visit XSplit’s official website and download XSplit VCam on your laptop or computer. The software is free, but you may need a license to remove a watermark from your recording.
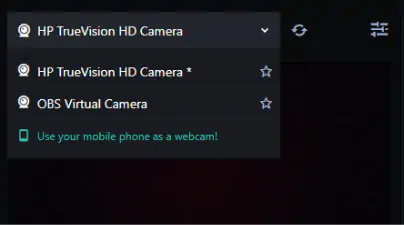
Step 2. Select your camera source
When you launch XSplit VCam, it will automatically detect your camera source. If you have multiple camera sources available, click on the drop-down arrow next to the camera icon and choose your preferred source.
If there is no camera source detected, you can try and press the Refresh Camera icon to restore the signal. Make sure there is no other app currently using the same camera source.
Step 3. Adjust or add a virtual background
Once your camera is all set, you’ll see the background options available on the right side of the main window. Choose a virtual background by adding either an image, a video, or even a webpage.
Step 4. Start recording a video
Now that your webcam with the virtual background is ready, you can open up your preferred screen-recording software and choose XSplit VCam as your camera source.
How to change a video recording background online
Vmaker is an online webcam recorder that allows you to capture both screen and webcam footage with a virtual background. To get access to this app, you need to sign up on the Vmaker’s website.
Here’s how to record a video with a virtual background online with Vmaker.
Step 1. Register an account and set up Vmaker
To use Vmaker online, you need to use Google Chrome browser and create an account on Vmaker’s website. After this, you can download the Vmaker plugin by clicking Download Vmaker on Vmaker’s dashboard.
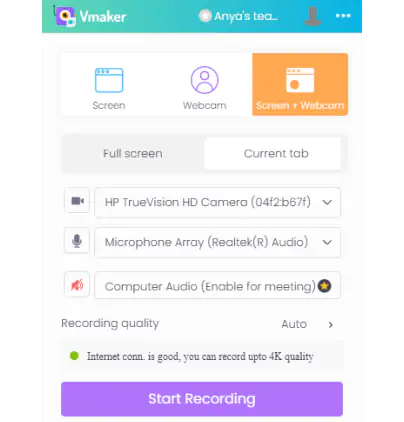
Step 2. Prepare your video settings
Back on the Vmaker dashboard, click Record to start. This will pull down a menu from your plugin. Choose the Screen + Webcam setting to configure your virtual background. Set your camera source and audio source in the next fields, too.
Step 3. Create your virtual background
On the panel under your webcam feed, click on the rightmost icon to open up your virtual background options. You can pick from the default images Vmaker has or import any other image saved on your computer.

Step 4. Start recording
Simply click Start Recording to begin the session. When you’re all done, you can click Stop Sharing.
How to use the webcam recorder with a virtual background on a Mac
ManyCam is a virtual camera and live-streaming software that offers various functionalities for live video production, including virtual backgrounds. It also allows you to add multiple video sources, like webcam, pre-recorded videos, and even feeds from your tablet or smartphone.
Step 1. Install the webcam recorder with a virtual background
Download ManyCam on your Mac. ManyCam offers a free version but you will need a subscription to access all the features. When the download is finished, install the app and launch it.
Step 2. Add your camera and audio
To add your webcam source, simply right-click on the Main Live window. A drop-down list of the available video sources will appear. Select your webcam source. Don’t forget to configure your audio source too by going to Audio Settings.
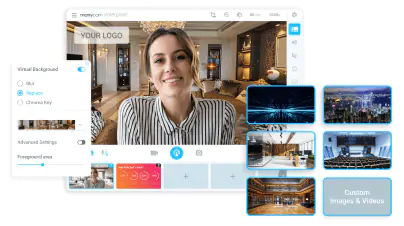
Step 3. Choose your virtual background
Hover over the icons on the right side of the main window until you see the Chroma Key tab. Click on this tab to slide out a new menu. Toggle on the Virtual Background option and then pick Replace.
Pick a template from the library. To use your own, upload it by clicking one of the boxes with a plus sign under your main video source. While you don’t need a green screen for these backgrounds, they do provide better results.
Step 4. Start recording
When you’re ready to record a video with the virtual background app, hit the red Record button under your live feed. If you want to take a pause or make adjustments, press the Pause button. To finish recording, simply click the red Stop button.
How to record a video with a virtual background on Android
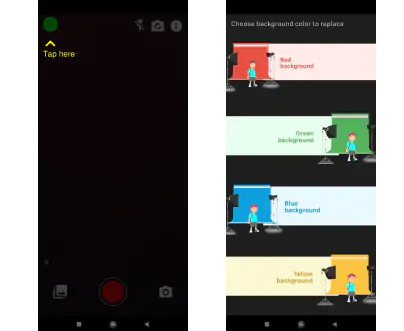
Chromavid is a free and simple app that utilizes chroma key effects for your virtual background needs. It has a selection of chroma key colors and images for you to capture, edit, and share.
To get the best results out of this app, you will need to find a solid green, red, blue, or yellow screen. Here’s how to use this app to record a video with a virtual background on an Android device.
Step 1. Install Chromavid
On your Android phone, open up your Google Play app. Go to the search bar and type Chromavid. Or you can also use the link provided below.
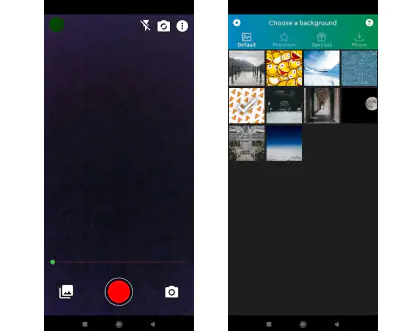
Step 2. Set your virtual background
Select your Chroma Key by clicking the solid-colored circle on the top-left of the screen. Choose the color of the background you have right now. For example, if you have a green screen behind you, pick the green color.
Afterwards, go back and select the Gallery icon on the lower-left to pick your virtual background. You can either go with one of the default backgrounds available or choose any of the images saved on your phone.
Step 3. Start recording with your virtual background
Click the red recording button to start. When you’re finished, just press the same button again to stop. The app will prompt you to either save the video on your phone or share it immediately on social media.
How to record a video with a virtual background app on iOS
Veescope Live Green Screen is a chroma key app for iOS that can record 4K videos. Unlike other apps, Veescope also comes with a timeline editor that allows you to create up to six layers of videos.
Similar to Chromavid, you will need a green screen or at least a blank wall ready to make this app work.
Step 1. Install the app
On your iPhone, open your App Store and type Veescope Live Green Screen into the search function. Choose the first result on the list and install it. Or follow the link below:
Step 2. Configure your settings
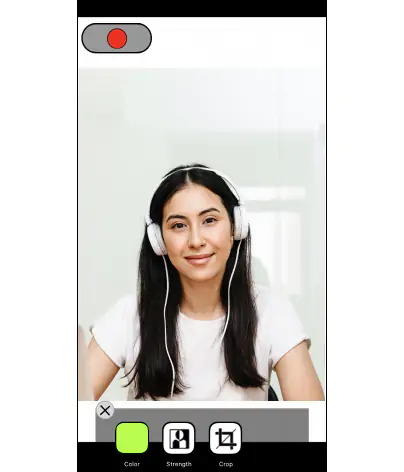
Click on the person-shaped icon on the panel to set up the key. You can select either Screen or Blank Wall, depending on what background you have.
Next, follow the app’s on-screen instructions to finish the green screen configuration. You can adjust further by using the Color and Strength sliders.
Lastly, click the flower icon on the panel to open up options for the virtual background. You can import background images or videos from your phone or capture one on the spot.
Step 3. Capture your video with a virtual background
When you’re satisfied with all the settings, you can now capture your video. Start recording by hitting the red Record button on the upper-right of the screen. Press it again when you’re done.
How to choose the best virtual background app
Thanks to the advanced software available, recording videos with virtual backgrounds is no longer complicated to do. Here’s what you need to keep in mind:
Budget: There are several free and paid apps available for you to try. Additionally, you may need a green screen if you want to record your own background videos. You don’t need to invest in expensive production materials to achieve a professional or creative look for your videos.
OS: There are several ways to record a video with a virtual background, and it all depends on what platform you use. If you prefer to record and edit videos on your phone, there are plenty of apps available that can add a virtual background.
Ease-of-use: You need to find a program that fits your levels of expertise. If you’re a beginner, try to get one that is simple for you to work with to avoid any issues.
Best ways to record a video with a virtual background
If you need a program for video and audio capture, you may try Movavi Screen Recorder. Make scrolling screenshots, draw shapes right on your recording, set a specific date and time for recording – and there’s more!
Summary
In this article, we’ve reviewed several video recorders with a virtual background, their features and how to use them. We hope it’s been helpful in your choice of an ideal way to record a video with a background image.
Disclaimer: Please be aware that Movavi Screen Recorder does not allow capture of copy-protected video and audio streams.

Frequently asked questions
Yes, you can still alter the background of a video that’s already recorded, and it doesn’t require advanced editing skills! Simply download Movavi Video Editor and import your video to the software. There is a powerful chroma key feature that replaces the background behind a subject with another. To learn more, follow the link below.
Provided you have a solid green, blue, yellow, or red background prepared, you can record a video with a virtual background with Chromavid.
References
Popular
Tips for video recording yourself
What is a capture card?
What is screen recording?
How to screen record on Dell laptop [7 ways]
Is OBS Safe? Your Guide to Safe Screen Recording
Best OBS Settings for a Low-End PC or Laptop
How to Screen Record on a Computer [Any OS] – Movavi
4 Ways to Record Your Computer Screen and Audio – Movavi
15 Best Screen Recorders with Facecam [2026] - Movavi
Best webcam software
Use phone as a webcam
[SOLVED] NVIDIA Shadowplay Not Recording – Movavi


1.5M+ users already subscribed to our newsletter