How to Screen Record on Windows 10 and 11 with Audio

  • Capture everything, not just your browser tabs
  • Highlight keystrokes and mouse actions
  • Draw on videos in real time

Free online screen recorder

  • Webcam
  • Microphone
  • Sound
  • Watermark

Supported browsers: Google Chrome, Mozilla Firefox, Microsoft Edge, Opera

Edited by Sam P Dunn
54,225

Key takeaways

  • Match the tool to your task: From creating detailed tutorials to grabbing quick clips, the ideal screen recorder for Windows depends on your specific needs.
  • Top contenders offer variety: Movavi Screen Recorder is the versatile all-rounder, Xbox Game Bar is the quick free option, Screen Capture is great for online, no-install needs, and Vidyard provides professional analytics.
  • Consider limitations: Be aware of potential content length limits on free plans and tiered access to advanced features.
  • Audio and sharing are crucial: Clear audio and efficient sharing methods are key to producing polished and accessible content.

Ever tried recording a Zoom call or an online lecture only to discover later that the audio was missing or your cursor disappeared at the worst moment? I’ve been there, so I spent a few intense days testing a good dozen screen recorders on Windows 10 and 11, everything from popular apps to lesser-known tools.

Some impressed me with speed and clarity, while others made me pull my hair out. In the end, I narrowed it down to the four best of the best that actually work in 2025, so you can capture your screen without any headaches. Whether you’re recording tutorials, business meetings, or late-night gameplay, these are the tools I’d personally reach for if I need to answer the question “How to screen record with audio on a Windows PC?”

My top picks

Are you wondering how to screen record on Windows 10 with audio? After sifting through loads of screen recording options, I've landed on four solid apps that really deliver.

Each one has a distinct advantage, making it perfect for certain scenarios. You'll find options for those who want complete control, those looking for a free solution, users who need pro-level features, and people who require mobile versatility.

Best overall: Movavi Screen Recorder
I favored Movavi for its all-around power and versatility. It captures screen and audio flawlessly, allows webcam overlay, live drawing, and scheduled recordings. Perfect for tutorials, lectures, or business meetings.

Best free / budget software: Game Bar
Game Bar comes built into Windows, which is great if you don’t want to install anything extra. It’s fast, simple, and ideal for short recordings or gameplay. I liked that it just works without fuss.

Best for online / quick captures: Screen Capture
This browser-based recorder is perfect for those moments when you need to capture something without installing software. It handles full screen, selected windows, or webcam, with mic/system audio. I found it especially handy for quick demos or lectures.

Best for business / analytics: Vidyard
Vidyard is geared toward professionals who need analytics and feedback alongside recordings. It’s great for sales demos, tutorials, or marketing videos where you want to see who watched your content. I liked the webcam + screen overlay and built-in viewing stats.

Comparison table: record screen windows with audio

Program

Best for

OS

Download

Adjusting recording parameters and 

full HD and 4K capturing

Windows, macOS

Capturing gameplay on a PC

Windows

Recording a screen on a Windows 10 PC without installing any additional software

Any, web-based

Recording your browser activity

Any, works in Google Chrome

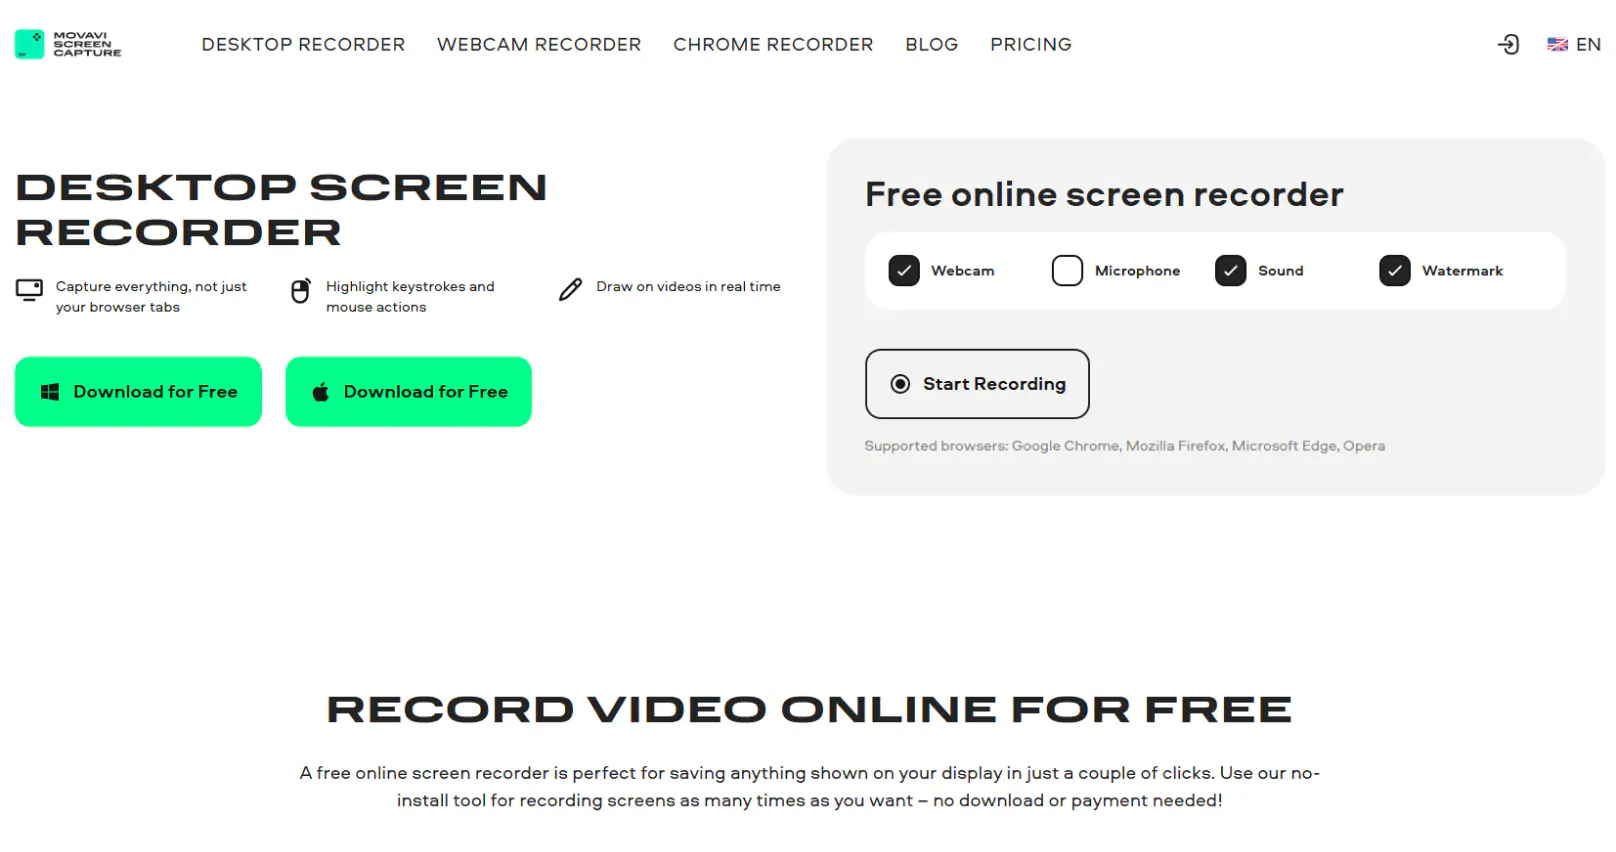
Best choice: Movavi Screen Recorder

Best for: capturing and annotating educational videos

Why I picked it: I loved how smooth and versatile this Windows screen recorder with audio is. It captures screen, audio, and webcam flawlessly, plus I can draw and schedule recordings. Honestly, it became my go-to for everything from tutorials to lectures.

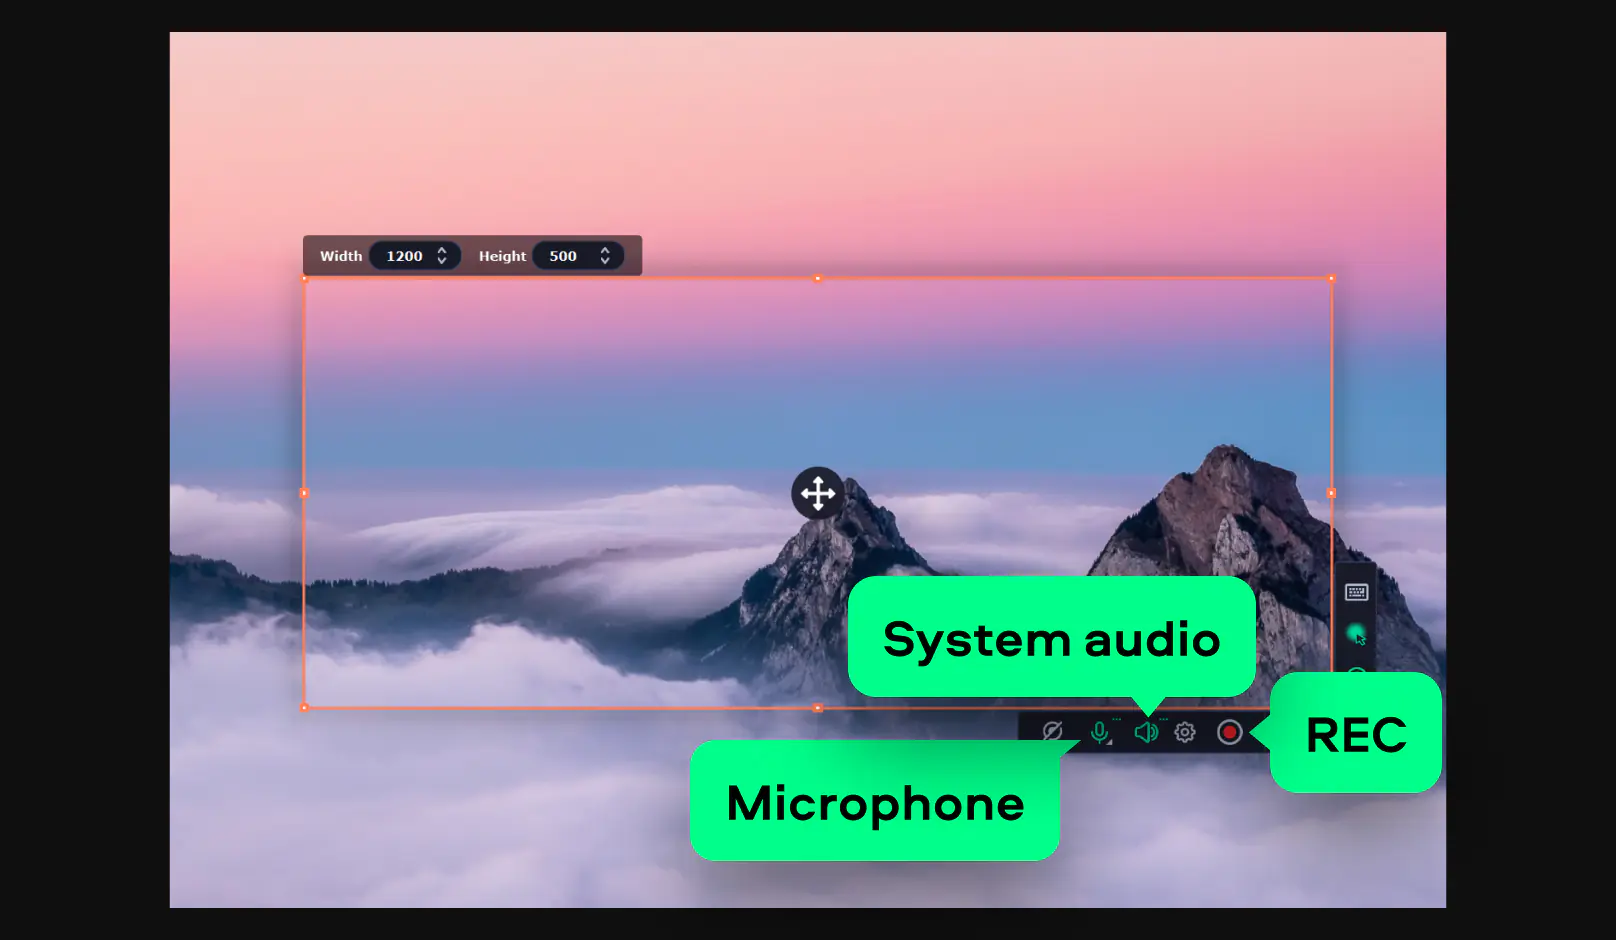
Movavi Screen Recorder is easily my favorite pick when I need to record screen Windows 10 with audio. It handles not just your standard “screen + system sound + mic” setup, but also supports HD/4K quality, live drawings/annotations, webcam overlay, and scheduling recordings ahead of time. It’s a synonym for a no limit program that lets you capture and save high-quality media with ease.

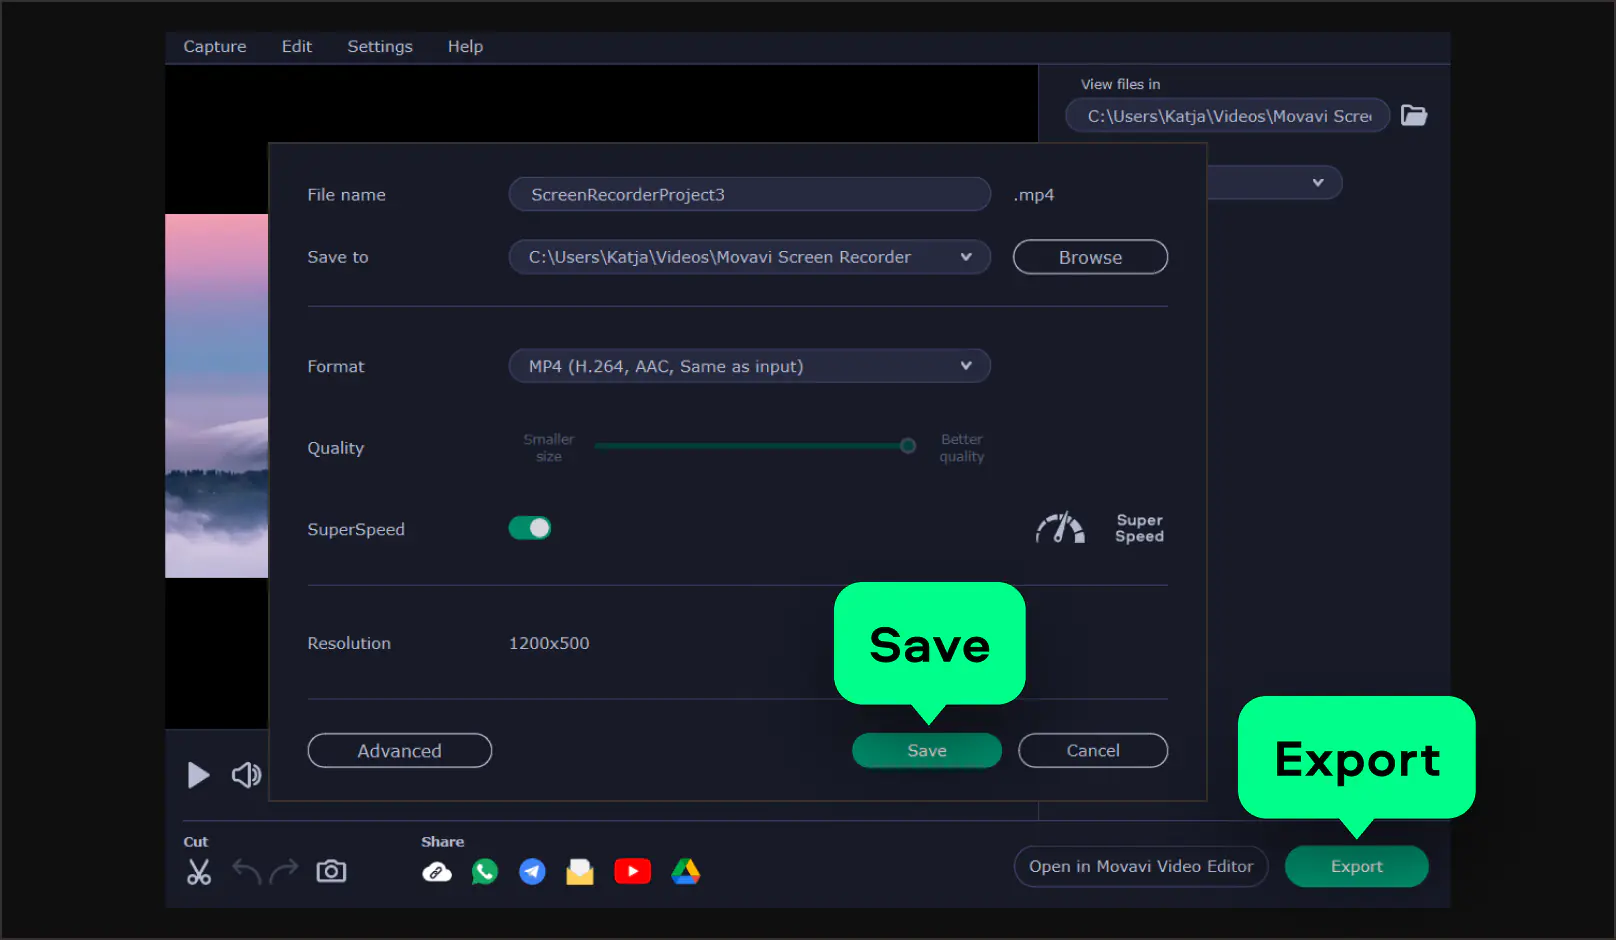
In its most recent version 24.6.1, they added an audio recording indicator so there’s never any doubt whether sound is being captured, and improved access to webcam settings. There is a free/trial version so you can test most of what it offers before buying, though some features are locked behind the paid version. If I were making lectures, tutorials, or any content where clarity and annotations matter, this is what I’d reach for first.

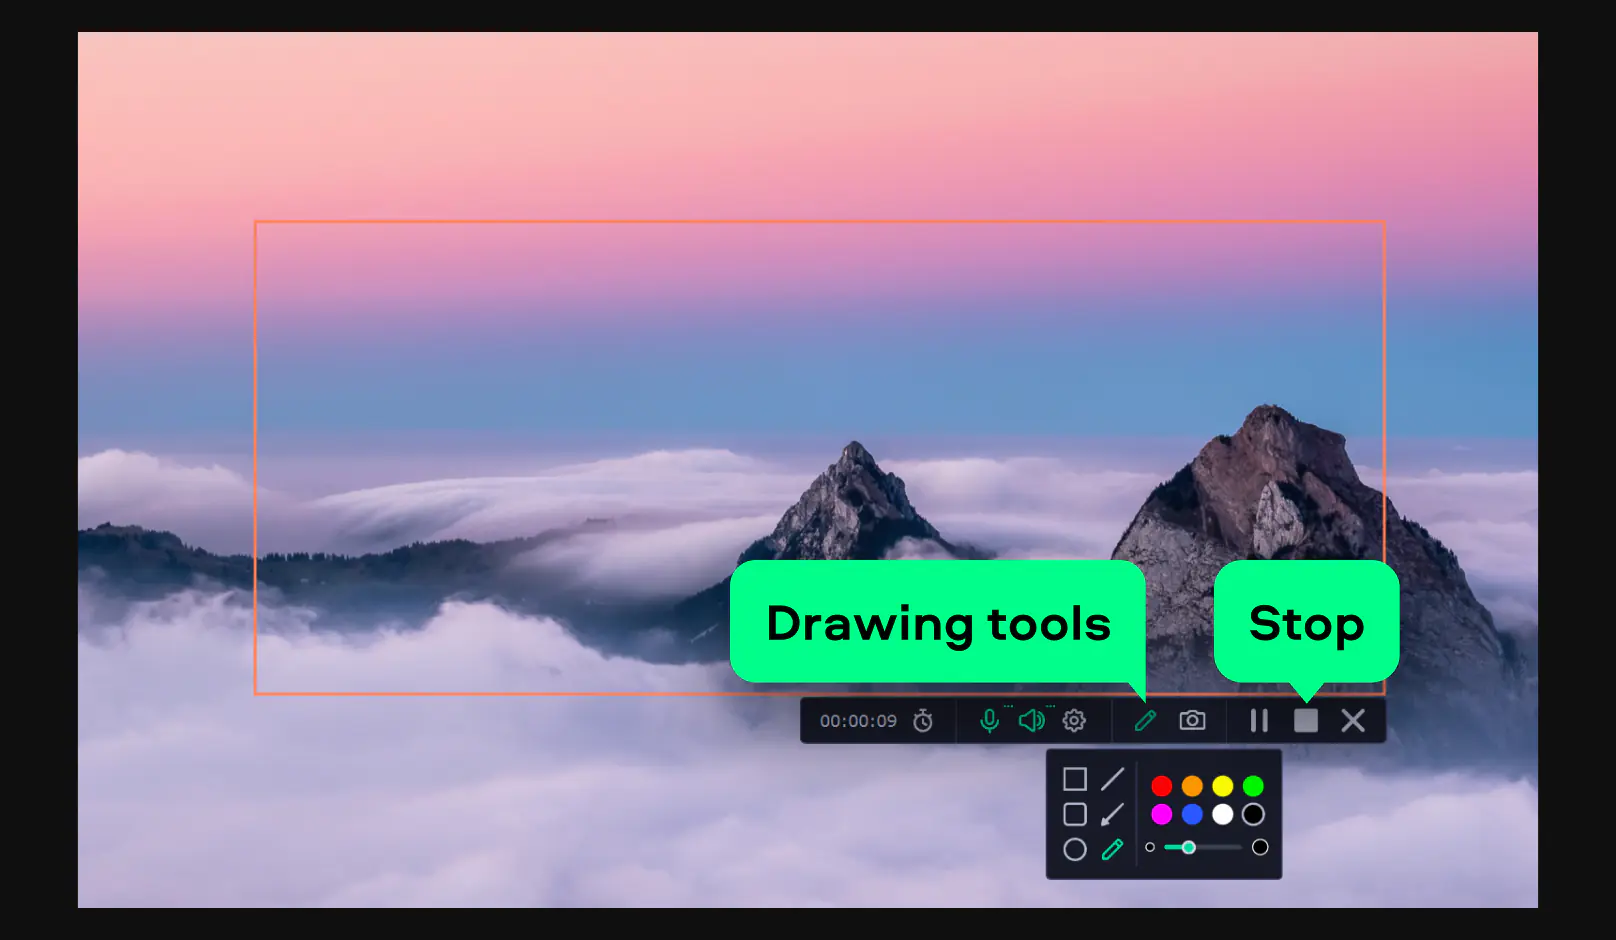
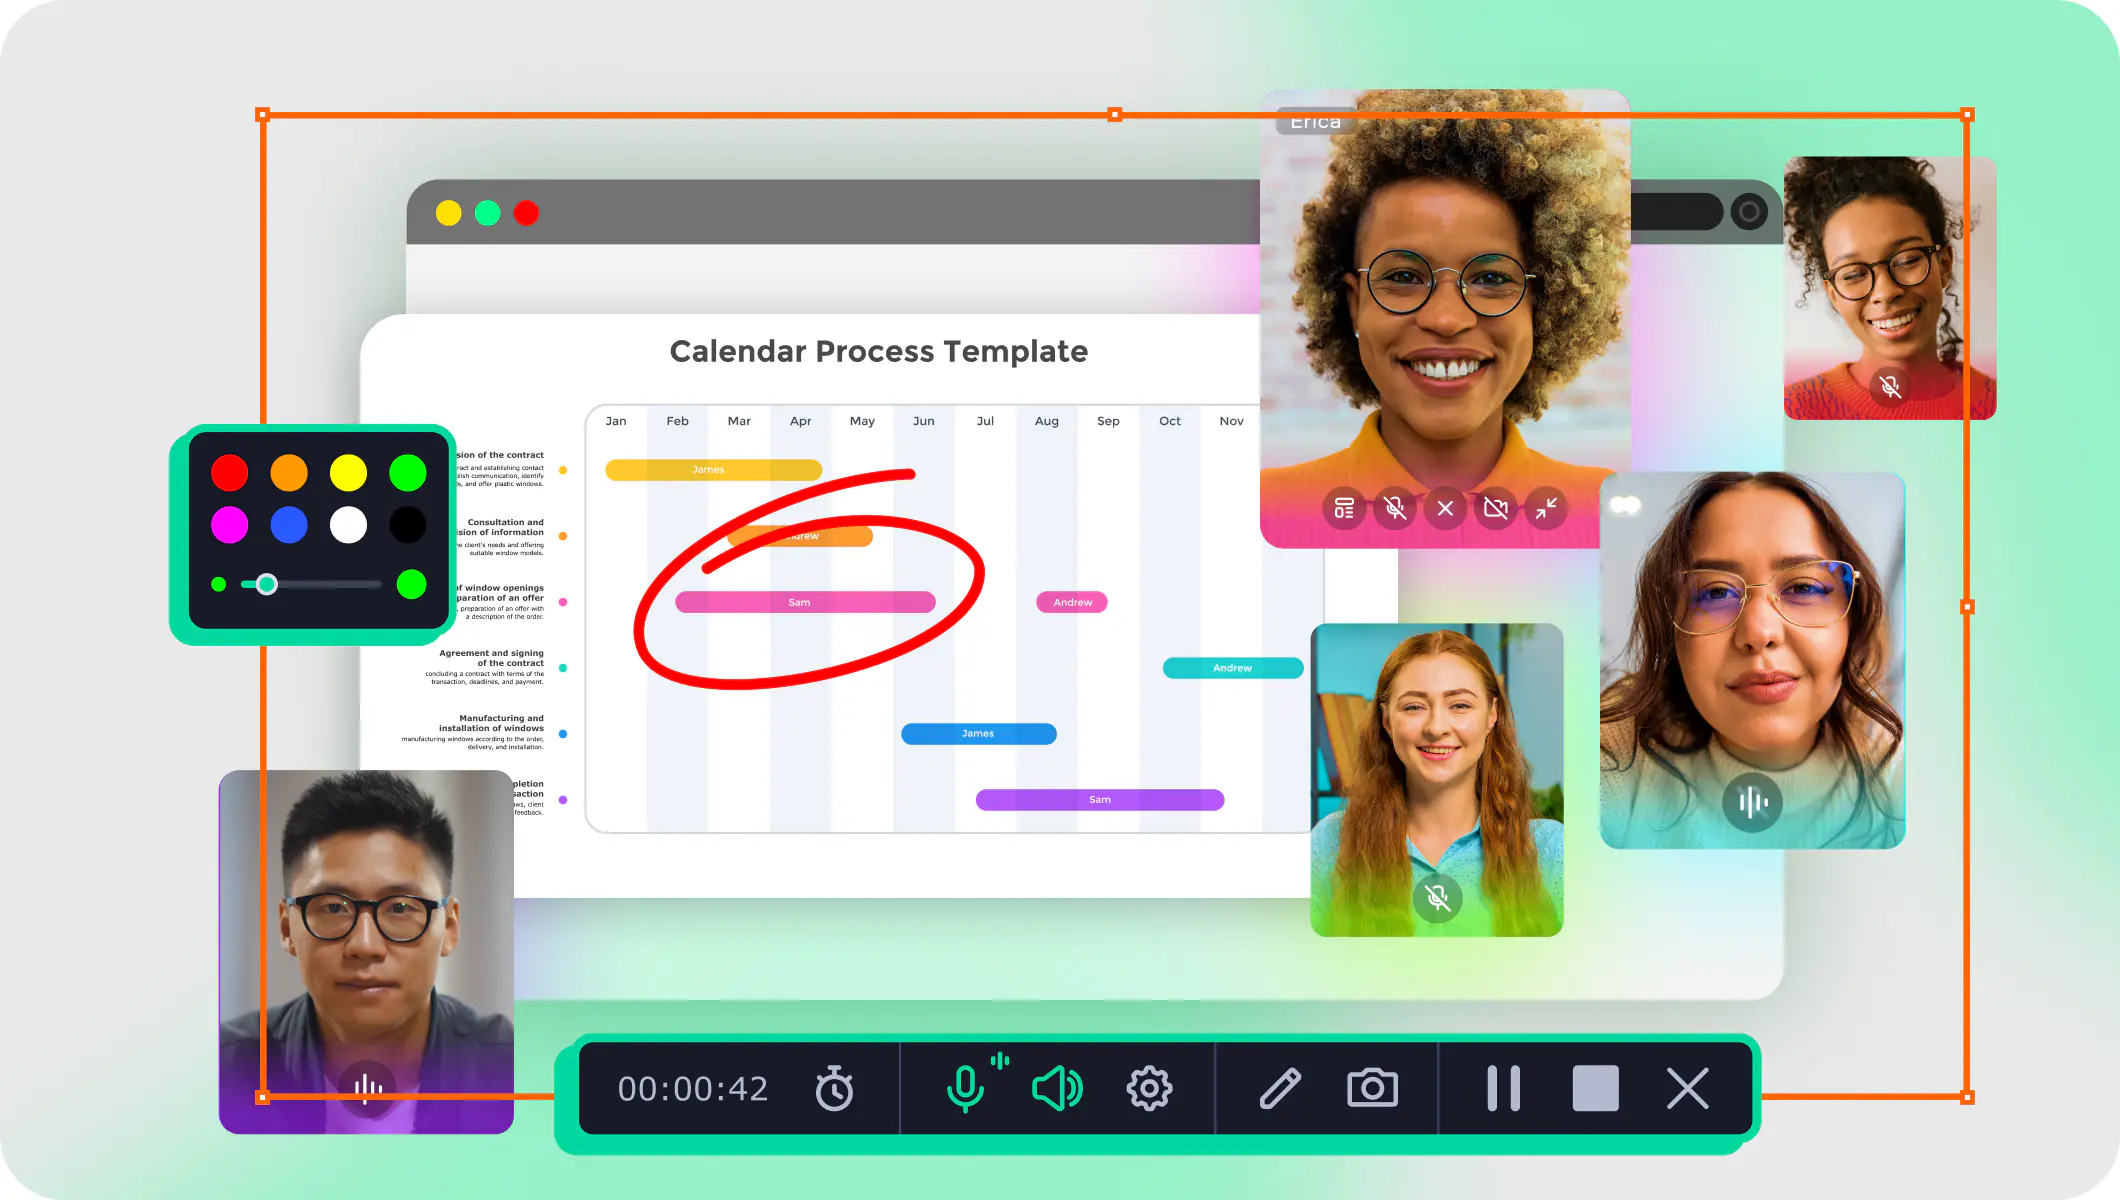
When I tested Movavi myself, I liked how smoothly it handles switching between recording areas (full screen/custom window) and how obvious it is when both system audio and microphone are active. What seemed great to me was the built-in drawing tools: I could highlight cursor clicks, annotate live, and overlay webcam without jumping into separate editing software.

I didn’t love the watermark in the trial version, or that very high resolution recording can push older computers to lag. But overall, the noise reduction, the scheduling, and the clarity of the audio made it feel like the recording tool I’d want if I were prepping classes or recording meetings that I need to review later.

Features

  • Button clicks and cursor movement capture

  • HD and 4K recording

  • Drawing right on your videos while recording live

  • Recording sounds from a microphone or speakers

Ratings

Pros:

  • Easy and user-friendly interface

  • Can depict webcam and screen recording at the same time

  • Ideal for capturing educational videos

Cons:

  • Functionality of a free version is limited

It is always advisable to screen record in 4K if the software supports it, even if you don’t need a 4K file at the moment.

Screen recording in 4K resolution provides greater flexibility in post-editing. You can zoom in or crop parts of the video without losing significant quality, giving you more creative control. It also provides an improved viewing experience, ensuring that fine details and visuals are presented clearly.

Additionally, you can downscale 4K content to 1080p for distribution, which typically results in sharper and cleaner videos compared to recording directly in 1080p.

How to use the Movavi Windows 10/11 screen recorder with audio

Movavi Screen Recorder allows you to capture the content displayed on your computer screen, be it a program window, a part of the screen, or your whole screen. With this program, you can easily record your screen and sound, including system audio. Additionally, Movavi Screen Recorder allows you to capture sounds from a microphone or computer separately from your screen recording. You can also draw while recording and show your keystrokes, which is perfect for creating tutorials and other instructional videos.

Follow the steps below to learn how to record a screen with audio in Windows 10 using Movavi Screen Recorder.

Step 1. Install the program

Download the installation file and install the screen recorder with audio for Windows 10. Launch the program after the installation is complete.

Step 2. Specify the recording settings

Click Screen recording on the sidebar and set the area of your screen you want to record. To select full screen, press the space bar. Make sure that Microphone and System audio icons are highlighted to record both video and audio. Optionally, you can reduce background noise from the microphone by clicking on the Cogwheel icon.

Fun fact! With Movavi Screen Recorder, you can record video from your webcam while capturing your screen. This allows you to add a personal touch to your recordings – perfect for letting your friends admire your brilliant insights and your beautiful face.

Step 3. Capture your screen

Hit the REC button to start recording and Stop to finish. During recording, you can pause, take snapshots, or use graphics from the toolbar to emphasize your points.

For added convenience, use the following shortcuts: F8 to take a snapshot, F9 to pause, and F10 to finish recording. Another helpful option is highlighting your cursor, mouse clicks, or keystrokes.

Step 4. Save your recording

Before saving, you can watch your recording. To remove unwanted fragments, click the Scissors icon and adjust the sliders on the timeline to select the sections you want to delete.

Finally, click Export, set the exporting settings – such as the destination folder, video format, and quality – and hit Save. Advanced settings are available for experienced users. You also can open video in Movavi Video Editor if you want to edit it further.

Now you know how to record screen on Windows 10 with a convenient tool – Movavi Screen Recorder.

As someone who regularly creates YouTube tutorial videos, I’ve tested numerous screen recorders over the past few days. After trying the default Windows screen recorder and popular alternatives like ShareX, I struggled to find a solution that could capture both my screen and audio seamlessly.

After a thorough search, I discovered Movavi Screen Recorder which stands out with its ability to capture the screen along with system audio and offers features like webcam integration. For YouTubers who need to simultaneously record their screen, system audio, and webcam, this tool is highly recommended.

How to screen record on Windows 10 with audio using Game Bar

Game Bar

Best for: recording gameplay videos

Why I picked it: It’s built into Windows. So no installation fuss. And it’s surprisingly efficient for quick gameplay or app recordings.

Game Bar is the built-in screen recorder in Windows 10/11 that lets you grab screen + audio without installing anything extra, literally for free. It was made mainly for gameplay, but it works for recording other apps too – though you’ll generally be limited to one app at a time.

In its latest updates (spring/summer 2025), Microsoft added a fresh look to the settings widget (quick access to audio, brightness, etc.), compact mode improvements, and new Edge Game Assist integration (an in-game browser overlay). It remains a solid choice if you need something fast, native, and always ready.

I gave Game Bar a once-over. I liked how fast it is to start recording with Win + G, and how clean the new quick settings feel. What wasn’t so great to me was the limitation of only recording one app/window at a time, and on older hardware, I noticed some lag when recording high-quality video. Still, for capturing short clips, lectures, or meetings where I don’t need fancy editing, it did the job nicely.

Features:

  • Built-in screen recorder on Windows
  • Optimized for capturing gameplay

Ratings

Pros:

  • Already pre-installed on your computer

Cons:

  • Can capture only one app at a time

  • Some users report it may slow down your system

Here’s how to screen record on Windows 10 with audio using Game Bar:

Step 1. Download Game Bar

It should already be pre-installed on your computer, but if it’s not, use the link below to download the installation file from Microsoft Store and finish the installation.

Download Game Bar

Step 2. Activate Game Bar

If this screen recorder for Windows 10 isn’t activated on your PC, you need to do it first. Click the Windows + I keys to open the Settings menu and select Gaming. Click Xbox Game Bar, then toggle the switch to On to activate Game Bar on your computer.

Step 3. Select the recording settings

Open the Captures tab to adjust the settings. You can set the video frame rate and quality, change the maximum recording length, and choose the output folder.

Step 4. Record your screen and audio on Windows 10

To start Windows screen recording with audio, hit Windows + G to bring up the recording panel and click Record in the Capture block. Here, you can also adjust the audio settings and monitor your computer's performance.

Another option is to press the Windows + Alt + R buttons to start recording automatically.

In both cases, the Game Bar will open a toolbar and start capturing the active window you had at the time. Don’t forget to activate recording from your microphone.

Step 4. Save the video

When you close or minimize the window, the recording will stop automatically. Alternatively, you can press the Stop button on the toolbar. You’ll receive a notification that the video has been recorded. Click on the notification to open the folder where your recordings are saved.

How to record a screen with audio in Windows 10 online

Screen Capture

Best for: fast and easy screen recordings for work or study

Why I picked it: I liked how easy it is to use, no downloads, it works in any browser, and it’s perfect for quick captures or online lectures.

Screen Capture is an online screen and audio recorder you can use without installing anything. With a tool like Movavi's free online screen recorder, you can capture full screen, a selected window or area, and include webcam or mic/system audio.

The free version works fine, but recordings come with a watermark. In my trials, I noticed audio from system sound sometimes comes through faintly, depending on the browser, and performance depends a lot on your network and browser permissions.

When fiddling with Screen Capture from Movavi, I liked how fast I could start a video just by opening the site, selecting the area, and hitting record – no setup needed. What didn’t feel great to me was the watermark and a bit of lag when switching between windows or capturing heavy motion. Still, for quick slides, short demos, or saving a meeting I wasn’t expecting, it’s really handy.

Features:

  • Easy-to-use online screen recorder
  • Allows recording webcam and screen at the same time
  • Can capture audio from microphone, system sound, or both

Ratings

Pros:

  • Doesn’t require an installation on computer

  • Available in all popular browsers

Cons:

  • The recorded video will have a watermark

To learn how to record a PC screen with audio online, check out the instructions below.

Step 1. Open the website

Go to Screencapture.com in your preferred browser. Supported browsers: Google Chrome, Mozilla Firefox, Microsoft Edge, and Opera.

Open the Screen Capture website

Step 2. Adjust the settings

Click the Sound icon to capture your screen with audio. If you want to capture your microphone or webcam, make sure to select the corresponding icons as well.

Step 3. Start recording 

Finally, hit the Start Recording button and choose the area you want to capture: a browser tab, window, or full screen. If you’re using the app for the first time, you’ll need to grant access to your webcam and microphone to start recording.

Step 4. Save recording

To finish recording, click Stop Recording. You can play the finished video back and download it to your computer. The video will automatically download in the WebM format.

Bestseller
Movavi Screen Recorder
Screen Capture

How to screen record with audio on Windows 10 using an extension

Vidyard

Best for: tracking your videos’ views

Why I picked it: I liked the analytics and webcam overlay – great for business or marketing videos where you want to see who watched your content.

Vidyard is a browser extension (Chrome & Edge) plus a desktop/web tool that lets you record your screen, webcam, or both – and includes system and mic audio. In its product updates from 2024, they introduced “AI Avatars,” improved script-personalization for each recipient, and faster feedback/analytics tools. The free version is usable, but you’ll run into limits: video-length caps, limited embed/share options, and fewer advanced features than paid plans.

When checking it out, I liked how clean the video + webcam overlay feels, and how handy the analytics are to see who’s viewed my video and for how long. What bugged me was that some of the nice AI features (like avatars and advanced personalization) are locked behind the higher tiers, so you can’t test everything with just the free plan.

Also, I didn’t love having a 30-minute cap per video on the free plan – for longer content, that gets inconvenient. Still, for business outreach, quick demos, or sharing polished browser-based recordings, it seemed a strong choice.

Features:

  • Web-extension for Chrome and Edge
  • Includes feedback feature with video watching states
  • Free version has limited functionality

Ratings

Pros:

  • Allows simultaneous webcam and screen recording

  • Shows you how many people saw a video

Cons:

  • Only available for Chrome and Microsoft Edge

  • Some users find the interface confusing

  • In the free version, recording is limited to 30 minutes per video and 5 videos per month

Here’s the instruction on how to record your screen using Vidyard:

Step 1. Install the extension

Follow the link below to install the extension.

Install Vidyard

Step 2. Set up the recording settings

Log in or create a new account. Click the Vidyard icon to view recording options. Click the corresponding icons to capture your screen, webcam, or both. If you also want to capture your microphone, make sure that the correct device is selected. 

You can also blur the background during webcam recording or use the built-in Speaker Notes to refer to your script.

Step 3. Capture your screen

Click the Start Recording button and choose what to capture: a browser tab, window, or full screen. Use the drawing tools from the toolbar to emphasize your points, pause the recording, or open your notes. Be aware that the recording time is limited to 30 minutes.

Step 4. Save the video

To stop recording, hit the Finish icon on the toolbar or click the Vidyard icon in your browser. All videos are automatically saved to the Vidyard server. By clicking the Edit Video link, you'll be taken to the workspace, where you can customize the video. The first time you access the workspace, you’ll need to authorize.

Next, you can share the video via a link, email, social media, or by using an embed code (note: free accounts have a 5-time limit for embedding).

Your most recent videos are available from the extension icon in your browser, under the second tab. From there, you can also access your Video Library to see how many times each video has been viewed.

Here’s how to screen record on a PC using Vidyard. This tool is pretty straightforward and versatile, too.

Tips for better screen recording and sharing

Screen recording with audio is more than just hitting REC. First, think about your audio setup – clear sound makes a huge difference.

If you’re capturing a lecture or meeting, use a headset mic to cut background noise.

Don’t forget to highlight your cursor or keystrokes if you’re making a tutorial; viewers will thank you.

Also, experiment with frame rates and resolution: recording in 1080p is usually enough, but 4K gives you flexibility to crop or zoom later.

When it comes to sharing your recordings, you’ve got options. You can upload straight to YouTube, send via cloud storage like Google Drive, or embed it in emails or presentations.

Quick, hassle-free sharing keeps your workflow smooth, and using links instead of huge video attachments can save everyone a headache.

Sharing option

Description

YouTube

Upload videos publicly or privately; easy to embed or share links

Google Drive / OneDrive

Store and share files with specific people via links

Dropbox

Cloud storage with link sharing and access controls

Email attachments

Quick for small files, but beware of size limits

Social media

Facebook, LinkedIn, or Twitter for public or limited audience sharing

Video hosting services

Vimeo, Wistia, or Loom for professional-looking embedding and analytics

disclaimer_person

Here’s what Movavi’s team does to provide you with verified information:

  • When selecting products to include in our reviews, we research both demand and popularity.

  • All products mentioned in this article have been tested by Movavi Content Team.

  • When testing, we aim to highlight the best features of a product and what it’s best suited for.

  • We study user reviews from popular review platforms and make use of this information when writing our product reviews.

  • We collect feedback from our users and analyze their opinions of Movavi software as well as products from other companies.

How to choose the best Screen recorder for Windows 10 and 11

So, picking the right screen recorder with audio for PC using Windows 10 or 11 PC really just comes down to what you're trying to get done. If you want something that can do it all – from making tutorials to recording meetings with your face in the corner – Movavi Screen Recorder is a solid all-rounder.

Need to grab a quick, free clip? The built-in Xbox Game Bar is your go-to.

And if you're looking to record on the fly without installing a thing, a browser tool like Screen Capture is the easiest way. For the pros out there who want to see how people are watching their recordings, Vidyard offers some seriously powerful analytics.

Movavi Screen Recorder

The perfect way to record anything from your screen

Movavi Screen Recorder

Frequently asked questions

Does the Windows 10 screen recorder record audio?

Yes. With the addition of the inbuilt Game Bar on Windows 10, screen recording with audio is now a simple procedure. However, Game Bar has some limitations since it was created for only recording gameplay. If you’re looking for a recorder with more advanced features, we recommend you try Movavi Screen Recorder.

How do I record my screen on Windows 10 with sound?

To record your screen with sound, use Movavi Screen Recorder:

  1. Download and install the program.
    Download Movavi Screen Recorder

  2. Adjust the recording settings.

  3. Hit REC to start recording and then Stop recording to finish

  4. Click the Export button to adjust the saving settings.

  5. Finally, hit Save.

How do I get a screen recording with audio?

To record your screen with system and/or microphone audio, use Movavi Screen Recorder.

  1. First, download the program.
    Download Movavi Screen Recorder for Windows
  2. Launch the installation file and follow the instructions. The program will open after the installation is complete.
  3. Click the Screen recording button and select the area you want to capture.
  4. Depending on which audio source you wish to record, activate the System audio or Mic icons (or both) and hit the REC button.
  5. Click Stop to finish recording.
  6. Edit the resulting video using the Cut and Delete buttons.
  7. Click Export, select the output format, then hit Save.

How do I record my screen with audio on Windows?

There are many versatile tools available to capture one’s screen with audio on Windows. Movavi Screen Recorder is one such program. It can capture sound from both your microphone and computer. It can also convert your captured video into audio if you want.

Can you screen record on Windows 11 with audio?

Yes, you can. Windows 11 comes with inbuilt screen-recording tools – GameBar and Snipping Tool. These two can come in quite handy, especially for basic operations. But if you’re looking for software with advanced features, we recommend you try Movavi Screen Recorder. This program allows you to tweak the recording settings according to your needs, schedule recording sessions, and annotate videos in real time.

Does Windows 10 have a screen recorder?

Windows 10 users can benefit from the built-in screen recorder, Game Bar. Although it’s best for recording gameplay videos, it can perform basic functions. However, if you wish to tweak the recording settings to your liking, schedule recording sessions, and draw on your videos, we recommend you try Movavi Screen Recorder.

More about Movavi Screen Recorder

What is the best Windows screen recorder with audio?

Here are the tools that can help you record your screen with audio:

  • Movavi Screen Recorder – a desktop solution for advanced recording sessions.
  • Game Bar – a built-in tool to record gameplay videos.
  • Screen Capture – an online service.
  • Vidyard – a service for tracking your videos stats.

Learn more about the best Windows screen recorders here:

16 Best screen recorders for Windows 10

Have questions?

Have questions?

If you can’t find the answer to your question, please feel free to contact our Support Team.

Join us for discounts, editing tips, and content ideas

1.5M+ users already subscribed to our newsletter

By signing up, I agree to receive marketing emails from Movavi and agree to Movavi's Privacy Policy.