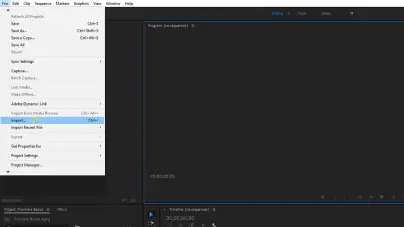
Step 1. Import and add your video to the timeline.
Start by importing the video you want to stabilize. Go to File > Import, find your video, and then click Open. Now, drag the video onto the timeline.

Warp Stabilizer: How to Fix a Shaky Video
Try Movavi Video Editor!
Enjoy intuitive controls within a simple interface
Leverage AI-powered tools like background & noise removal
Post directly to popular social media platforms
By clicking the download button, you're downloading a free version of the program.*

If you’ve got a shaky video, Premiere® Pro’s Warp Stabilizer is a solid option to help fix your clip. Here’s the rundown on how to use Warp Stabilizer in Premiere® Pro.
Special pick: Movavi Video Editor
Movavi Video Editor is a powerful video-making suite packed with features that can help you master any video project. It’s easy-to-use and comes with helpful AI features that churn out professional-grade edits. You can remove noise, backgrounds, and upscale the resolution of low-quality videos all in a few clicks and upload instantly to YouTube and TikTok.

At Movavi, we’re committed to providing you with verified information only. Here’s what we do to ensure this:
When selecting products to include in our reviews, we research both demand and popularity.
All products mentioned in this article have been tested by Movavi Content Team.
When testing, we compare key parameters, including video and audio trimming, visual effects, stabilization, video quality adjustments, saving and sharing videos, and other significant features.
We study user reviews from popular review platforms and make use of this information when writing our product reviews.
We collect feedback from our users and analyze their opinions of Movavi software as well as products from other companies.
What is the Warp Stabilizer effect?
Introduced in Adobe CS6, Warp Stabilizer is a motion stabilizer effect in Adobe® Premiere® Pro used to stabilize shaky footage. Editors use it to smooth out handheld shot footage or footage from a camera that didn't have effective built-in stabilization.
Here's how it works:
Analyzes your footage. The Warp Stabilizer effect analyzes your footage frame-by-frame with multipoint tracking.
Stabilization. Then, the tool uses the tracked points to estimate motion and stabilize the footage. If a point moves from one frame to the next, the stabilizer applies the opposite motion to keep the point steady.
Cropping and auto-scaling. Stabilizing footage often results in the frame moving, which can lead to black borders around the edges of the video. To counter this, Warp Stabilizer automatically crops the edges and scales up the footage to maintain the original frame size.
Warp Stabilizer in Premiere® Pro is a powerful tool, but it's not perfect and can produce odd results. If your footage has a lot of motion or if the background changes significantly throughout the clip, you’ll need to do a lot of tweaks. And be aware that it can introduce a "warping" effect, where the footage appears distorted or stretched, hence the name Warp Stabilizer.
But with careful use and settings adjustments, it can be a very effective tool for smoothing out shaky footage. Be sure to use our best warp stabilizer settings in the section below to get the best results.
How to use Warp Stabilizer in Premiere® Pro
Step 1. Import and add your video to the timeline.
Start by importing the video you want to stabilize. Go to File > Import, find your video, and then click Open. Now, drag the video onto the timeline.
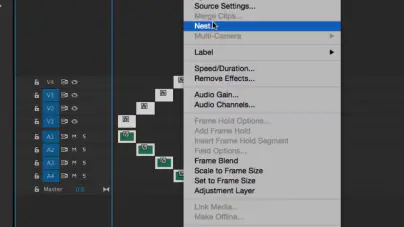
Step 2. Create a new sequence
It's generally recommended to apply the Warp Stabilizer effect to a clip in a new sequence. You can do this by right-clicking the clip in your timeline and selecting Nest. Give your nested sequence a name and then click OK.
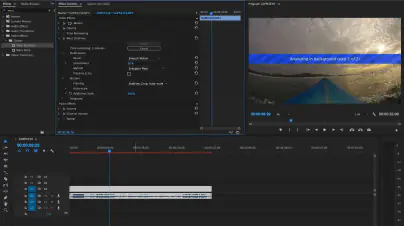
Step 3. Find the Warp Stabilizer effect
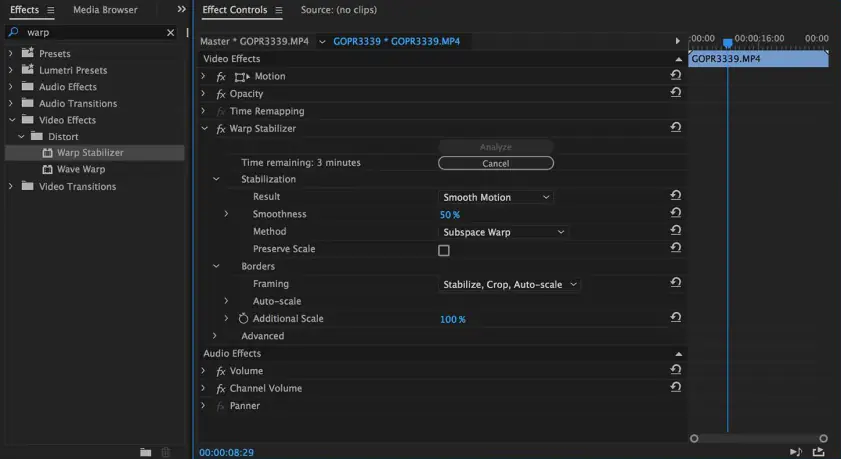
Now, go to the Effects panel. You can do this by clicking Window on the top menu and then selecting Effects. In the Effects panel, type Warp Stabilizer into the search box or look under Video Effects > Distort.
Once you've found the Warp Stabilizer effect, drag and drop it onto the clip in your timeline (the nested sequence you created earlier).
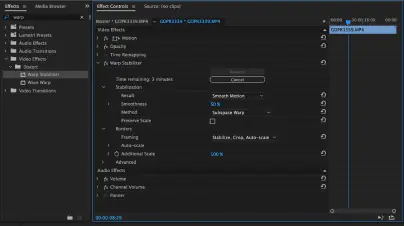
Step 4. Analyze the footage
After you've applied the effect, Premiere® Pro will automatically start analyzing your footage. You can see the progress in the Effect Controls panel. This process can take some time, especially for longer videos.
After Premiere® Pro has finished analyzing your footage, it will automatically stabilize it. You can adjust the settings in the Effect Controls panel if necessary. For example, you can change the smoothness of the stabilization or choose between different methods of stabilization (like No Motion or Smooth Motion).
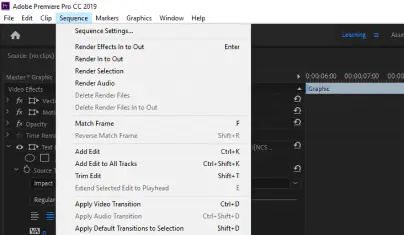
Step 5. Render your video
Finally, render your video to see the final result. Go to Sequence in the top menu and then click Render Effects In to Out. This will render all effects in your sequence, including Warp Stabilizer.
Remember, it might not work well with clips that have a lot of motion or if the background changes significantly throughout the clip. Review your footage carefully after applying the Warp Stabilizer effect and adjust the settings as necessary to get the best result.
Best Warp Stabilizer settings
Key settings to focus on include:
Stabilization
Smoothness
Borders
Crop less/smooth more
Detailed analysis
Rolling shutter ripple
Here are the most important settings to create the best results:
Stabilization
These settings allow you to adjust the stabilization process before rendering to create a better end-result. It includes four ‘methods’ which can dramatically alter the way clip looks in the end. They are:
Subspace warp: this is the default setting in the effect. It works to warp parts of the frame for stabilization. However, this method can cause unwanted warping, so you may need to use one of the simpler edits below.
Perspective: this method corner-pins a frame to stabilize it, and is the default from Subspace if there are not enough areas to track. However, this method can cause unwanted keystoning. If that’s the case, move down this list.
Position, scale, and rotation: the stabilizer bases everything on position, scale, and rotation data.
Position: last, this method based on position data only. It’s the most basic way to stabilize footage.
Smoothness
Smoothness settings are under the Stabilization options and govern the fluidity of the stabilized motion in a clip. It has two general settings and one to tweak the original motion of the shot.
Smooth motion: this is the default setting that attempts to smooth out the original camera movements based on the Smoothness setting.
No motion: this general function causes the program to remove all motion from a shot – in theory. When you choose this setting, you’ll auto-disable the Crop Less/Smooth More advanced option – see below. Only use this setting if your target object stays in the frame for the entire duration of the clip.
Smoothness: this allows you to adjust how much of the camera’s original motion to stabilize. On the low end, the effect will try to stay with the original motion of the shot. You can turn it up, but remember, values over 100 require image cropping.
Borders
These settings tweak how the effect stabilizes the moving edges of a frame. There are four framing settings under this effect:
Stabilize Only
Stabilize, Crop
Stabilize, Drop, Auto-scale (default)
Stabilize, Synthesize Edges
Ultimately, you may need to play with all the framing settings to prevent black borders on your clip. But if there isn’t too much data to generate ‘Stabilize, Synthesize Edges’ typically works well. It causes the program to generate new edges for your footage from existing pixels.
However, you’ll need to render before viewing the complete edit. And you may need to adjust the Smoothness settings to get it just right. 5% is usually enough to balance everything out.
Crop less/smooth more
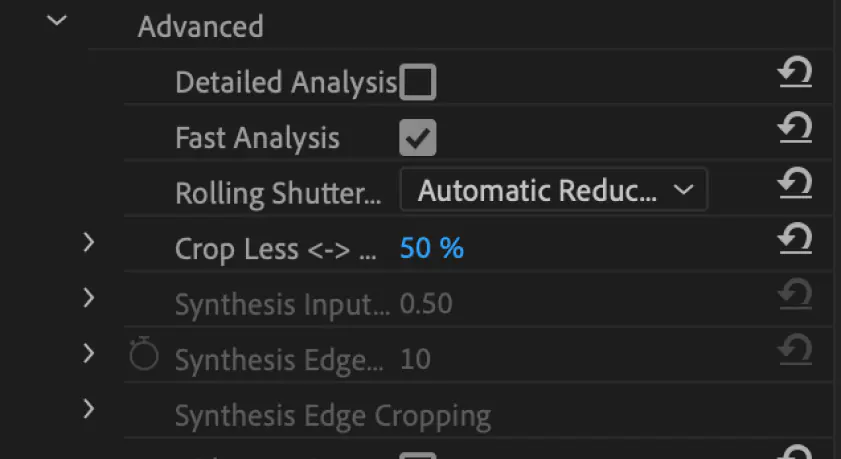
Crop less/smooth more adjusts the extent to which the effect will crop or scale your footage. This works to prevent the appearance of black borders or gaps because of stabilization. If you have a low value here, it will smooth the image, but you’ll see more of it. The best way to test this feature is to start at 50% and work your way down by increments of 10.
Detailed analysis
The detailed analysis setting controls the degree to which the effect will examine the motion of each pixel in your footage. This is useful for clips with rapid or intricate motion, or those with low contrast or noise. Try out different values to identify the optimal balance for your specific clip.
Rolling shutter ripple
With this effect, the stabilizer will remove the ripples that occur within stabilized rolling shutter footage. The default setting is Automatic Reduction, but the Enhanced Reduction setting is particularly useful for anyone using a DSLR camera. Even if you don’t, it’s worth a shot! However, you can only use this setting under the Perspective or Subspace Warp Methods.
Tips on using the Premiere® Pro Warp Stabilizer
The order in which you apply effects will affect the final render
Whether you’re in Premiere® Pro or After Effects®, be sure to always use Warp Stabilizer to get your clip where you want it before adding more effects. For example, certain color effects will require reanalysis if you apply the effect afterwards, so always use it first.
Leverage the advanced options
Don’t stop at the basic settings before rendering your clip. Settings like Crop Less/Smooth More and Detailed Analysis enable you to perfect the motion and generate a professional-grade effect. However, this can also take up some extra time and increase the size of the project file.
You can use Warp Stabilizer in Proxy Workflow
By default, Premiere® Pro displays a full-resolution file. To lower the size of your project, you can use Warp Stabilizer in the Proxy Workflow mode.
Best Warp Stabilizer plugins
ReelSteady
ReelSteady comes with advanced technical tools that allow for meticulous data tracking. This ensures the best possible stabilization for your footage. The tools are technical, but the plugin interface is simple, making it suitable for users of all experience levels – as long as you’re willing to pay the $399 price tag.
Mercalli V6
Apart from ReelSteady, Mercalli V6, developed by the Germany-based company ProDad, is another reliable stabilization option. It has powerful tools for achieving the stabilization you need, but at a lower cost. And it works with both After Effects® and Premiere® Pro, so you don’t have to transfer clips.
Vakago Batch Stabilization
Although Warp Stabilizer renders excellent results, it requires analysis of your clip. If you try to do this with multiple clips, it can cause Premiere® Pro to crash. If you want to stabilize multiple videos in the background or overnight, the Batch Analysis Plugin fulfills this need.
Summary
And with that, you have everything you need to fix a shaky video with the Warp Stabilizer effect on Adobe® Premiere® Pro. Bookmark this page to refer to our best settings to render the best stabilized clip possible.
Movavi Video Editor
*The free version of Movavi Video Editor may have the following restrictions depending on the build: watermark on exported clips, 60-second video or 1/2 audio length limit, and/or some advanced features unavailable when exporting videos.

The Warp Stabilizer effect gives editors the ability to fix shaky footage from a handheld device or one without a solid stabilizer built in. The original effect is a product of Adobe, but other popular video editors now offer similar features.
Most reviewers say it works well, but it’s not a magic tool for every situation. If your footage is very shaky or the background changes, it can produce strange results. But there are solid alternatives available, like Movavi Video Editor.
Warp Stabilizer in After Effects® often yields slightly more precise results than Premiere®. However, After Effects® also allows you to stabilize footage manually using keyframes and motion tracking. This requires a higher level of skill but renders better looking clips.
In the Premiere® Pro interface, click the Effects bin on the bottom left of your screen – located inside Edit Workspace. In the search bar, type Stabilizer and you will see it appear under Video Effects > Distort.
To stabilize without Warp Stabilizer, you can use the old Stabilize Motion feature in After Effects®. Here’s now to do it:
Go to the Tracker Panel and via the Window menu.
Click the Stabilize Motion option.
In the tracker box, choose a spot to start tracking.
Click the Play button in the tracker panel.
When you’re satisfied with the data, click Edit Target and then Apply.
Sourced from Adobe’s Support Community:
To fix this issue, simply right-click on the clip and Nest it. Then add the Warp Stabilizer effect. This allows the system to get the appropriate dimension for render.
Popular
Best professional video editing software
Best HD video editing software
Zoom Webinars vs. Meeting: Which Is the Best for Effective Virtual Events? [Detailed Comparison]
Top 10 Free Video Cropping Software to Crop Video in 2025
How to Add Special Effects in iMovie: Guide
Top 9 Video Editors for Chromebook | Our Choice
Top 11 Free YouTube Intro Makers | Create YouTube Intro Online
Top 17 Best Gaming Intro Makers in 2025 | [Free and Paid]
Instagram Story Dimensions | Instagram Story Size
How to stabilize a shaky video
Best video stabilization software
What Is Video Bitrate? Everything You Need to Know

Have questions?
Join us for discounts, editing tips, and content ideas


1.5M+ users already subscribed to our newsletter