
Step 1. Install Movavi Video Editor
Download and follow the instructions to install Movavi Video Editor. Then, open the program to get started.

How to Make a Music Video
Use Movavi Video Editor to edit your next music video!
Stunning effects from professional designers
Intuitive, easy-to-use interface
Super speeds for processing and rendering
Every musician dreams of being famous: people noticing the face in the crowd, songs playing in bars and coffee shops, music videos shown on TV. How can one achieve this? Nowadays, the Internet provides outstanding opportunities for everyone to get noticed.
The four steps to make a music video
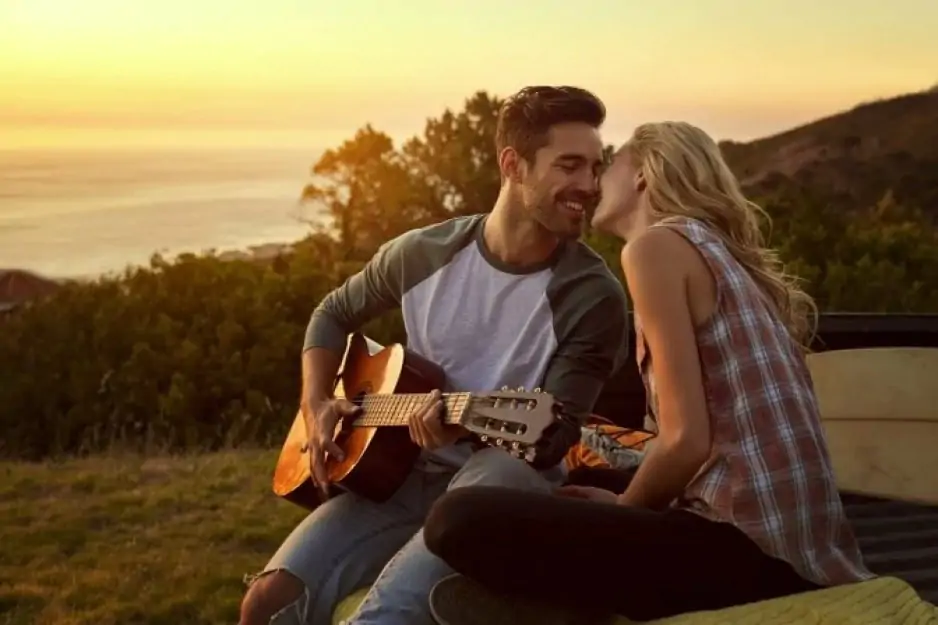
One of the first things that come to mind is to make a music video and upload it on YouTube. This is a great way to promote yourself as an artist, as proven by Justin Bieber, Pentatonix, and Ed Sheeran. Just get yourself a good camera and be ready to get famous.
Making a music video from scratch sounds too difficult? Don’t worry, Movavi’s got you covered! Here’s your step-by-step guide on how to shoot a music video.
1. Come up with a concept

What’s the use in filming when you have no inspiration and no idea what to start with? First, you need to decide what you’re going to show the viewers on YouTube. Is it some kind of a story? Then what’s the plot? Or your idea is to record yourself singing the song? Everything’s up to you.
2. Make a plan

What do you need to film your music video? There are four aspects to consider: the storyboard, the team, the equipment, and the place.
If you decide to make a complicated video with different scenes or even a plot, don’t forget to write the script. One of the methods for this is creating a set of storyboards. A storyboard is a visual map of your video. It has all the shots you need for the future montage. Make up a detailed picture of the entire music video and bring it on paper. Here’s an example of a storyboard for you to take inspiration from.
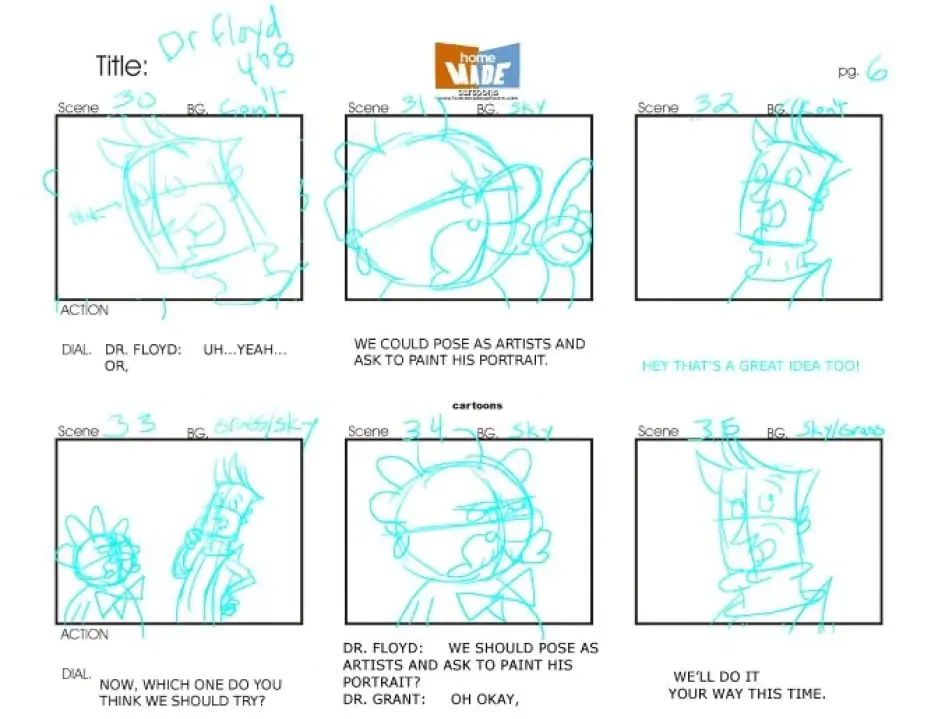
Image source: Wikipedia
Now let’s discuss the team. Of course, if you haven’t planned anything big, just footage of you singing, you may not need a team. However, if your idea is to tell a story with several characters, you’ll need at least a camera person and one or more actors. Depending on the budget and/or how many friends are ready to help you, your team may grow. It may include a lighting person, a director, a makeup artist – or any other person you need to turn your concept into a video.
Think about the equipment you might need to record a video. It’s great if you have everything necessary, but if you lack something – decide whether you are going to buy it, or maybe you can borrow it from your friends.
Talking about the place, choose the one which fits your idea. You may film at home, or ask your friend for permission to do this at their house. If you choose a public place, make sure that the owners or the managers don’t mind. If there’s a lot of people around (for example, if you’re filming on the street), make it obvious that you’re making a video. This will help the people who don’t want to be on the record get past the filming zone. This is especially important if the scene you’re filming is provocative (for example, a fight). If people are not aware that it’s staged, they may interfere (in case of a fight – try to calm the fighters down or call the police). So, consider inviting a couple more people to your team to explain to the passers-by that everything’s alright.
3. Record the video
Gather your team, take your equipment, go to the place of filming. Lights, camera, action! Follow your storyboard as a checklist and make sure that you film every scene from it. Here are a few tricks of the trade you may find useful:
Don’t limit the filming time to the video length you need according to the storyboard. Even though you may need only 10 seconds, it is worth filming longer sections and recording several trials. Who knows, which shot will look the best during the editing?
If you’re not happy with a shot you’ve made, don’t hesitate to re-take it. Sometimes one sloppy shot may ruin the whole impression.
Things don’t always go according to plan. Some shots keep failing, others may be taken by accident, but they fit the atmosphere and the plot. Don’t restrict yourself to just the storyboard. Think on the fly! If you feel that you need something else, that’s not listed in the plan – try this out. You can always cut the excess while editing.
4. Edit the footage and upload it to YouTube

With your footage in-hand, it’s time to get creative. Here’s how you can edit your music video and give it that professional feel using Movavi Video Editor.
Step 1. Install Movavi Video Editor
Download and follow the instructions to install Movavi Video Editor. Then, open the program to get started.
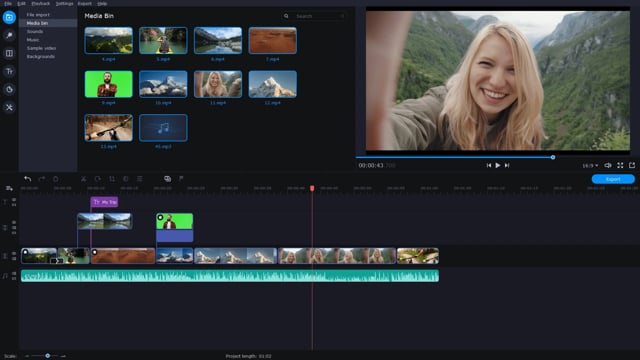
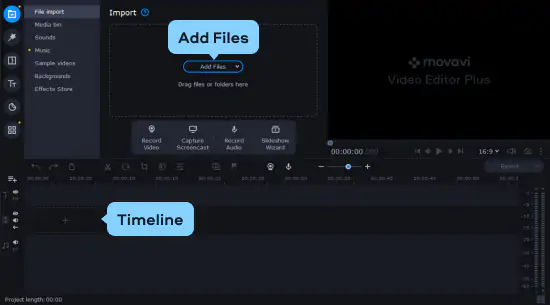
Step 2. Upload your video files
Click Add files and then import the videos you’d like to edit into your music video. Your video files will appear in the Media Bin. And from there, you can drag and drop your files into the Timeline for editing.
When uploading your files, it’s important to stay organized, as it will save you time and help in presenting your vision for the music video. Professional editors often organize their clips by shot types, a story timeline, or by the type of take.
Movavi Video Editor makes it easy to label and group your videos in your media bin. Be sure to take the time to go through the organization process, so you can find clips quickly and with ease.
Step 3. Edit your music video
There is no set method for editing a music video, and there are many ways in which you can put everything together. The overview below is the most common format professional editors use to arrange a music video, followed by some insights on the tools you can use to bring your music video creation to life.
Format
Music videos generally have three elements that make them complete:
The performance
A story or visual elements
Edits to the rhythm or beat of the song
Professional editors often start by cutting together all the performance shots of the musicians to ensure that it’s the key focus of the video. Afterwards, you can trim and chop the performance and insert a storyline or visual elements to complete the video.
And last, when editing, be sure to use the rhythm or beats in the music to motivate your cuts instead of just moving to another shot arbitrarily. It will help to enhance the music video and the music piece itself.
Editing tools for music videos
With Movavi Video Editor, you can use these tools and more to complete the music video format above.
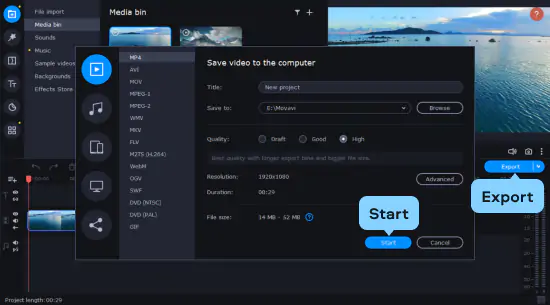
Step 4. Export your music video
With your music video edited, it’s time to export. Click the Export button, and from there, you can choose the video format that suits your needs.
MP4 with an H.264 codec is the most popular format as it makes it easy to upload on mobile devices and social media. When you’ve chosen a format and resolution, click Start to save your video.
Equipment you will need to record a music video
Below, you’ll find two lists with all the equipment you need for recording your music video, whether you’re a beginner or a professional.
Disclaimer: we use affiliate links to the products mentioned on this page. When you click an affiliate link and make a purchase, we receive commissions. If you want to support our portal, you can use the links. Otherwise, you can find the recommended products using a search engine.
Starter kit
Camera
You can shoot most basic level music videos on a smartphone, like an iPhone 11.
Microphone
Shotgun microphone – Movo VXR10-PRO External Video Microphone
Lapel microphone – PoP Voice 16 Feet Omnidirectional Mic
Tripod
Lighting
Neewer 10-inch LED Ring Light Selfie Ring Light – comes with a tripod
Professional equipment
Camera
Microphone
Shotgun Microphone – Rode VideoMic Pro+ Camera-Mount Shotgun Microphone
Lapel Microphone – Sennheiser Professional ME 2 Small Omni-directional Lavalier Microphone (purchase clips separately)
Tripod
3 Legged Thing Pro Range 2.0 Winston 2.0 Kit Carbon Fiber Tripod System
Lighting
GVM 3 Pack LED Video Lighting Kits with APP Control
Stabilizer
DJI RS 3 Pro Combo - 3-Axis Gimbal Stabilizer for DSLR and Cinema Cameras

A camera and a microphone are the most necessary things you’ll need to make a music video. You may also need a lighting kit, a tripod, and a stabilizer.
Make up the idea for your video.
Plan the storyboard.
Prepare the equipment.
Choose the location.
Shoot the video.
Edit your footage.
Read our review of top cameras for music videos and choose the one you like best:
*The free version of Movavi Video Editor may have the following restrictions depending on the build: watermark on exported clips, 60-second video or 1/2 audio length limit, and/or some advanced features unavailable when exporting videos.

Popular
Top 7 slow-motion video players
Top 5 best GIF croppers
How to Cut Music: Online, Offline, and on Mobile
How to Remove Audio from a Video: Free Ways
Old Film Effect | How to Make a Video Black and White
OFFICIAL: Download iMovie for Windows Video Editor 2026
[Solved!] How to Mute TikTok: 3 Helpful Methods


1.5M+ users already subscribed to our newsletter