
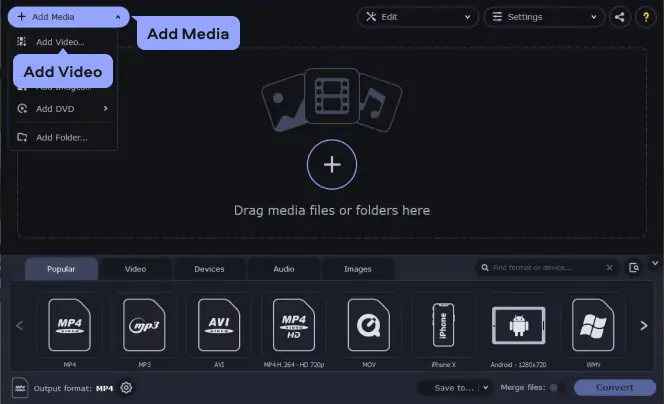
Step 1. Download and install Movavi Video Converter
Download Movavi Video Converter – a powerful and easy-to-use YouTube converter. Run the downloaded file and install the program following the on-screen instructions.
How to Convert Videos for YouTube – Your Complete Upload Guide
You can also convert your files with our powerful desktop app.
Key takeaways
When I’m preparing videos for YouTube, the first thing I look at is how fast and cleanly I can convert the source file. YouTube will happily accept MP4, MOV, AVI, MKV, and their likes, but if the file isn’t optimized before upload, you either lose quality or waste time rectifying errors. Read on to learn how to convert videos for YouTube like a pro.
How to convert a video file for YouTube with Movavi Video Converter
Movavi Video Converter has been my go-to desktop tool when I need a quick fix without diving into complex codec settings. When I first ran a batch of 10 different video files through it, including an old WMV clip and a modern MKV file, I was genuinely impressed by the speed at which they were all processed.
In fact, the conversion speed was faster than anything else I tested, and the dedicated YouTube presets meant I didn't have to guess the correct MP4 settings, resolution, or bitrate ranges; you just select the YouTube preset, and the software handles the rest behind the scenes. Meanwhile, that’s besides the fact that Movavi supports all the major file types you might throw at it, which is a major upside in my book.
I also appreciate that the team is constantly optimizing it for modern hardware. The most recent updates have focused on even tighter integration with the latest GPU acceleration technologies, which I noticed immediately when converting a 4K 60 FPS clip; it blew past other converters I tested. Likewise, the UI remains clean and easy to navigate, which is another big plus, especially for beginners who might be intimidated by more technical tools. For a hands-on guide to using the program, Movavi also provides helpful resources for users who want to make the most of the software.
If you prioritize speed over all else, like me, here is the quick process I follow to convert MP4 to YouTube upload format using Movavi Video Converter.
Step 1. Download and install Movavi Video Converter
Download Movavi Video Converter – a powerful and easy-to-use YouTube converter. Run the downloaded file and install the program following the on-screen instructions.
Step 2. Add your source video file
Once installed, launch the program and sign up if you are a first-time user. Then, proceed to the home dashboard and click the Add Media, after which you select Add Video. You can then browse and select the video file you want to convert (whether it’s a big MKV, an old WMV, or a raw camera file). I typically just drag and drop the file directly into the main window, which is quicker.
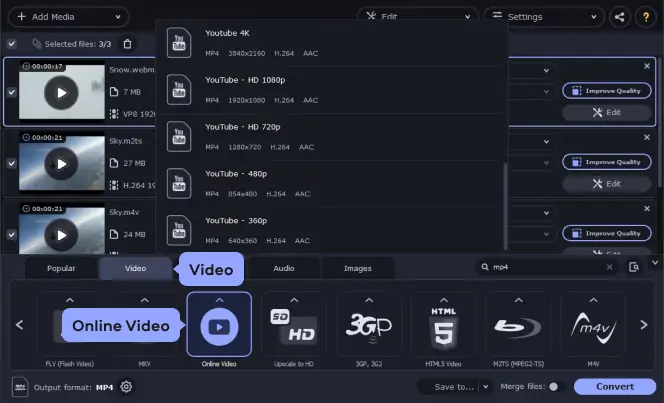
Step 3. Select a YouTube preset
This is where Movavi shines. Navigate to the Video tab at the bottom of the window. Scroll down to the Online Video category. Select the appropriate YouTube preset. This single click automatically configures your video to the optimal MP4 format, H.264 codec, and recommended resolution for YouTube. You can skip the technical settings entirely.
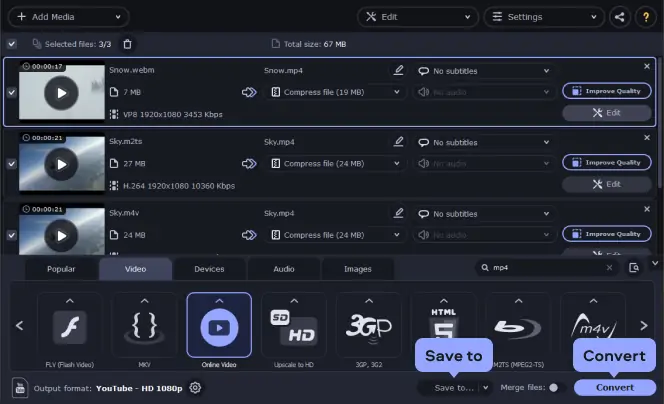
Step 4. Convert the video for YouTube
Once the preset is selected, click the Save to button to choose your output folder. Then, hit the large Convert button to convert to the YouTube format. The GPU acceleration (if your computer supports it) will kick in, and the conversion process should be completed swiftly.
Step 5. Upload the converted video to YouTube and adjust privacy
After the conversion is completed, navigate to YouTube in your browser, click the Create button (represented by a camera icon), and then select Upload Video. Afterwards, drag your newly converted MP4 file into the upload window. During this process, you will be prompted to set the title, description, and privacy settings.
As seen in the table below, choosing the correct privacy setting is essential for controlling who can watch your video. I would assume most creators create for public consumption; hence, you can always choose the Public privacy setting. However, if you still need to make edits or want to share the video with only a few people, switching to Unlisted or Private gives you that control without exposing the video to everyone.

Here’s what Movavi’s team does to provide you with verified information:
When selecting products to include in our reviews, we research both demand and popularity.
All the products covered in this article have been tested by our team.
When testing, we compare key characteristics, including supported input and output formats, quality loss when converting, and other significant features.
We study user reviews from popular review platforms and make use of this information when writing our product reviews.
We collect feedback from our users and analyze their opinions of Movavi software as well as products from other companies.
How to upload videos to YouTube
Whether you're uploading a freshly converted file from your computer or a quick edit from your phone, the process is slightly different. Here are the two different methods I use depending on the device I’m working with.
Method 1. Uploading from a computer (PC/Mac)
This is the best way to upload high-quality, large files that you’ve converted using desktop software.
Checks and visibility. After the upload completes and YouTube processes the file, review the Checks section for any copyright issues. Finally, set the video's Visibility (Public, Unlisted, or Private) and click Publish.
Method 2. Uploading from a mobile phone (Android/iOS)
This method is ideal for quick vlogs, shorts, or videos recorded directly on your mobile phone.
Before you choose a YouTube video format converter program, you’ll need to know about the settings that matter most for how to convert a video to a YouTube format. Understanding the settings below will enable you to create and convert YouTube-compatible files more easily.
Video format
YouTube supports numerous file formats, but it doesn’t support everything. You’ll first want to make sure that your video converter for YouTube upload supports the file formats that you want to use – and that those formats are supported by YouTube. Current formats include:
Video length
If you haven’t yet verified your YouTube account, you can add videos that are up to 15 minutes long. However, if you verify your account, you’ll be allowed to log into YouTube and upload up to 12 hours. The minimum length of any YouTube video – for either registered or unregistered users – is 12 seconds.
File size
When you convert a video to YouTube format, keep file size in mind. Unregistered users can upload files up to 2 GB, but registered users can upload files as large as 128 GB.
Resolution
The higher your video’s resolution, the clearer the picture will be, but the longer your video will take to load if you have limited bandwidth. The minimum recommended resolution is 426 × 240, and the recommended resolution for HD videos is 1080p (1920 × 1080).
Bitrate
Bitrate refers to how much data a video uses per second for upload and download speeds. HD videos will have higher bitrates, which are associated with clearer images and sharper sound.
Aspect ratio
YouTube’s standard aspect ratio is 16:9. If your video is set to a different aspect ratio (e.g., if you forgot to rotate your phone sideways when recording), it will appear with black bars on the sides and/or top and bottom of the frame.
Frame rate
YouTube recommends uploading videos in the same frame rate that they were recorded. Popular frame rates include 24, 25, 30, 48, 50, and 60 frames per second. Faster frame rates create smoother, clearer looking videos.
Video container
Video container is another term for the file format. YouTube recommends using MP4 as your video container but supports multiple formats.
Video codec
Your video codec encodes your video’s data stream, which means it governs how much quality loss occurs in file compression. The best video codec for YouTube is H.264.
Audio codec
Like your video codec, your audio codec governs the audio quality that may be lost due to compression. YouTube recommends AAC-LC.
Now you should have the information you need for how to convert a video file for YouTube. Whether you’re uploading a short clip or a feature-length film, use the settings in this article to ensure that your conversion settings are appropriate and your media is properly formatted to share on YouTube. And, if you haven’t chosen the right video converter and uploader software for the job yet, why not put Movavi Video Converter on your list? With a free download option, you can take it for a test drive before you buy and see if it’s the right video converter for your needs.
Frequently asked questions
You can upload a YouTube video in just a few simple steps:
Sign in to your YouTube account at the top right of the screen.
Review the YouTube community guidelines to ensure that your video is appropriate for the website.
At the top of your screen, click the Upload button. It should look like a gray up arrow.
Browse for your file or drag and drop it into the upload box.
Select the appropriate privacy setting (e.g., public, unlisted, private, etc.)
Fill in all appropriate fields for title, description, and tags.
Check the Advanced Settings tab to ensure that all settings are correct.
Hit the blue Publish button.
For more tips on uploading videos to YouTube, check out this video:
To upload an HD video to YouTube, ensure that your video is saved as a file type supported by YouTube. Once you’ve done this, simply upload the video to YouTube. In the video player, you can then select the Settings link and click on Quality. This will allow you to select between available resolutions for your video. This also allows you to upload a batch of HD videos at once, which is the fastest way to publish your videos if you have several to upload.
You can’t upload DVD files to YouTube. You can, however, import a DVD file, rip it, and turn it into a file format that YouTube supports. Be sure that you have all necessary permissions when turning a DVD file format into a YouTube video.
You can change video quality on YouTube and view HD videos at lower resolutions on YouTube by following the above steps to upload an HD video to YouTube. If your video has a lower resolution, however, you will not be able to increase its resolution on YouTube.
When converting an audio track to a video file for YouTube, import the audio file into your video converter. You can then choose a still image to display while your audio plays throughout the video. For fast and easy publishing, ensure that you export the file in a format that works for YouTube uploads.
The best way to upload from your phone is to download and open the YouTube mobile app. Tap the + button at the bottom of the screen. Select Upload a video. Choose the video on your phone that you want to upload. Follow the prompts to edit and upload your video.
While YouTube supports several file formats, MP4 is the recommended format for HD videos.
Your video may have failed to upload or transfer to YouTube for several reasons. As you work to determine why your video is failing to upload, make sure that your file format is supported by YouTube, the file size isn’t too big or too small, and that your internet connection is quick enough to support the upload.
Immediately after upload, your video may appear blurry because it is still processing. Wait about 30 minutes and try again to see if the HD version of your movie has processed properly.
How to compress video for email
How to convert AVI files
How to rip DVD video to your PC
How to convert a video to HD quality
How to convert a DVD video for the iPod
Convert MP4 to AVI free & online [fast & easy]
Convert FLAC to WAV [Free & Online] – Movavi Audio Converter
Get Movavi Video Converter Activation Key for Free
How to Change the Aspect Ratio of a Video (16:9/4:3/5:3/3:2)
Convert MP3 to AAC [Online & Free] – Movavi Audio Converter


1.5M+ users already subscribed to our newsletter