How to Compress a Video on Mac – 6 Best Methods [2026]

Edited by
Ben Jacklin
33,545

Compressing videos on your Mac is a great way to free up space and make sharing easier. If you've got big files from a recent trip or just need to send a quick screen recording, learning how to shrink them down can be a huge time-saver. It's especially helpful when you're working with really high-quality footage, like 4K videos, which can take up a lot of room on your computer. By compressing these files, you can store more videos and share them with others without it being a hassle.

Key takeaways

  • Built-in tools like QuickTime and iMovie offer basic compression without extra downloads
  • Dedicated converters like Movavi provide more control over quality and file format settings
  • Online tools work well for occasional use but have file size limitations
  • Choose your method based on compression needs: quick reduction vs. quality preservation

Understanding video compression basics

Making videos smaller is important because it helps them load faster and take up less space. To do this, we can get rid of extra information that isn't needed or lower the quality a bit, like making the picture not as sharp or using less data to show the video. The key is to find a good balance between making the file small and still having it look good enough to watch.

There are two main ways to compress files: one that reduces the quality but makes the files really small, and one that keeps the quality the same but doesn't make the files as small. For most people, the first way is what they need to use, because it makes the files a lot smaller, which is usually what they want.

  • Best for:

    Users who want precise control over compression settings and support for 180+ file formats

  • Why it was picked:

    Offers the best balance of compression quality, speed, and user-friendly interface for Mac users

Movavi Video Converter is really good at compressing videos and it's easy to use. It helps you make videos smaller, change the quality, or make the file a specific size, which is great when you need to send videos by email or store them on a device with limited space.

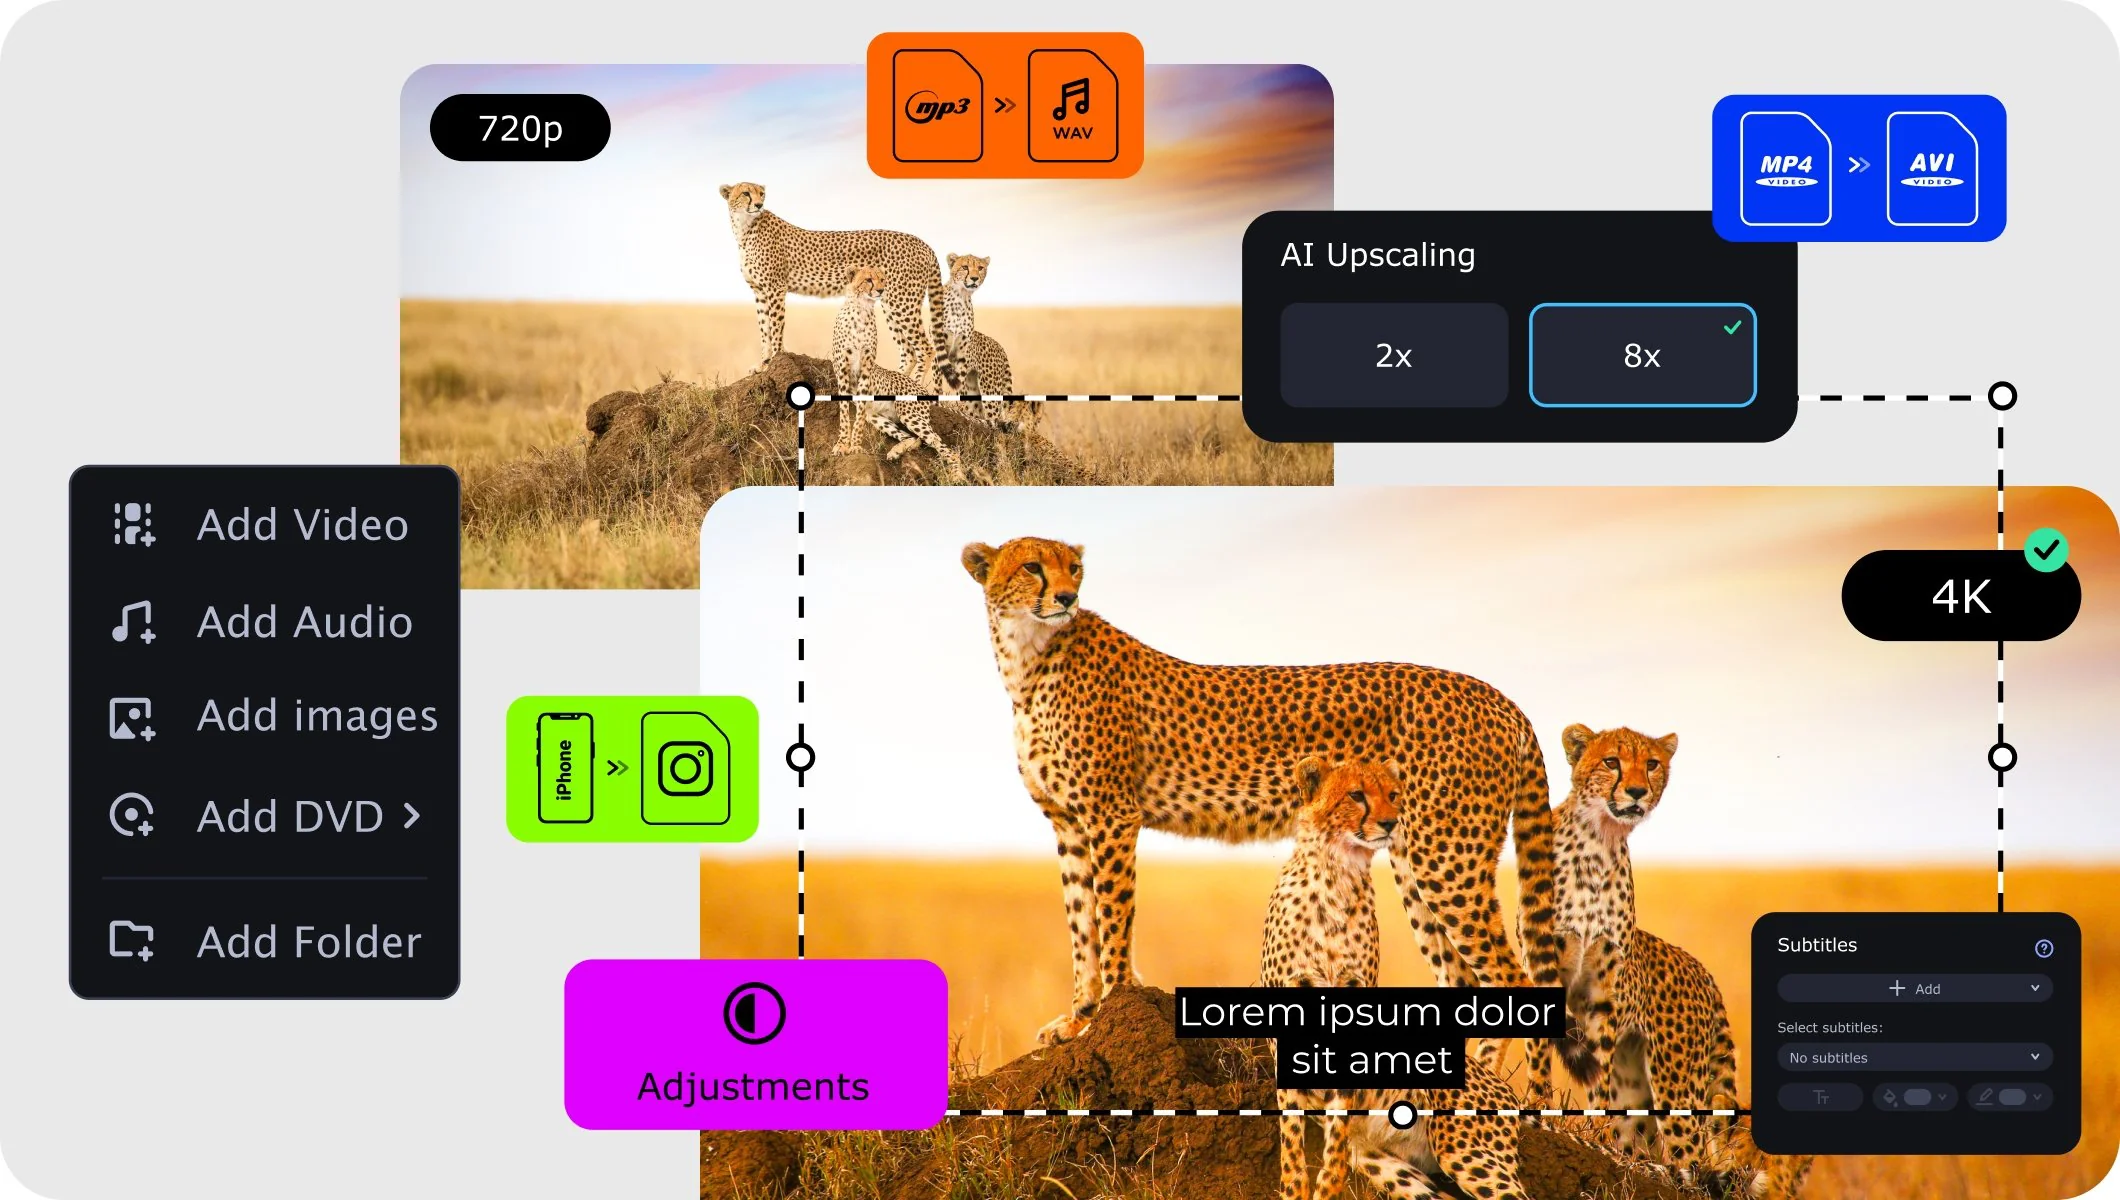
This video converter is really useful for changing video formats, like turning MOV files into MP4 files. It can even handle big jobs like squeezing 4K videos down to a size that's perfect for social media. Lots of people who use it say it's super easy to use and can handle lots of different formats, which makes it great for both newbies and pros. One of the coolest features is the smart presets – they take the hassle out of figuring out the best settings for different platforms, so you can just focus on getting your video ready to share.

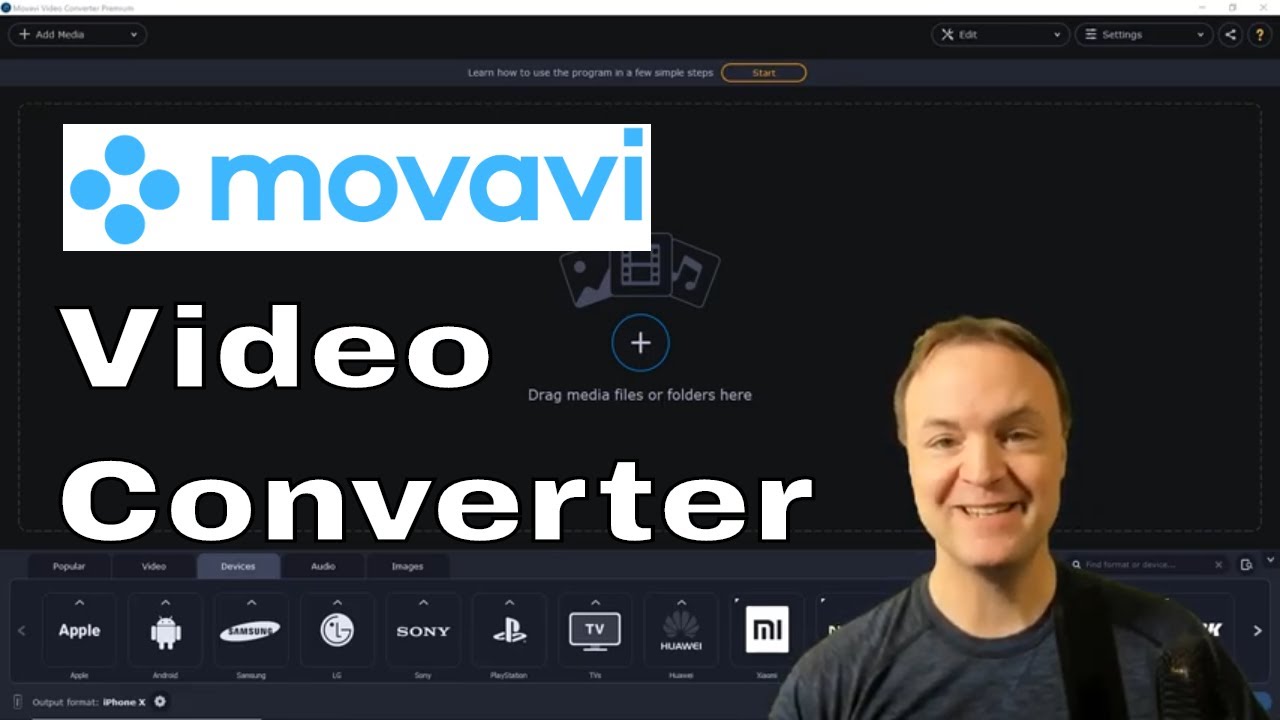
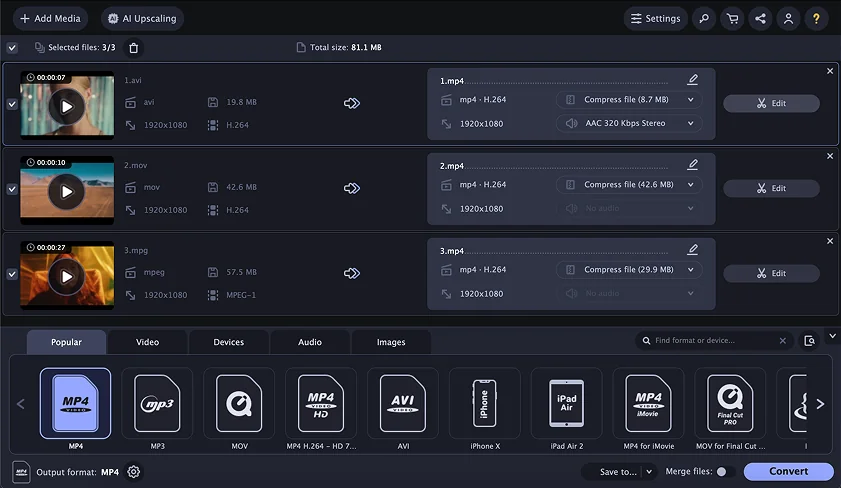
How to compress with Movavi Video Converter:

  1. Download and install Movavi Video Converter for Mac.
  2. Drag your video file into the application window.
  3. Click the Video tab and select your desired output format.
  4. Click the estimated file size to set a custom target size if needed.
  5. Hit Convert to process your compressed video.
Pros:
  • Supports over 180 video formats including MOV, MP4, AVI

  • Hardware acceleration for faster processing

  • Custom file size targeting

  • Batch conversion capability

  • Basic video editing tools included

Cons:
  • Free trial adds watermark to exported videos

  • Requires purchase for full features ($54.95/year)

What users say on Reddit:

Reddit users praise Movavi Video Converter for its ability to easily switch between video formats, highlighting the straightforward conversion capabilities. Users appreciate the intuitive drag-and-drop interface that resembles iMovie, making it accessible for both beginners and experienced editors.

What YouTubers say:

Rating

Recent updates:

The newest Movavi Video Converter update brings AI upscaling (up to 8x resolution), lightning-fast conversions, and improved lossless compression. Editing is also smoother than ever thanks to super-precise trimming tools and an integrated online subtitle search.

2. QuickTime Player – fast and simple

  • Best for:

    Quick compressions of MOV files with minimal setup

  • Why it was picked:

    Already installed on every Mac and perfect for basic compression needs

QuickTime Player offers the fastest path to reduce video file size. Since it's built into macOS, you can start compressing immediately without downloads or installations. The export options provide different quality levels that significantly impact how to compress a video on mac effectively.

While not as feature-rich as dedicated converters, QuickTime handles most common compression scenarios effectively. It's particularly good with MOV files since that's Apple's native format.

How to compress with QuickTime:

  1. Open your video in QuickTime Player.
  2. Go to File > Export As.
  3. Choose a lower resolution (1080p instead of 4K, 720p instead of 1080p).
  4. Select your export location and click Save.
Pros:
  • No installation required

  • Very simple interface

  • Fast processing for basic compressions

  • Maintains good quality at lower resolutions

Cons:
  • Limited format support (mainly MOV and MP4)

  • No custom bitrate controls

  • Basic compression options only

What users say on Reddit:

Reddit users appreciate QuickTime Player for its simplicity and reliability for basic video playback and compression tasks. Users value its integration with the Mac ecosystem and the fact that it's pre-installed. However, some users find limitations when trying to handle more complex video management tasks.

What YouTubers say:

What reviewers say:

Recent updates:

Apple continues to support QuickTime on macOS Sequoia 15, though QuickTime for Windows has been discontinued due to security vulnerabilities. Mac users can still reinstall QuickTime through system updates, and the application remains a core part of the macOS multimedia framework.

3. iMovie – feature-rich but slower

  • Best for:

    Users who want to edit while compressing and don't mind longer processing times

  • Why it was picked:

    Combines video editing with compression in one free package

iMovie gives you more control than QuickTime while remaining free. The sharing presets are designed for specific platforms, making it easy to create optimized files for YouTube, email, or mobile devices without losing quality while creating smaller file sizes.

According to PCMag's 2026 review, iMovie continues to shine thanks to its ease of use and competent audio editing, color grading, and speed-changing tools, while also supporting unique iPhone video formats like Cinematic mode and ProRes. The downside is complexity. iMovie assumes you want to edit, so the interface includes many tools you might not need for simple compression tasks.

How to compress with iMovie:

  1. Import your video into a new iMovie project.
  2. Add the clip to your timeline (editing optional).
  3. Click Share and select your preferred preset.
  4. Adjust quality settings if needed.
  5. Choose export location and click Save.
Pros:
  • Free with all Macs

  • Professional-grade compression presets

  • Can edit before compressing

  • Direct sharing to social platforms

Cons:
  • Slower processing compared to dedicated converters

  • Requires creating a project even for simple tasks

  • Interface complexity for basic compression

  • Limited format output options

What users say on Reddit:

Reddit users praise iMovie for its free availability and user-friendly interface that has long dominated the macOS space for video editing. However, users criticize iMovie's limitation to macOS only, with Windows users seeking alternatives, and some express frustration that there isn't a direct iMovie equivalent available for PC platforms.

What YouTubers say:

Rating

Recent updates:

iMovie received a minor update in 2026 after a year-long gap, focusing on performance improvements and bug fixes. Apple continues to maintain iMovie as a free entry-level video editor, though it hasn't added major new features recently, instead focusing on stability and compatibility with newer iPhone video formats.

4. VLC Media Player – open source flexibility

  • Best for:

    Tech-savvy users who want free, powerful compression with advanced codec options

  • Why it was picked:

    Completely free with professional-level compression capabilities

VLC surprises many users with its conversion abilities. Beyond playing virtually any video format, it can compress and convert files with extensive codec control. The preset profiles make it accessible, while manual settings satisfy power users who need precise video size control.

According to PCMag, VLC 3.0 added support for HDR10 and Chromecast streaming, demonstrating the software's continuous evolution beyond basic media playback to include advanced features. Processing can be slower than paid alternatives, and the interface assumes technical knowledge. But for free software, the compression quality is excellent.

How to compress with VLC:

  1. Open VLC and go to File > Convert/Stream.
  2. Add your source video file.
  3. Choose a compression preset or customize codec settings.
  4. Select output location and format.
  5. Click Start to begin conversion.
Pros:
  • Completely free and open source

  • Supports virtually all video formats

  • Advanced codec customization

  • Cross-platform compatibility

Cons:
  • Steeper learning curve

  • No file size estimation before conversion

  • Slower processing on large files

  • Interface not optimized for conversion tasks

What users say on Reddit:

Reddit users frequently highlight VLC Media Player's dual functionality as both a media player and format converter, with users noting that VLC provides great control over output settings and good presets for less experienced users. However, users note that VLC's conversion capabilities may not be as intuitive or feature-rich as dedicated conversion software, and some find the interface less polished for conversion tasks.

What YouTubers say:

Rating

Recent updates:

VLC 3.0.23 "Vetinari" was released in 2026 with over 100 security fixes, Dark Mode support, and improved codec support for formats like Opus, FLAC, and ProRes. The update also includes Windows XP support fixes and numerous stability improvements.

5. CloudConvert – browser-based convenience

  • Best for:

    Occasional compression without installing software

  • Why it was picked:

    Works on any Mac with just a browser and handles most common formats

CloudConvert processes files in the cloud, meaning your Mac's resources stay free during compression. Upload limits exist for free accounts (1 GB per file), but the service handles format conversion and compression simultaneously.

Security-conscious users should note that files temporarily exist on CloudConvert's servers, though they claim automatic deletion after processing.

How to use CloudConvert:

  1. Visit cloudconvert.com in your browser.
  2. Upload your video file.
  3. Choose output format and quality settings.
  4. Start conversion and download the result.
Pros:
  • No software installation required

  • Works on any Mac with internet

  • Handles many formats

  • Doesn't use local processing power

Cons:
  • Requires internet connection

  • 1 GB file size limit on free plan

  • Upload/download time adds to total processing

  • Privacy concerns with cloud processing

What users say on Reddit:

Users generally find CloudConvert convenient for converting small files without installing software, though some express concerns about upload limits and seek offline alternatives for larger projects.

What YouTubers say:

Rating

6. Compressor – professional Apple solution

  • Best for:

    Final Cut Pro users or professionals who need industry-standard compression

  • Why it was picked:

    Apple's professional compression tool with extensive format support and quality control

Compressor is Apple's professional-grade compression application, part of the Final Cut Pro ecosystem. It offers the most comprehensive compression options on Mac, with precise control over every encoding parameter.

According to PCMag, Apple's Creator Studio subscription now includes Compressor alongside Final Cut Pro, Logic Pro, and other professional apps for $12.99 monthly, making professional-grade compression tools more accessible to creators. The software costs $49.99 standalone and assumes professional video knowledge. For most users, it's overkill, but video professionals appreciate its power and integration with other Apple pro apps.

Pros:
  • Professional-grade compression quality

  • Extensive preset library

  • Batch processing with watch folders

  • Integration with Final Cut Pro and Motion

Cons:
  • $49.99 purchase price

  • Steep learning curve

  • Overkill for casual users

  • Requires macOS 10.15.6 or later

What users say on Reddit:

Users appreciate Compressor's professional capabilities but note its complexity and cost compared to simpler alternatives for basic video compression tasks.

What YouTubers say:

Rating

Recent updates:

Apple released Compressor 4.11.1 in November 2025 with an important security fix addressing a remote code execution vulnerability that could affect network-based server features.

Choosing the right tool for your needs

The best compression method depends on your specific situation:

  • Quick, simple compression: Use QuickTime Player for MOV files or basic needs
  • Best quality control: Choose Movavi Video Converter for versatile, user-friendly compression
  • Free with editing: Pick iMovie if you want to trim or enhance while compressing
  • Maximum format support: Go with VLC for unusual formats or advanced codec control
  • No installation: Try CloudConvert for occasional web-based compression
  • Professional workflow: Consider Compressor if you're already in the Apple pro ecosystem

For most Mac users, the sweet spot is either QuickTime for simple tasks or Movavi Video Converter when you need more control without complexity.

Movavi Video Converter

The ideal way to get your media in the format you need!

Frequently asked questions

What's the difference between MOV and MP4 for compression?

MOV files are Apple's native format and often larger, while MP4 is more compressed and widely compatible. Converting MOV to MP4 typically reduces file size by 20-30% without losing quality.

How much can I compress a video without losing quality?

You can usually make a file a lot smaller, by about half to two thirds, just by changing a few things. For example, you can lower the resolution from 4K to 1080p, or adjust the bitrate settings. But if you go too far, the quality will start to look bad, and how much it looks bad will depend on how complicated the content is.

Why do some compressed videos look pixelated?

Aggressive compression or very low bitrate settings cause pixelation. Try using a higher quality preset or increasing the target file size to maintain better visual quality.

Can I compress videos in batch on Mac?

Yes, Movavi Video Converter, VLC, and Compressor all support batch processing. iMovie and QuickTime require processing files individually.

Is it better to compress before or after editing?

Edit first, then compress. Working with high-quality source material during editing produces better results than editing already-compressed footage.

Have questions?
If you can’t find the answer to your question, please feel free to contact our Support Team.
Join us for discounts, editing tips, and content ideas

1.5M+ users already subscribed to our newsletter

By signing up, I agree to receive marketing emails from Movavi and agree to Movavi's Privacy Policy.