7 Ways to Record MP3s on a Mac [2024]

Try Movavi Screen Recorder:

  • Record your mic and system sound

  • Capture audio and video

  • Save your recordings as MP3 files

Edited by Ben Jacklin
14 000

Not sure of how to record an MP3 on your Mac? Here are seven ways to get the job done.

Recording an MP3 on a Mac isn’t a hard task. Movavi Screen Recorder is a user-friendly solution that also offers a host of additional features. With an intuitive interface, Movavi Screen Recorder makes it easy to capture sound, edit your recording, and schedule it all in one spot. Download it for free and capture your MP3 audio files now.

Key features:

  • Draw lines and arrows on screenshots and videos in real time
  • Show keystrokes and mouse movement in video guides and instructions
  • Record videos in HD and 4K
  • Record system audio and microphone sound

At Movavi, we’re committed to providing you with verified information only. Here’s what we do to ensure this:

  • When selecting products to include in our reviews, we research both demand and popularity.

  • All products mentioned in this article have been tested by Movavi Content Team.

  • When testing, we aim to highlight the best features of a product and what it’s best suited for.

  • We study user reviews from popular review platforms and make use of this information when writing our product reviews.

  • We collect feedback from our users and analyze their opinions of Movavi software as well as products from other companies.

How to record an MP3 on a Mac with Movavi Screen Recorder

Movavi Screen Recorder is a user-friendly application for Mac and Windows devices that enables you to record both video and audio from your screen with ease. It provides swift capturing, customizable parameters, simple system audio grabs, and integrated editing tools to refine your recordings. Plus, you can also record audio from multiple sources to capture the full breadth of sound.


Here’s how to record MP3 audio on a Mac using Movavi Screen Recorder:

Step 1. Download and install Movavi Screen Recorder

To begin, download Movavi Screen Recorder and follow the instructions to install it on your computer. The process takes just a few clicks.

Step 2. Configure recording parameters

Launch Movavi Screen Recorder and choose the Screen recording option from the program's sidebar.

To capture internal audio, disable the Webcam and Microphone icons, and make sure the System Audio button stays green. Although the program records the screen and audio track simultaneously, you can save the audio track independently during the finalization process. To record an MP3 on your Mac, click REC to record and turn on your audio.

Step 3. Save the file to your device

Once you've completed the recording, trim the audio and save what you need. Use the Scissors and Trash Can icons to cut and discard any superfluous audio. With that, you're prepared to save the edited track to your computer.

To store your finished audio file, click on the Export button and select MP3 in the next window to save only the audio track. Before saving, ensure you have adequate space and check the file size. Then, click Save and wait for the file to export.

How to use Voice Memo on your Mac to record MP3

Since macOS 10.14, Voice Memos has become a handy tool that syncs recordings seamlessly across the iPhone, iPad, and other Apple devices.

After recording the audio, you can effortlessly play files, and the intuitive interface allows users to navigate the app with ease. Voice Memos records audio only in MP3 format, so follow these simple steps to learn how to record an MP3 on a Mac:

  1. Open the Voice Memos app, and click the red circle to capture an MP3 recording.

  2. To pause or stop the recording, click the red Pause button.

  3. Click Done to finish and then rename the file as desired.

  4. You can also trim and replace audio in the file by clicking the Edit button at the top right.

  5. Click the Options icon to adjust playback speed and enhance your audio track.

How to start recording MP3s on your Mac with QuickTime Player

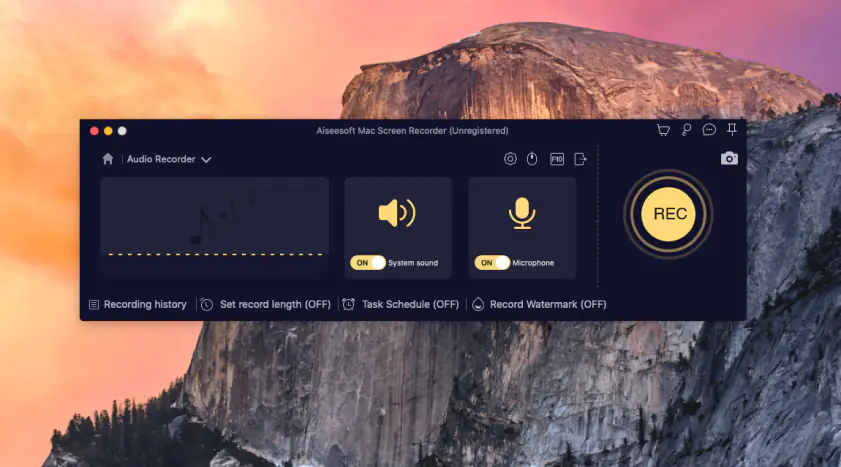
Though other programs on our list offer more functionality, QuickTime Player offers a simple solution for audio-only recording. Yes, this pre-installed Mac application is more than just a media player. It’s a recording application that allows you to create basic video and audio recordings on your Mac with ease.

You can record MP3 audio via a microphone and perform simple editing tasks, such as trimming the audio file, splitting it into clips, merging and rearranging sound clips. You can also share the file as needed.

Using your Mac to record an MP3 with QuickTime Player is easy with these straightforward steps:

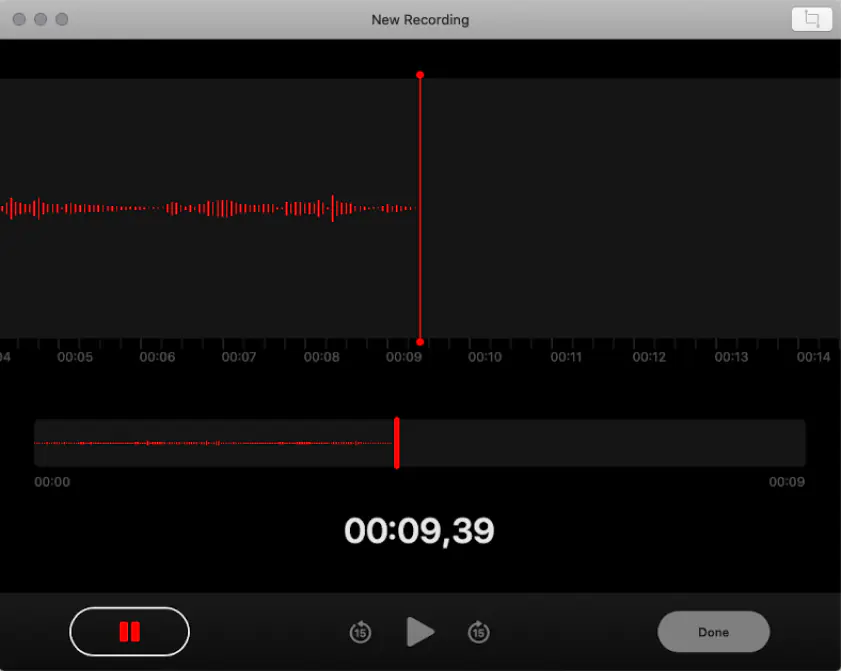
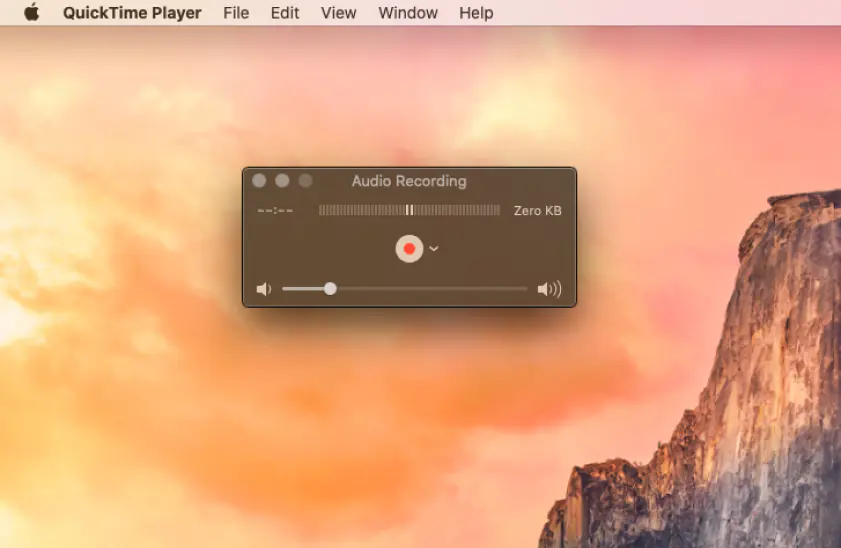
  1. Open QuickTime Player on your Mac and navigate to File > New Audio Recording at the top. You can also access QuickTime Player from the Application folder or the Launchpad.

  2. Access the Options menu by clicking the drop-down arrow. From the list, select a microphone to use and choose the desired recording quality for the MP3 audio file. Note that maximum-quality audio recordings will consume more storage space.

  3. Drag the Speaker slider to adjust the recording volume.

  4. Press the red Record button in the middle to record. QuickTime Player will capture all sounds from the selected microphone. To pause and resume the recording, option-click the Record button during the process.

  5. When finished, click the Stop square button to end the recording.

  6. In the upper-left corner, select File > Save to store the new audio recording.

QuickTime Player saves in the M4A format by default, but you can convert the audio recording into the MP3 format using the Music app.

How to record an MP3 file on a Mac with Audacity

Audacity is a popular choice among Mac users, particularly for musicians, voice-over artists, podcasters who work with multi-track audio and appreciate its advanced editing options.

The program is free and open-source. And it’s also a preferred choice for both beginners and professionals over other premium audio recorders and editors. Even with an interface that takes a little getting used to, it has millions of users who swear by its capabilities and vast resource library.

Follow these steps to learn how to record an MP3 file on a Mac with Audacity: 

  1. Install and open Audacity and navigate to the Recording Device tab.
    Download Audacity

    Click on the second option to see all recording devices connected to your Mac. Choose the source you want to use for recording. If your microphone isn't visible, ensure it's properly connected.

  2. Go to the Tracks menu option and select Add New. Choose either Stereo Track or Mono Track, depending on your needs.

  3. Now, you're ready to record audio through your microphone using Audacity. Click the Record button at the top bar. The recording will begin immediately, and you'll see an audio graph showing that your voice is being captured.

  4. Once you're finished, click the Stop button at the top bar to end the recording.

  5. Audacity has a full suite of editing tools and options from automated noise reduction all the way to pop removal. When you’re done, click the File menu at the top left, Export, and then choose Export as MP3.

  6. Name your file, adjust your output settings, and select a destination location.

  7. When you’re done, click Save.

How to record MP3 audio on a Mac with GarageBand

GarageBand is a fully equipped music creation software that serves as an exceptional recording app for a Mac, iPhone, and iPad. More than just an audio-recording app, GarageBand is a comprehensive music creation platform that enables you to record, mix, edit multiple soundtracks, and release and share your music globally.

Here’s how to record an MP3 on a Mac using GarageBand:

  1. Download and launch GarageBand.
    Download GarageBand

  2. Under New Project, select Voice

  3. Click Choose in the bottom-right corner and enter a unique name for the project. Then, choose where to save the file by clicking on the arrow next to the file name. 

  4. Click Create to get started on the project.

  5. When the project opens, select a voice. And on the right side, you can apply various effects. But to record only your voice or without effects, click No effects. To disable the metronome, click Control on the taskbar and uncheck the Metronome setting.

  6. To record an MP3 on your Mac, click the red recording button at the bottom of the screen and press this button again to stop the recording.

  7. To save your GarageBand project, go to File > Save As and choose a name and destination for the file. This will save your file as a GarageBand project only, so you’ll need to export as an MP3 file. 

  8. Select Share > Export Song to Disk to export and double-check that the file type is .mp3.

  9. Enter the unique name you chose for your recording and choose where to save the file by clicking on the arrow next to the file name. Click Create to export the file.

How to record an MP3 on a Mac with EaseUS Screen Recorder

If you're looking to capture Mac system audio without plugins like Soundflower, EaseUS Screen Recorder is the perfect solution.

This audio-recording software allows you to capture internal audio or sound from a microphone or other external devices with just a few clicks. In addition, you can adjust various parameters of your recordings, including format, bitrate, sample rate, and more. 

After completing the recording, you can trim or split the recorded audio files using the built-in editing tools. Overall, this internal audio recorder is worth a try.

Here’s how to record an MP3 on a Mac with EaseUS Screen Recorder:

  1. Install and open EaseUS Screen Recorder.
    Download EaseUS Screen Recorder

  2. Click the Audio option on the interface.

  3. Then, at the bottom left of your screen, click the Sound icon and enable System sound to record your Mac's audio.

  4. To access more audio options, click Settings. From there, you can set the output format, bitrate, sampling rate, and more.

  5. Once completed, the program saves the file in the Recordings section with the most recent audio file listed first.

How to record an MP3 on a Mac with Aiseesoft Screen Recorder

Aiseesoft Screen Recorder is an efficient tool for capturing a wide range of videos, including online videos, games, video conferences, and webcam footage. You can record in full-screen mode or set custom screen size parameters. And the lock window feature allows you to focus on recording activity in a specific window, preventing screen recordings from interfering with other tasks.

Here’s how to record an MP3 on a Mac using Aiseesoft Screen Recorder:

  1. Install and launch Screen Recorder on your computer and click on Audio Recorder to access the audio recording interface.
    Download Aiseesoft Screen Recorder

  2. Choose whether to record audio from System Sound or Microphone, depending on your needs.

  3. While recording audio from a microphone, be sure to enable Microphone noise cancellation and Microphone enhancement options to reduce video noise and amplify audio, preventing audio echo during recording.

  4. You can also use the drop-down menu next to the speaker to change the sound source for recording. 

  5. The Sound check option directs you to the audio settings.

  6. Adjust the volume slider to find the appropriate level and click the red REC button to record. 

  7. Once the recording is complete, click the Stop button, and the program will direct you to the Preview window. Click the Save button to store the audio recording on your computer.

Best ways to record MP3s on a Mac

  1. Movavi Screen Recorder – best for video and audio capture
  2. Voice Memo – best for syncing with multiple Apple devices
  3. QuickTime Player – best for users who want an all-in-one recorder and player
  4. Audacity – best for audio recording and editing
  5. GarageBand – best for users who want to make music on their Mac
  6. EaseUS Screen Recorder – best for users who like a very simple interface
  7. Aiseesoft Screen Recorder – all-in-one recording program

Summary

This article explored seven effective methods to record MP3s on your Mac. Movavi Screen Recorder is our top pick. But whether you are a professional musician, a podcaster, or simply someone looking to capture audio for personal use, any of the solutions above could meet your needs.

Program

Best for

Download

Syncing with multiple Apple devices

Free solution for Mac users

Movavi Screen Recorder

The perfect way to record anything from your screen

Disclaimer: Please be aware that Movavi Screen Recorder does not allow capture of copy-protected video and audio streams.

Frequently asked questions

How do I record an MP3 from QuickTime?

It’s simple! Open QuickTime and on the top left, select File > New Audio Recording. Click the drop-down arrow and select a microphone from the menu. Choose MP3 for your desired quality and press the Record button. Click Stop when finished and then File > Save to save your new recording.

How do I record an MP3 file?

Use the step-by-step instructions above to record MP3 files on a Mac using:

  • Movavi Screen Recorder

  • Voice Memo

  • QuickTime Player

  • Audacity

  • GarageBand

  • EaseUs Screen Recorder

  • Aiseesoft Screen Recorder

Have questions?

Have questions?

If you can’t find the answer to your question, please feel free to contact our Support Team.

Join for how-to guides, speсial offers, and app tips!