
Movavi Screen Recorder
The perfect way to record anything from your screen
Disclaimer: Please be aware that Movavi Screen Recorder does not allow capture of copy-protected video and audio streams.

How to Screenshot on an ASUS Laptop [14 Best Ways]
Try Movavi Screen Recorder to screenshot your laptop.
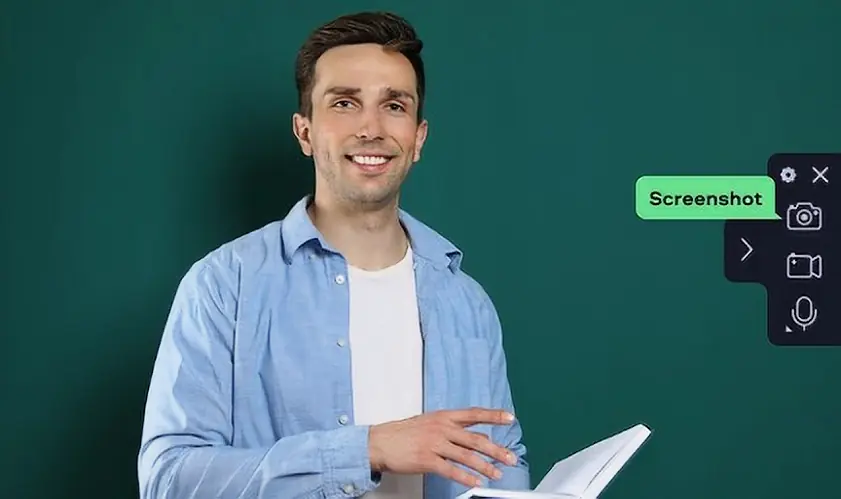
Create screenshots in one click
Capture the off-screen content with scrolling screenshots
Draw on screenshots and edit them
Share the captured images to the cloud or a messenger
In this guide, we'll look at various methods you can use to capture a screenshot on a laptop from ASUS and answer the question of how to screenshot on an ASUS laptop.
Disclaimer
The apps with #CommissionsEarned in the description have affiliate links. When you click an affiliate link and make a purchase, we receive commissions. If you want to support our portal, you can use the links. Otherwise, you can find the recommended products using a search engine.
Special pick: Movavi Screen Recorder

Our special pick from the table above is Movavi Screen Recorder. With this program, you can easily take screenshots of your laptop including scrolling screenshots, edit them and share your pictures. Besides screenshots, you can also record your screen. Overall, Movavi Screen Recorder is a versatile screen recording tool that will help you capture any screen activities.

When selecting products to include in our reviews, we research both demand and popularity.
All products mentioned in this article have been tested by Movavi Content Team.
When testing, we aim to highlight the best features of a product and what it’s best suited for.
We study user reviews from popular review platforms and make use of this information when writing our product reviews.
We collect feedback from our users and analyze their opinions of Movavi software as well as products from other companies.
Best for: Users who want to quickly take screenshots for free
If you're wondering how to screenshot on an ASUS laptop without downloading any programs or installing any extra tools, there are actually several simple keyboard combinations you can use. This is one of the easiest methods of how to take a screenshot on an ASUS laptop. You don't need to download anything and you can simply use your keyboard to capture whatever is on your screen at the time. Here are three different keyboard-only methods to try.
Using only the PrtSc button
Press the PrtScr key on your keyboard. This will create a snapshot of your screen and save it to your clipboard.
You can then open another program like an image editing tool and use Ctrl + V or right-click and press Paste to paste the screenshot. Remember to not copy anything else in between as this will replace the ASUS screenshot on your clipboard.
Using Windows + PrtSc buttons
Press the Windows key and the PrtSc key at the same time.
This will automatically save a screenshot to your device, as well as store it on the clipboard. You can then paste it into another program or simply find the saved ASUS laptop screenshot in your Screenshots folder.
Using Alt + PrtSc buttons
The last method of how to screenshot on an ASUS laptop using the keyboard is to press Alt + PrtSc together. This method will capture your currently active window, rather than the whole screen, and save it to the clipboard.
Open another program and paste your image from the clipboard to edit or save it.
How to screenshot on a laptop with Snipping Tool
Best for: Users who want a built-in screenshot solution
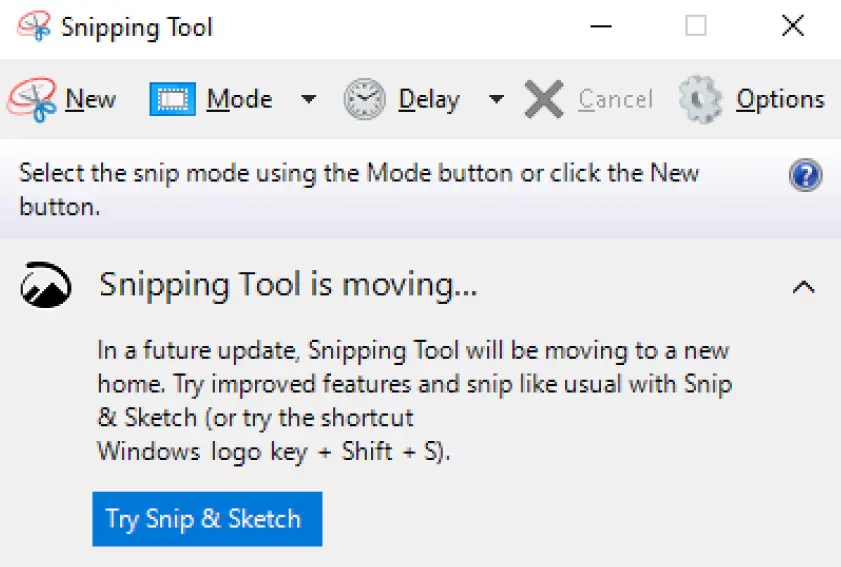
Another way for taking a screenshot on devices like a Vivobook or Zenbook without the PrintScreen button is to use Snipping Tool.
To find Snipping Tool, click the Windows key and type Snip into the search box.
Snipping Tool should appear in your search results. Click on it to open it.
Prepare whatever you want to capture in your screenshot and use the drop-down Mode menu to select which capture mode you want to use.
When you're ready to take a screenshot, click the New button in the top left of the Snipping Tool window. You can then click and drag a box around the area you wish to capture. Once you release the mouse button, the screenshot will be captured and should pop up in a new window.
You can then use the Snipping Tool’s built-in editing features like a highlighter to annotate your image or simply click on the Save button to save your screenshot wherever you want on your device, like on the desktop or in your Pictures folder.
Best for: Users who want an easy way to take editable screenshots
PCMag rating: 3 out of 5
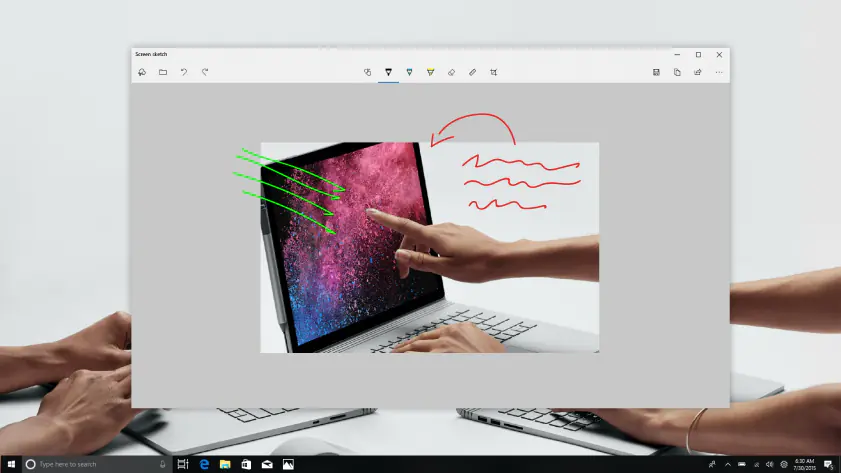
If you’re wondering “how do you get a screenshot on my ROG, Zephyrus, Chromebook, or other devices?”, Windows Snip and Sketch is another method you can use.
To find this tool, go to the search bar and type Snip.
You should see Snip & Sketch appear in the list of search results, so click to open it. Then, choose a mode: you can pick from Window Snip, Fullscreen Snip, Rectangular Snip, or Freeform.
Click on New to take your screenshot in the chosen mode and it will then appear in the Snip & Sketch window. You can use the various functions to either copy, share, save, or edit your screenshot. If you want to edit it, click the Pencil or Pen icons to add text or click on Crop to change the size.
Once you're done, click Save to save your new image anywhere on your Windows 7, Windows 8, or Windows 10 laptop or PC.
How to take a screenshot with Action! - screen and game recorder
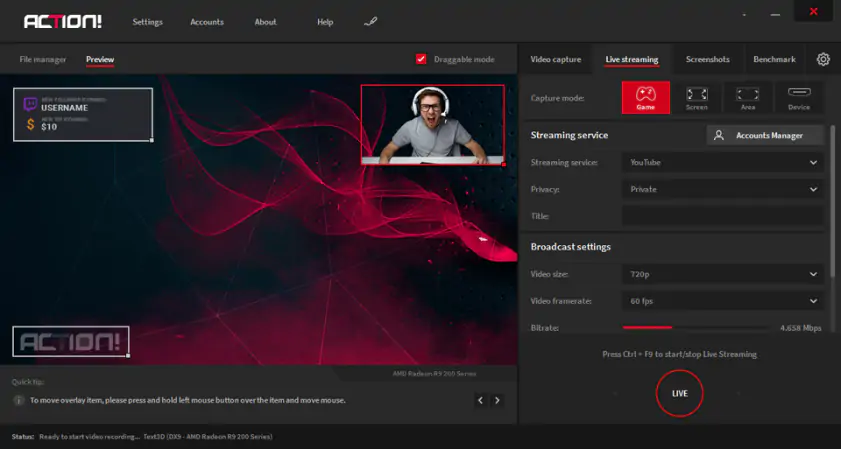
Best for: Users who want to screenshot and screencast with just one program
G2 rating: 4.8 out of 5, 12 reviews
Although screenshotting isn’t the main feature of this program, Action! - screen and game recorder can capture a screen in different modes, and save the screenshots in BMP, PNG, and JPEG.
Download and install the program, then launch it.
Download Action! - screen and game recorder
Go to the Capture Screenshots tab and select the desired capture mode. Then select the output format from the File format list.
Click the Capture Screenshots button in the bottom right corner of the program window.
How to take a screenshot with Aiseesoft Screen Recorder
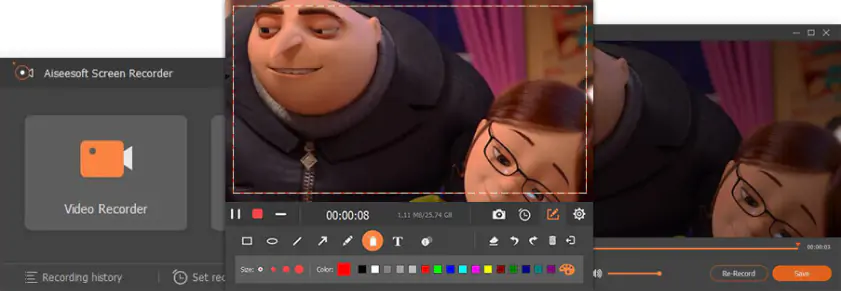
Best for: Users who want a snipping tool with intuitive editing
G2 rating: 4.5 out of 5 stars. 2 reviews
Aiseesoft Screen Recorder works to capture online videos, games, webinars, lectures, Skype calls, videoconferences, and webcam videos. You can record in full screen or set customized screen size parameters. Aiseesoft also has everything you might need to take a screenshot: different capture modes, a selection of output formats and an ease of use.
Download and install the program, then launch it.
Download Aiseesoft Screen Recorder
Click Video Recorder. In the upper right corner of the program window, press the Screen Capture icon.
Drag the frame over the area you want to screenshot. Use the tools from the toolbar to edit and draw on the screenshot. Finally, click the Save icon to choose the output folder and image format.
Best for: Users who want a fully-functional screenshot taker and screen recorder
G2 rating: 4.5 out of 5, 50 reviews
Movavi Screen Recorder is another tool to use when you want to know how to screenshot on an ASUS laptop.
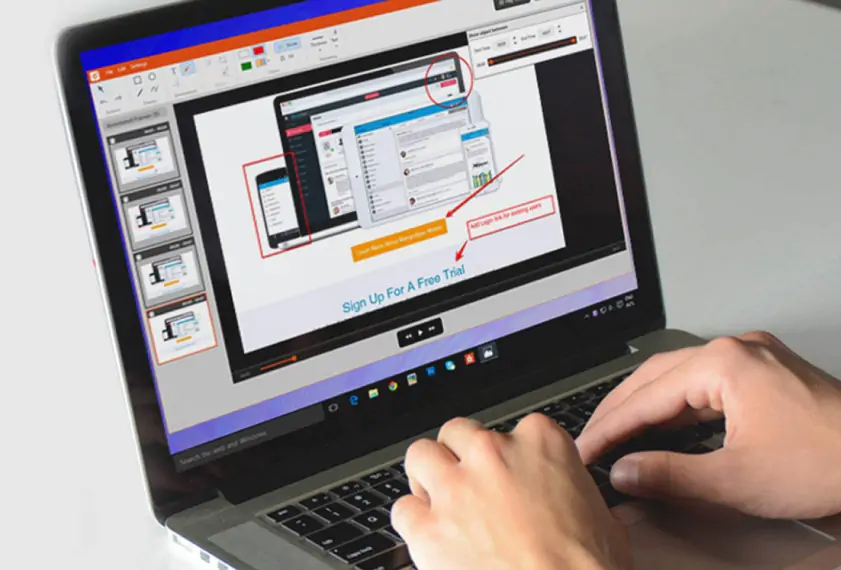
1. Download the Windows version to your device. Follow the on-screen installation instructions to get Movavi Screen Recorder installed and ready to use.
2. Before you actually take your screenshot, you need to prepare it. Get whatever content or windows you want to capture ready on your screen and then open Movavi Screen Recorder.
3. With Movavi Screen Recorder running, click on the Screenshot button from the sidebar. This looks like a camera icon and it will allow you to either take a screenshot of the whole screen or a cropped screenshot of a smaller section of the screen by cutting away the sides. On the panel below the capture frame, you can click the Scrolling screenshot button, copy the screenshot to the clipboard, or save it as an image file.
4. Movavi Screen Recorder features its own built-in editing tools that let you adjust and annotate your screenshot in various ways. You can click on the various sidebar icons, like the arrow, line, highlighter, and so on to make edits and adjust your image before saving it. The program will save screenshots on your gaming laptop, SonicMaster, or another laptop by default in PNG format.
Best for: Users who want to take multiple screenshots quickly
Use the instructions below to learn how to screenshot on an ASUS laptop by clicking your mouse, and how to set this tool up before you start.
To begin, press the Windows key and type Steps Recorder into the search bar. You can also just type the first few letters and watch the screen to see if the Steps Recorder tool appears in the list.
Open the Steps Recorder tool and click on Start Record in the window that appears. This begins a recording process in which you can click your mouse to take screenshots. Every time you click the mouse, a new screenshot will be taken and stored, so you can click between different windows or at different moments while a video or piece of content is playing to take lots of shots.
When you've finished taking screenshots with your mouse cursor, click on the Stop Record button. Once you do this, a window will appear to show you all of the screenshots you've taken during the session. You can then click on Save to save the screenshots to your device.
Best for: Users who want to share screenshots with friends and family
G2 rating: 4.7 out of 5, 109 reviews
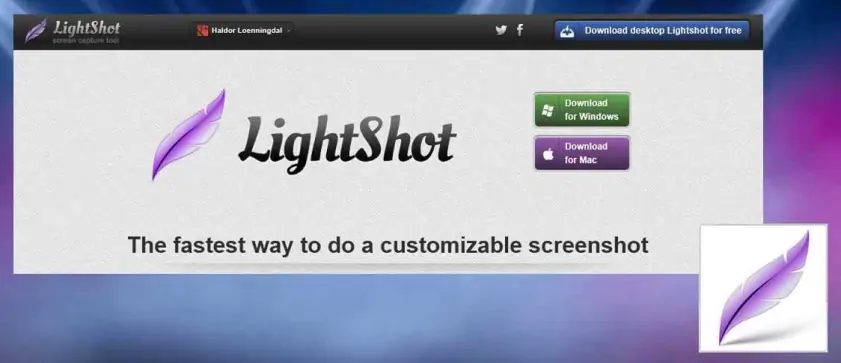
You can use the Lightshot app to take screenshots of your laptop. This app is useful for taking multiple screenshots and editing them, as well as sharing them online. Here’s how to take a screenshot on an ASUS laptop:
To get started with it, you'll need to download it and install it. Head to the official Lightshot site to find a download link and follow the on-screen instructions to set it up on your device.
Next, before you actually use Lightshot to take a screenshot on your laptop, you'll need to prepare the content you want to capture. Open the window or program or piece of content you want to screenshot.
Go to the Hidden Icons area of your taskbar. This is in the bottom right of your screen, beside the time, date, and other icons. You should see a little arrow pointing upwards. Click on it and then click on the Lightshot icon. Then drag the cursor to choose your screenshot capture area.
Lightshot comes with a range of tools you can use to edit your image. You may use these tools to adjust the screenshot you just captured, and you can also use the Share tools to share your screenshot on popular sites and social media platforms.
Best for: Users who want a free and open-source screen capture tool
TechRadar rating: 4.5 out of 5
ShareX is another program you can use to capture screenshots on your device. This is a free and open-source tool that makes it easy to capture, edit, and share screenshots on the Windows platform. Here’s how to screenshot on an ASUS computer with ShareX:
To get started with it, the first step is to download and install it. You can find ShareX on the official ShareX website. Simply click the Download button on the main page, run the .exe file and follow the on-screen instructions to get it set up.
Once ShareX is installed on your device, you can open the program and configure it to your liking. It comes with lots of options and settings for users to play around with. To do this, go to the Task Settings menu on the left sidebar and then head to the Capture menu. Here, you can edit various aspects of your captures, such as hiding the mouse cursor, playing a sound for each capture, and so on. You can also use the Application Settings menu to choose a destination folder for your screenshots to be saved. You can even set up hotkey combinations that allow you to use ShareX even more quickly.
Once you've adjusted the settings of ShareX to your liking, find and prepare the content you want to capture. You can then open ShareX and click on Capture and then choose your capture method to screenshot the window, the whole screen, or a specific area. You can also use the hotkeys you configured in the previous step. Your screenshot will be automatically saved in the destination folder specified.
Best for: Users who want a screenshot taker and video recorder in one
TechRadar rating: 4.5 out of 5
TinyTake is another free screen capture software that also functions as a video recorder, capable of capturing both still images and long recordings of your screen on laptops and other devices.
To start using it, head to the TinyTake official site and click on Download Now. You can then follow the on-screen guide to get the program set up on your device.
As with other screenshot methods, it's important to prepare the content of your screenshot before you take it. Open the relevant windows or programs you want to capture.
TinyTake runs in the background of your device and can be accessed from the Hidden Icons area of the system tray. This is found by clicking on the small upward-pointing arrow in the bottom right corner of your screen, near the time and date. Find the TinyTake icon, right-click on it, and then choose a capture mode: you can pick from Capture Region, Capture Window, or Capture Full Screen. You can also open the TinyTake app window and click the green Capture button to take screenshots, too.
Open the TinyTake window and head to the images gallery. This will show all of the screenshots you've taken with TinyTake as thumbnails. Click on a thumbnail to see your screenshots and use the built-in editing tools, if needed, to edit them before saving.
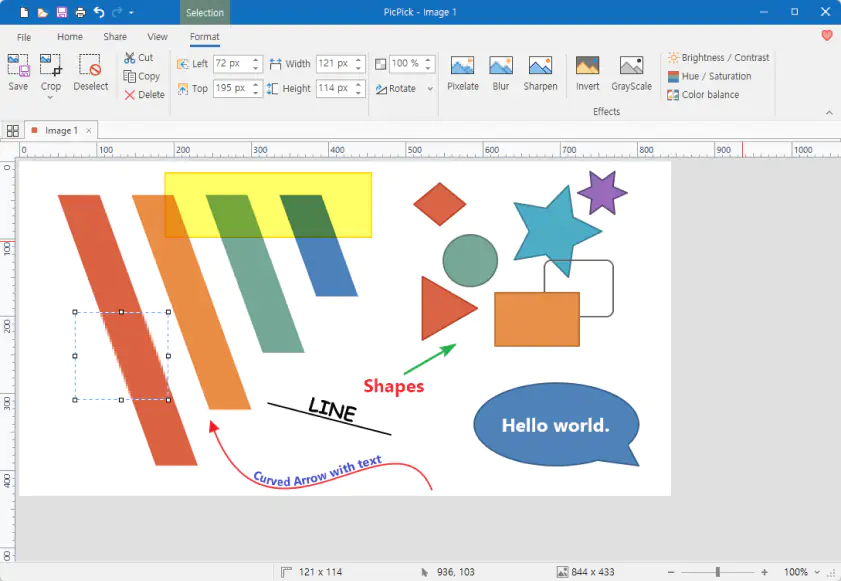
Best for: Users who want a screenshot tool for graphic design
CNET rating: 3.5 out of 5, 137 reviews
PicPick is an all-in-one graphic design tool that supports screen capture, image editing, color picking, and other features.
To get started with this program, head to the official PicPick site and click on the Download button on the home page. You can then launch the .exe file and follow the instructions on-screen to set up PicPick on your device.
Once PicPick is installed, it will automatically open and you can use the different settings tabs to set up the app as you like. Use the Capture tab to adjust capture settings and set the destination folder for your screenshots, for example, and use the Images tab to adjust the quality of your screenshots.
Once the app is configured and you're ready to capture something, prepare it on your device and then click on the PicPick icon from your system tray (it may be in the Hidden Icons area in the bottom right) and press the Capture button to take a screenshot. You can also use PicPick's hotkeys if you set them up earlier during the configuration step. You may then use PicPick's editing tools if needed or simply save your screenshot.
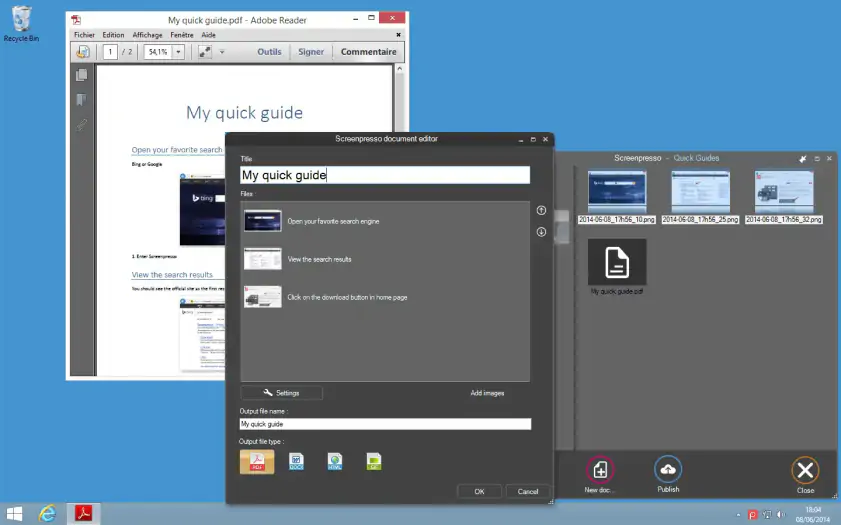
Best for: Users looking for a lightweight screen recorder
G2 rating: 4.5 out of 5, 27 reviews
The last program on our list is Screenpresso. This is another app you can use to take a variety of screenshots, including scrolling screenshots, of your device.
First, you'll need to get the app installed. Head to the official Screenpresso website and click on the Download button to download the necessary files. Follow the on-screen instructions to set up the app.
Prepare whatever you want to capture in your screenshot and then press the Print Screen key on your keyboard or the Capture button via the Screenpresso window to start capturing. You'll then be able to choose from different capture methods like window capture or fullscreen capture, as well as scrolling captures.
Screenpresso automatically saves your screenshots and you can easily access them by opening the Screenpresso window. You can then use the built-in tools to make any edits before saving your files to your device.
How to choose the best screenshot app
We hope that this guide has given you lots of options for the next time you need to take a screenshot on your laptop. If you're still not sure which method to choose, here are some simple factors to keep in mind:
Ease-of-use: Some methods for screenshotting on laptops are much easier and simpler than others, so find one that matches your experience level and is easy for you.
Features: Some screenshot methods are very basic and will just copy a screenshot to your clipboard for you to paste and save in another program, but others are full-scale programs that provide editing tools, multiple sharing options and screenshot modes including scrolling screenshots.
Price: Find a screenshot tool or application that is within your budget. Remember that there are plenty of free screenshot tools available, but you may want to pay for extra features and functions.
Support: it’s generally better to use an app with accessible customer support. It’ll help you out in case of trouble.
Best ways to take a screenshot on an ASUS laptop
Summary
Now you know how to take a screenshot on a laptop in multiple ways, including built-in tools and programs and third-party software. We recommend using Movavi Screen Recorder, a simple tool that provides different ways of saving the screenshot along with a wide selection of editing tools.
Disclaimer: Please be aware that Movavi Screen Recorder does not allow capture of copy-protected video and audio streams.

You can use Movavi Screen Recorder to take a screenshot on a laptop:
Download and install Movavi Screen Recorder to your device.
Download Movavi Screen Recorder
Click on the Screenshot button in the sidebar.
Edit and save your image.
To take a scrolling screenshot, try these programs:
Movavi ScreenShot
PicPick
GoFullPage
ShareX
Nimbus
TweakShot
Screenshot Guru
To learn more about the apps, follow the link below.
If you use hotkeys to make a screenshot, it’s copied to clipboard, and you need to paste it to an image editor to save as a picture. Built-in apps can save the screenshot to any folder you want. Movavi Screen Recorder allows you to save the screenshot as an image or share it to the cloud storage.
You can use any pre-installed or third-party software. Programs like Movavi Screen Recorder, Snipping Tool, Windows Snip & Sketch allow you to not only take screenshots but also edit and share them.
How to make a Zoom meeting recording
17 Best Free Screenshot Tools to Use [2026]
12 Ways to Record a Part of a Screen in 2026
15 Best Screen Recorders with Facecam [2026] - Movavi
5 Best Recorders for Drawing on a Screen - Movavi
How to Screenshot on an Acer Laptop [5 Easy Ways] – Movavi
12 Best Video Calling Apps for PC [2026] – Movavi
What Is a Screencast? Complete Guide [2026] – Movavi
Best laptop screen recorders


1.5M+ users already subscribed to our newsletter