How to Screen Record on a Mac [5 Best Ways in 2025]

Try Movavi Screen Recorder!

  • Capture internal audio and microphone on your Mac.

  • Grab your screen and webcam in high quality.

  • Edit and share your recordings.

Edited by Ben Jacklin
28,698

Key takeaways

  • Apple includes a few built-in options for screen recording, like the Screenshot app and QuickTime, but many users opt for a more powerful third-party program like Movavi Screen Recorder, ScreenFlow, or OBS Studio.
  • Some programs, like the Screenshot app, are more straightforward and easy to use, but lack features like video editing. Screen recording programs with additional features, like OBS Studio, may have a steeper learning curve, especially for beginners.
  • Remember that there’s no single “best” screen recording software. Instead, you should consider what you need from a screen recording program and then pick the option that best matches your situation.
  • You can activate the built-in Screenshot app by using the keyboard shortcut Command + Shift + 5.
  • With Movavi Screen Recorder, you can utilize automatic recording to record something remotely, which is great for saving webinars, lectures, or presentations you can’t watch live.

If you’ve spent much time on the internet, you’ve probably seen a screen recording. Tutorials, lectures, seminars, meetings… screen recordings are used for all kinds of things. They’ve even become a medium for major movies, from thrillers like Host to War of the Worlds. But you don’t need to be a Hollywood-level editor to be able to make high-quality screen recordings.

In fact, you don’t necessarily even have to download any software. That’s because Macs come with multiple built-in options for screen recording, which are user-friendly if a little basic. I tested these, plus a few of the most popular third-party apps, from Movavi Screen Recorder to OBS Studio and beyond, to help you find the perfect screen recorder for your needs.

My top picks

  • Best overall: Movavi Screen Recorder
    This app strikes a great balance between a user-friendly UI and powerful features like automatic recording and keystroke highlighting.
  • Best free program: OBS Studio
    As an open-source program, OBS Studio offers all of its many features for free, without any paywalls.
  • Best for efficient sharing: ScreenRec
    The ability to immediately share your recording via a secure URL is great for those in a hurry.
  • Best built-in screen recorder: QuickTime
    This program comes installed on Macs and is a capable screen recorder you can use without downloading any additional software.
  • Best for video editing: ScreenFlow
    With powerful video editing tools, ScreenFlow lets you adjust your recording right after making it, potentially saving you time.

Comparison table of the best screen recorders on Mac

Program

OS

Key features

Our rating

Mac, Windows

  • Display keystrokes and mouse movements
  • Schedule record allows you to record remotely
  • Upload recordings directly to social media

5/5

Mac

  • Hotkey shortcut to launch app
  • Record whole screen or part of screen

3.0/5

Mac

  • Record audio from microphone or system
  • Built-in to Macs
  • Very basic video editing

3.5/5

disclaimer_person

Here’s what Movavi’s team does to provide you with verified information:

  • When selecting products to include in our reviews, we research both demand and popularity.

  • All products mentioned in this article have been tested by Movavi Content Team.

  • When testing, we aim to highlight the best features of a product and what it’s best suited for.

  • We study user reviews from popular review platforms and make use of this information when writing our product reviews.

  • We collect feedback from our users and analyze their opinions of Movavi software as well as products from other companies.

How to record your screen using the Screenshot app

Screenshot app

  • Why I picked it

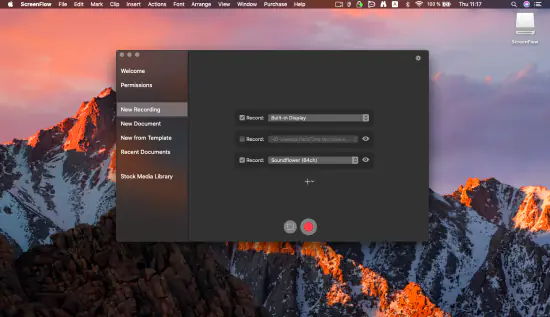
    I liked being able to screen record at any time with just a handful of button taps.

  • Best for

    Users who want to screen record without downloading any extra programs

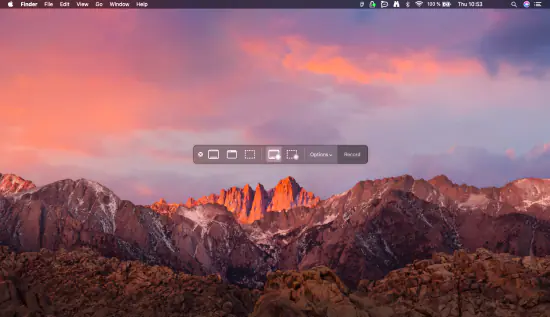
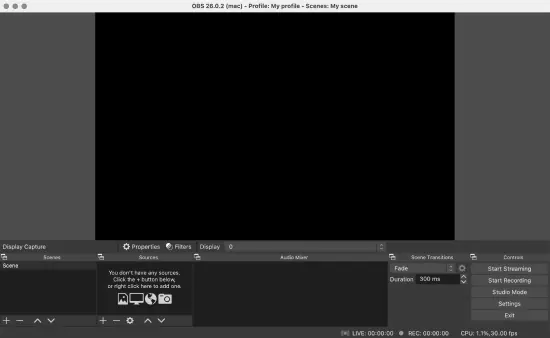
Most of us have had to record our screens at least once. Fortunately, learning how to record screens on Mac is easy, in part because Mac includes a built-in app to do just that. It’s called the screenshot app. It should come pre-installed on your Mac, so you shouldn’t have to download any additional programs.

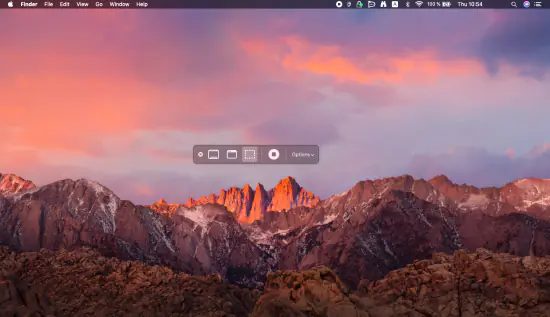
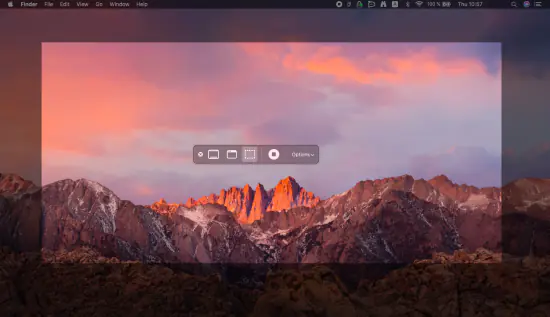
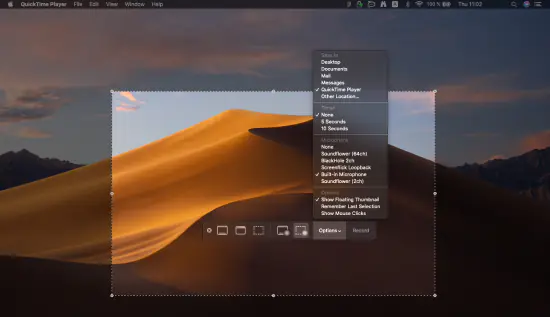
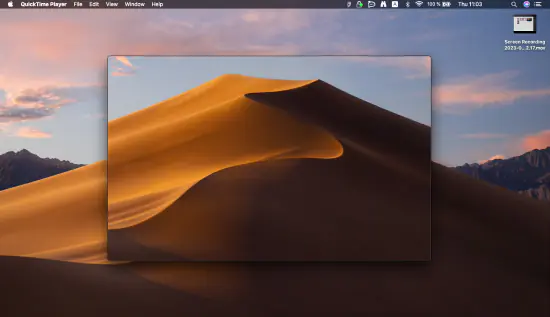
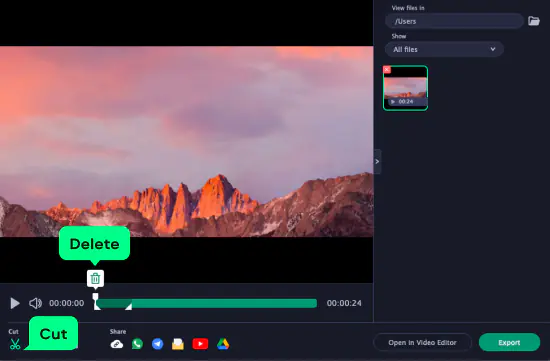
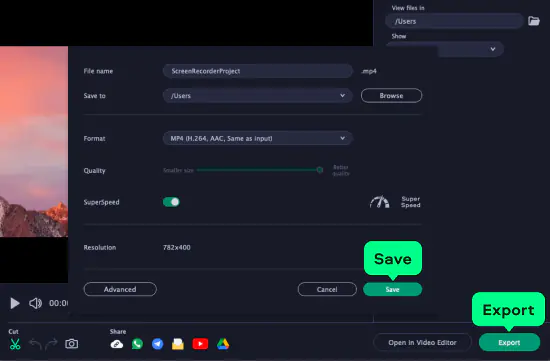
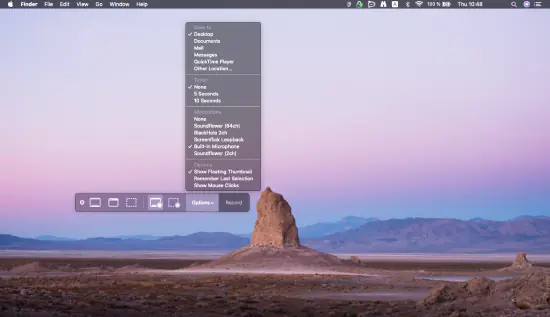
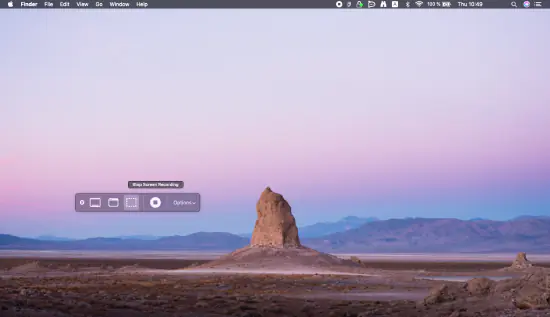
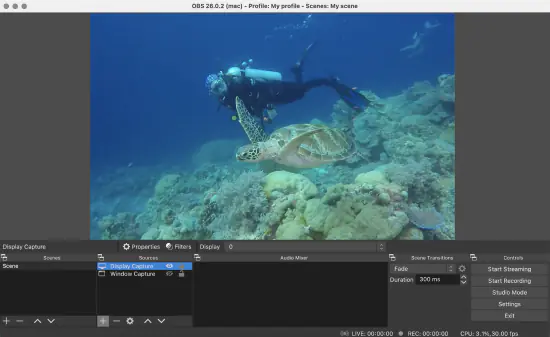
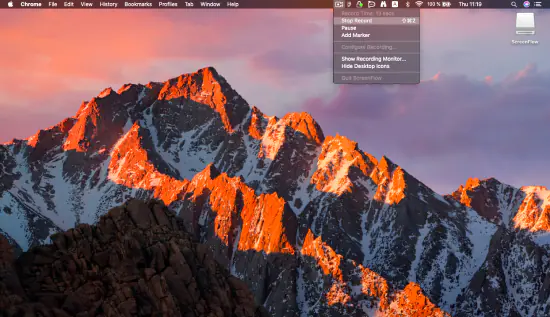
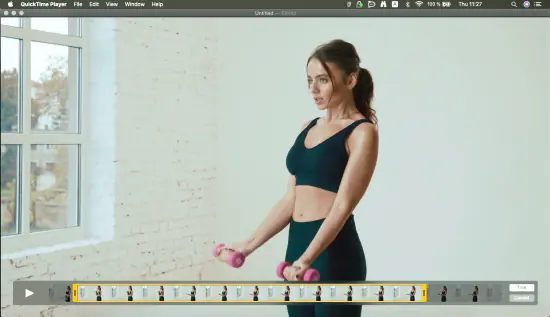
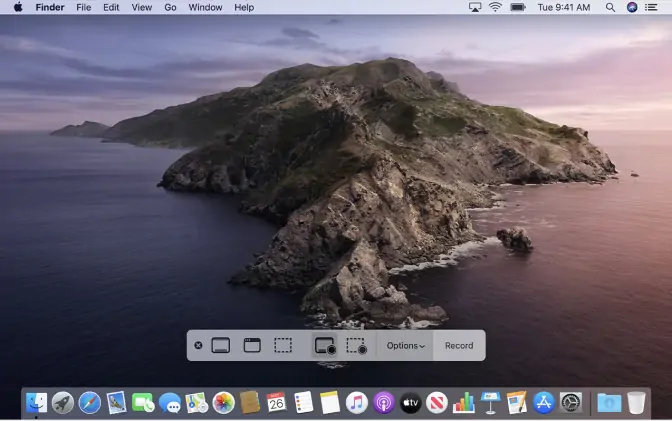
When testing, I liked how easy the screenshot app is to use. All you have to do is press a few buttons and the toolbar appears. A couple more clicks, and you’ve started (and stopped) your screen recording, which will automatically be saved to your files. You can choose whether to record your entire screen or a selected portion of it.

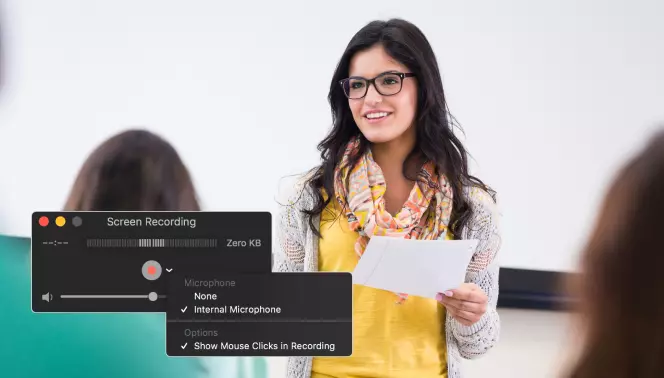
However, that’s more or less it. If you need any additional capabilities, like the option to record from a specific audio source or the ability to edit your recorded video, you might need to consider one of the other options on this list.

Features:

  • Multiple screen recording options (full screen, partial screen, specific window)
  • System audio recording capability
  • Microphone audio capture capability

Pros:

  • A quick and efficient method

  • No need for extra downloads

  • Completely free

Cons:

  • Doesn't allow you to easily capture system audio

How to record the whole screen

Step 1. Launch the recording app

Press the Command + Shift + 5 keys at the same time on your Mac's keyboard.

Step 2. Start recording

Select the Record Entire Screen option in the pop-up toolbar at the bottom of the screen.

Press the Record button to start recording your entire screen.

Step 3. Stop recording

When you're ready to end the recording, click on the Stop icon (a square inside a circle) at the top of the screen. You may also press the Command + Control + Esc keys to end the recording.

How to record a part of the screen

Step 1. Launch the recording app

Press the Command + Shift + 5 keys on the keyboard to bring up the recording toolbar.

Step 2. Start recording

Press the Record Selected Portion button to record a specific portion of the screen, or click on the icon that is further to the right, which shows a dotted line and allows you to click and drag out to cover an area of the screen you want to record.

Press the Record button to begin the recording process.

Step 3. Stop recording

When you've finished recording, click on the Stop icon at the top of the screen or use the Command + Control + Esc shortcut.

Screenshot app is incredibly efficient for streamlining tasks. Users can quickly perform common actions by using customized key combinations. It saves time, reduces repetitive motion, and is especially useful for multitasking.

How to screen record on a MacBook with QuickTime

QuickTime

  • Why I picked it

    I liked Quicktime’s clean, user-friendly interface, which makes screen recording easy for anyone, even beginners.

  • Best for

    Users who want to easily capture video from their Mac screens

Another option for how to capture screen on a Mac is to use the built-in QuickTime Player application. This app is usually used for playing media files, but it can also be used to make them and edit them, too, and it works for capturing video from your MacBook Air, MacBook Pro, or other Mac OS X device. If you also want to use QuickTime as audio recording software for your Mac, pay attention that the program doesn’t capture microphone audio.

Features:

  • Record webcasts with or without the audio stream
  • Overlay the webcam preview and change its size and shape
  • Grab system sound, mic, even speaker feeds – clean and noise-free
  • Show keystrokes and mouse movements, draw right on your screenshots and videos while recording live
  • Schedule to record at any time, then watch later
  • Save your recordings in every popular file format
  • Share links to your videos or upload them directly to the cloud and social media

Pros:

  • No need to download or install anything extra

  • Free and easy to use

  • Can also play and edit your recordings

Cons:

  • Can only capture external audio

Step 1. Start the recording app

Open the QuickTime Player application on your Mac device.

Step 2. Set the recording

Press File, then click on New Screen Recording. This will open the Screenshot and Recording tools.

You can click on the various icons to capture the full screen or part of the screen.

You can also click on the Options menu to adjust options, like setting up a timer or choosing an audio device to record external audio with your recording.

When you're ready to start capturing, press the Record button.

Step 3. Stop the recording

When you're finished recording, press the Stop icon at the top of the screen, or use the Command + Control + Esc hotkeys shortcut to stop screen recording.

How to make a screen recording on a Mac with Movavi Screen Recorder

If you are looking for dedicated software for screen recording then Movavi Screen Recorder is one of the best options. It is compatible with all Mac devices. It is capable of both capturing a video and recording the screen with a single click.

Movavi Screen Recorder

  • Why I picked it

    Movavi Screen Recorder is packed with advanced features, but in testing I found it to be relatively straightforward to use.

  • Best for

    Beginners and advanced users who want to record a screen on a Mac with system audio and microphone

Movavi Screen Recorder is a reliable and effective app for people who want to know how to record a video on a Mac or how to make a screen capture on a Mac. With this app, you can easily record streaming videos on your Mac, capture webinars and online calls, or create video tutorials. The program also offers advanced editing and converting tools you can use to trim files after recording.

Movavi Screen Recorder is frequently updated. In May 2025, version 24.6 was released, which included improvements and fixes to some bugs.

Movavi Screen Recorder is well-liked, with an overall rating of 4.6 on Software Advice. It also received 4.2 stars in a review by Dealarious, with the interface being awarded 5 stars out of 5.

Features:

  • Record webcasts with or without the audio stream
  • Overlay the webcam preview and change its size and shape
  • Grab system sound, mic, even speaker feeds – clean and noise-free
  • Show keystrokes and mouse movements, draw right on your screenshots and videos while recording live
  • Schedule to record at any time, then watch later
  • Save your recordings in every popular file format
  • Share links to your videos or upload them directly to the cloud and social media

Pros:

  • A handy tool to ramp up productivity with digital media capture

  • Easy to set up and grab from screen or webcam in HD and 4K

  • Ready to customize footage and create videos on the go

  • Taking and editing partial or scrolling screenshots is a snap

  • Runs smoothly on any Windows or Mac computer

Cons:

  • No limits to your creativity in the full version of the program

Step 1. Install the software

Download the program and follow the installation instructions.
Download Movavi Screen Recorder

Step 2. Set the recording area

After you launch the program, the sidebar will appear. Press the icon with the video camera. Use the cursor to position the capture frame to record a particular area of the screen.

Step 3. Record your screen

By clicking on the REC button, you can start to record the screen on a Mac. There are hotkeys to help you control the recording process: ⌥ ⌘ 1 to pause and resume and ⌥ ⌘ 2 to stop to record screen activity on a Mac. You can also change these hotkeys if you wish; to do this, go to the Settings menu.

Step 4. Edit the recording (optional)

Last but not least is the process of editing and converting the result. Click the Scissors icon and use the white markers to select an unnecessary part of the capture and cut it by clicking the Trash Can icon.

Step 5. Save the final video

Now hit the Export button to save the result. Don’t forget to name the file and choose the folder, so you don’t lose the recording. Choose the format for the recording – popular video formats like MP4 and MOV are available. If you want to record a GIF on your Mac, simply choose the GIF format. Complete the process by hitting the Save button.

I really like that Movavi Screen Recorder offers automatic recording. You can set the recording area, the date, the duration, specify the time it should start, and what the program should do after it finishes. This feature is very convenient for those who have lots of webinar sessions or want to spend time on other tasks.

How to record your screenwith ScreenRec

ScreenRec

  • Why I picked it

    One of the most important parts of a screen recording is ensuring the right people see it. I love how ScreenRec instantly generates a secure, encrypted URL to let you immediately share your screen recording.

  • Best for

    Users who want no-time-limit, one-click screen recording and sharing features

The options we’ve discussed would all work for corporate screen recording. But what if you want a program specifically created for productivity and presentations? That’s what ScreenRec is. When testing, I loved a few of the productivity oriented features. For example, when you finish a screen recording, the application generates a URL for you to share your recording instantly. These links are encrypted, which helps offer peace of mind while sharing potentially private or sensitive content.

However, some of the other features weren’t quite as impressive. For example, the ability to annotate could be very powerful, but I found the annotation toolbar a little difficult to use. ScreenRec also limits users to just five minutes of recording unless they create an account. If you’ve ever recorded your screen, you probably know that five minutes isn’t very much, especially if you’re recording something for a presentation. Plus, there are no video editing tools.

Still, ScreenRec is a professional, straightforward screen recording program with some unique features. If your focus is on efficiency, and you need to produce and share high-quality recordings fast, ScreenRec might be a great option for you.

Screenrec has hundreds of five-star reviews, with an overall rating of 4.7 on Trustpilot and 5.0 on Software Advice.

Pros:

  • Able to immediately share your recordings via a URL

  • Can record (and download) screen recordings for free

  • Annotation tool lets you add context to recordings

Cons:

  • No video editing tools

  • Users who don’t create a ScreenRec account are limited to five minutes

How to record a screen with ScreenRec

Step 1. Launch the recording app

Download, install, and launch the program.

Step 2. Start recording

Create a capture window. You can do this by clicking Alt + S. Customize the size of your capture window. This is your chance to choose which part of your screen you will record. Click Record.

Step 3. Stop recording

When you’re done, click Stop. ScreenRec should generate an encrypted link, which you can use to share your video. Alternatively, you can download your video to your machine.

Video editing is an important step for creating professional-looking recordings. Although most video recorders come with basic editing features, you can always use separate video-editing software to fine-tune your recordings. Remember to save videos in a safe location and consider backing them up in case of any issues.

How to record a screen with OBS Studio

OBS Studio

  • Why I picked it

    OBS Studio is one of the most popular open-source screen recorders available, and I found it in testing to be just as powerful as the reviews suggest.

  • Best for

    Users who are interested in content creation or streaming

OBS Studio is a free and open-source app that you can use to screen record Macbook, iMac, or any other Mac device. This app is used by a lot of YouTubers, streamers, and content creators, thanks to its versatility. It offers a range of features that advanced users can take advantage of while filming to make unique, custom videos and presentations. OBS lets you capture screen and record sound on your Mac, including system sounds and microphone audio.

OBS released a major update to OBS Studio in March 2025. Version 31.0 of OBS Studio includes several new features, including a preview scrollbar, zoom indicator, background blur, integration with Amazon IVS, and more. Dozens of bug fixes and minor improvements were also included with this release.

OBS is an incredibly popular screen recording program, with an average rating of 4.7 stars from over 1,000 reviews on Software Advice. It’s also been well-received by established reviewing platforms. It was awarded 4 stars out of 5 by TechRadar and PC World.

Features:

  • Real-time video capture and editing features
  • Audio mixer tool
  • Unlimited scenes and video tracks
  • Customizable configurations for audio and video editing
  • Modular dock user interface

Pros:

  • Free and open-source

  • Lots of features and functions for users to experiment with

  • Trusted by many content creators and professional streamers

Cons:

  • The interface can be quite confusing and overwhelming for beginners

Step 1. Get the application

So, how do you use OBS Studio to film your screen on a Mac? First, download the application to your computer from the official OBS site.

Download OBS Studio

Install the application, following the instructions to complete the process. Once the program has been installed, you can open it up.

Step 2. Adjust the settings

Note the Sources box in the bottom-left section of the screen. You should click on the + icon at the bottom of this box and then click Display Capture. A menu will appear with the list of monitors you have. You can then click on the main display you want to record from.

You can add additional recording sources to the Sources box, if desired. For example, you may add a webcam source if you want to record a video of yourself, and you can click on Audio Sources to add a range of audio sources, like external microphones or system audio, to record sound.

Once your sources have been added, you can use the Settings menu to adjust settings and choose where your recordings are to be saved to.

Step 3. Do the recording

Finally, press the Start Recording button in the bottom right to begin the recording process with OBS Studio.

You can pause the recording at any time using the Pause button in the bottom left and then press Stop Recording when you've finished. The recording will be automatically saved to your system.

How to record a screen with ScreenFlow

ScreenFlow

  • Why I picked it

    I liked having access to powerful video editing tools within a screen recording software.

  • Best for:

    Users who want an all-in-one video creation, editing, and sharing tool

If you're looking for a professional-grade app for screen recording, video editing, and video creation, ScreenFlow might be the best way for you to screencast on a Mac. This high-end app is made for experienced users and offers a wide range of features, as well as iOS recording, a stock media library, professional animations, and more.

Version 10.5 of ScreenFlow was released in August 2025. It included over 20 bug fixes and a few notable new features, including the ability to record the audio of multiple applications, exclude ScreenFlow and other specific applications from screen recordings, make timed recordings, and more.

While ScreenFlow hasn’t received quite as many ratings as some of the more popular programs on this list, it is very well-liked by experienced editors. It received an impressive 4.5 star rating from Techradar Pro and has an overall rating of 4.8 on Software Advice, with users particularly liking its functionality and ease of use.

Features:

  • Simultaneous screen and webcam recording
  • System and microphone audio capture
  • Library of customizable titles
  • iOS screen recording 
  • Video-editing tools

Pros:

  • Lots of advanced features

  • Can be used to record on iOS devices, too

  • Produces high-quality recordings with both video and audio

Cons:

  • One of the most expensive screen recording apps available

Step 1. Download and install the program

The first step of using ScreenFlow to record your Mac's screen is to download and install the ScreenFlow app from the official site.

Download ScreenFlow

Step 2. Tweak the settings

Once the program has been installed, open ScreenFlow. A window will appear that lets you select the video and audio you wish to record. Configure the parameters accordingly.

Step 3. Record the screen

Press the Record button. A timer will count down and the recording will start.

When you want to stop recording, click on the ScreenFlow icon in the top right section of the screen and press Stop Recording.

The full ScreenFlow menu will then open up with your recording file ready to be edited and saved.

Recording the entire screen can inadvertently capture sensitive information, which may not be intended for sharing. Recording a specific area also brings its own challenges, like the possibility of missing crucial on-screen elements. Keep this in mind when doing screen recordings and take necessary precautions to protect your privacy.

How to stop recording with Screenshot app and QuickTime

If you're recording your screen using either Screenshot app or the QuickTime Player, the method to stop your recording is always the same. All you need to do is press the Stop icon, which looks like a square inside a circle and appears at the top of your screen. As soon as you click on this icon, the recording will end and you can then save it to your device for editing, sharing, and playing.

How to edit recorded videos in QuickTime Player

Once you've recorded videos of your Mac's screen, you may want to edit them. You can do this with the help of QuickTime Player. Here's how to do it.

Step 1. Add the file to the program

To get started, open the QuickTime Player application.

Press File and open the video that you want to edit.

Step 2. Do the necessary edits

Click on the Edit button to access the editing menu. From here, you can make use of various editing features and functions to make adjustments to your clip.

If you want to rotate or flip your file, click the Rotate/Flip buttons in the editing menu. You can turn the video left or right, or flip it horizontally or vertically.

If you want to trim your file, click the Trim button and adjust the beginning and end lines to isolate the part of the recording you wish to save. Then press Trim to confirm.

If you want to split a video into multiple clips, move the red line to the section where you want to split and press the Split Clip button. Your clip will split into two.

Step 3. Export the result

When you've finished editing, press the Done button and then go to File > Save to save your new video.

Screenshot app
3.0/5
Bestseller
Movavi Screen Recorder
5.0/5
QuickTime
3.5/5

Tips on recording a screen

Before you start recording your screen to make videos, it's a good idea to do some preparation. Here are some tips to keep in mind:

  • Make sure that whatever you want to record is finalized and ready to start, such as a presentation you want to show or a program you're making a tutorial for.
  • Write down some notes to remind you of important points you want to cover in your video.
  • Rehearse your video or presentation several times before starting the recording.
  • Try to ensure that you record in a quiet space when using a microphone, as you will want to try and minimize any background audio.
  • If you make a mistake that needs to be edited out, pause for a moment before continuing. This will make it easier to find and edit the section out.
  • When recording a tutorial, consider highlighting your keystrokes and mouse movements to help viewers follow your process and stay engaged.

How to choose the best screen recorder on a Mac

With all these great options, it can be difficult deciding which screen recorder to go for. Remember, there’s no single “best” option. Instead, carefully consider your situation, including your experience with screen recording and what you’ll need in a screen recorder. That way, you can pick the right solution for you.

For example, if you just need to record something on your screen quickly, consider using Screenshot app. They’re efficient, easy to use, and you won’t have to bother downloading any additional software.

However, if you want additional features, you might consider one of the third-party apps we discussed here. For example, people interested in creating tutorials or recording lectures might enjoy using Movavi Screen Recorder. The ability to highlight keystrokes is vital for making a high-quality tutorial, and Movavi’s scheduled recording software is great for capturing streamed content you can’t watch live.

Movavi Screen Recorder

The perfect way to record anything from your screen

Disclaimer: Please be aware that Movavi Screen Recorder does not allow capture of copy-protected video and audio streams.

Movavi Screen Recorder

Frequently asked questions

How do I record my screen on a Mac?

You can use Movavi Screen Recorder to record screen on your Mac.

  1. Download and install Movavi Screen Recorder.
    Download Movavi Screen Recorder
  2. Open the program and click Screen recording. Choose your capture area.
  3. Press the Speaker button for system audio and/or the Microphone button for microphone/external audio.
  4. Press the red Record button to start and press Stop when you're finished.

How do I record my Mac screen without QuickTime?

There are various ways in which you can capture your Mac screen without having to use QuickTime. You can download and use a recording app such as Movavi Screen Recorder, ScreenFlow, or OBS Studio. Another option is to record using hotkeys.

How do you screen record on a Mac?

You can use your Mac's own hotkey combinations to start screen recording using a built-in tool:

  1. Press the Command, Shift, and 5 keys at the same time.
  2. Choose to record either the whole screen or a section of it.
  3. Use the Options menu to configure your recording and choose to record sound, if needed.
  4. Press the Record button to start and press the square in circle icon at the top of the screen to finish.

How do I record my screen and audio on a Mac?

You can record your Mac’s screen (including audio) from your computer and/or a microphone in just a few steps:

  1. Download and install Movavi Screen Recorder for Mac.
  2. Launch the app and tap the Screen recording button in the toolbar.
  3. Drag your cursor across the area of your screen that you want to record.
  4. In Movavi’s toolbar, select your preferred audio settings to record system and/or microphone sound.
  5. Click the REC button to start recording. You can also pause and restart if needed.
  6. When you’re finished, click the Stop button.
  7. Edit your screen recording in Movavi Screen Recorder and save it or share it to your preferred video platform.

For more detailed instructions, check out this article:

5 ways to screen-record on a Mac

Can QuickTime record screen and audio?

Yes, QuickTime can record your screen with microphone audio if you have your microphone set up. To record your computer’s audio, you’ll also need to ensure that you’ve selected the option to record system audio, as well. To record audio in your screen recording in QuickTime, go to the File menu and choose your microphone from the dropdown menu.

How do I record with QuickTime Player?

To record your Mac’s screen with QuickTime Player, follow these steps:

  1. Open QuickTime Player.
  2. In the File menu, select New Screen Recording.
  3. Click on the icon to record part or all of your screen.
  4. Click Record to start recording.
  5. When you’re done, click Stop and your screen recording will save to your computer.

Do Macs allow screen recording?

Yes, Mac screen recording is allowed. You can use built-in hotkey features to take a simple screen recording, or you can download an app like Movavi Screen Recorder to take more advanced recordings and create fully edited, polished videos.

How do you record on a Mac without an app?

You can record your Mac’s screen without downloading any third-party apps. To record your screen, follow these steps:

  1. On your keyboard, press Cmd + Shift + 5 together.
  2. Choose the option that best fits your needs (Record Entire Screen or Record Selected Portion).
  3. Click the Record button to begin recording your screen.
  4. When you’re done, click Stop.

Why is there no sound when I screen record on a Mac?

If you’re using hotkeys or another solution to record your screen on a Mac, you may not have set up the recording to capture system audio. You can check the settings or options in your screen recording solution to try to fix this problem. You can also avoid “no sound” issues by using a more robust application like Movavi Screen Recorder.

Have questions?

Have questions?

If you can’t find the answer to your question, please feel free to contact our Support Team.

Join us for discounts, editing tips, and content ideas

1.5M+ users already subscribed to our newsletter

By signing up, I agree to receive marketing emails from Movavi and agree to Movavi's Privacy Policy.