
Step 1. Install OBS Studio
Follow the link below to download the program and install it.
Once you’ve downloaded and installed the program, follow these steps to learn how to record using OBS.

How to Record a Screen with OBS
Download and launch the OBS application.
Go to the Sources box at the bottom and click +, then select the Display Capture option.
Click Start Recording to begin capturing.
Save at least half the time that takes by instead capturing your screen with Movavi Screen Recorder – a comprehensive and intuitive alternative to OBS!
OBS – or Open Broadcaster Software – is one of the most popular programs available to help users record videos from their computer screen. This article can serve as your ultimate tutorial on how to record a screen with OBS. You’ll also find a comparison with an alternative screen recorder from Movavi.

Our goal is to provide you with only verified information. To ensure this, Movavi Content Team does the following:
When selecting products to include in our reviews, we research both demand and popularity.
The team tests all the products mentioned in this article.
When testing, we compare the key characteristics of the products, which include selecting capture area, schedule recording, showing keystrokes and mouse, and other significant features.
We study user reviews from popular review platforms and make use of this information when writing our product reviews.
We collect feedback from our users and analyze their opinions of Movavi software as well as products from other companies.
Special pick: Movavi Screen Recorder

If you need an alternative to OBS, our special pick is Movavi Screen Recorder. The program can help beginners and advanced users to capture screen recordings with ease. It gives you the ability to record from multiple sources, screencast, show keystrokes and mouse movements, and a lot more.
Key features:
How to install the OBS screen recorder
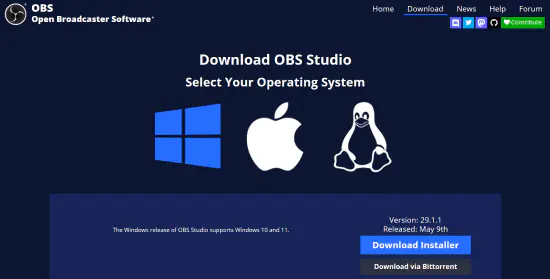
Let’s start our OBS review with how to install the software.
Go to the official website and select your OS from the three blue buttons (Windows, macOS, or Linux) and download the installer file.
Go to the OBS website
Once it’s downloaded, open the installer file.
Follow the prompts to install OBS Studio on your computer. When you see options to add plugins, only install the ones that are necessary to run OBS on your computer.
OBS Studio interface
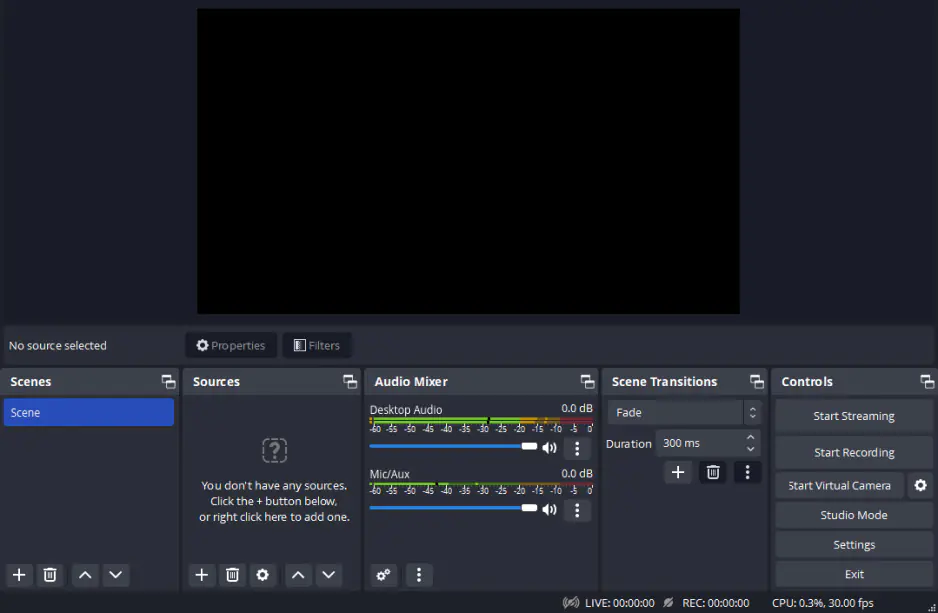
OBS Studio is not the most user-friendly platform for newer users, especially those who don’t have a lot of screen-recording and video-editing experience. While its interface can be a bit intimidating at first, if you know the basics, getting started is fairly straightforward. Before you dive in, get to know the six basic parts of the software:
Video and audio sources: this is where you’ll find the options to set your audio sources, like system audio or microphone, as well as video sources, such as screen capture or webcam footage.
Scenes: this section of OBS shows your “scenes,” which are just the video and audio coming from your chosen sources (e.g., livestream, images, screen recording, etc.).
Audio mixer: this is where you’ll adjust audio in your recording, including volume, trimming, voice-over, and other settings.
Scene transitions: this feature allows you to seamlessly transition between video clips with animations, like fades or dissolves.
Controls: in this section, you can start and stop your screen recording, make adjustments to recording settings, etc.
Preview window: after you finish recording but before you export your finished file, you can get a preview of what it will look and sound like in the preview window.
Setting up OBS
Webcam settings
If you want to capture your webcam feed with OBS Studio, you’ll first need to add your webcam as a source. To do this, go to the Sources section and click on the + button to add a source. Select Video Capture Device. Give your webcam a nickname that you can easily remember and click OK. Then, from the dropdown menu, choose your webcam. Now, you’re all set to start recording your webcam feed with OBS Studio.
Recording audio
To record audio in OBS Studio, you’ll need to make sure that you have the right audio inputs selected. In the Controls section, go to the Settings menu and click on the Audio tab. Here, you should see options to select or deselect the available audio inputs, including system audio, connected microphones, etc. Choose the devices you want to use for your project’s audio and make sure that you don’t have any devices selected that you don’t want to use. This section also gives you the option to enable push-to-mute or push-to-talk capabilities for any or all of the audio devices you’re using. This can be useful when you want to minimize excess noise while focusing on dialog or system audio in different parts of your video.
Plugins
Because OBS Studio is an open-source screen recorder, it has a lot of user collaboration. As a result, many users have created plugins to enhance the OBS experience. OBS maintains an extensive list of community-created plugins. For most plugins, Windows and Mac users can just download the plugin and follow the prompts. Linux users can also opt to use Flatpak to automatically install plugins. To manually install a plugin, you’ll usually just need to add it to the program files. You can typically find those program files by navigating to the appropriate folder for your system:
Windows (64-bit): C:\Program Files\obs-studio\obs-plugins\64-bit
Windows (legacy 32-bit): C:\Program Files\obs-studio\obs-plugins\32-bit
macOS: ~/Library/Application Support/obs-studio/plugins
Linux: ~/.config/obs-studio/plugins
The best OBS recording settings
While OBS has a somewhat steep learning curve, it does have several really useful settings that users find very useful. Some of the best OBS settings include:
Video settings: with the base (canvas) resolution and output (scaled) resolution settings, users can adjust their video settings to match their screen or make adjustments based on other parameters, as well as set the bitrate for their export video. Set a lower resolution if you face the high CPU usage issue.
Audio settings: with these settings, you can choose your audio inputs and outputs, set push-to-talk or push-to-mute on different audio feeds, and make other adjustments to optimize your video’s audio.
Encoder: OBS Studio also includes a video and audio encoder that encodes files in different video and audio formats. This allows you to convert your export file to the format of your choice without a third-party video converter.
How to use OBS Studio to record a screen on a PC
To screen record with OBS, you’ll need to download and install the program from the official OBS site. The program runs on Windows 8.1, Windows 10, or Windows 11. So as long as you have a relatively new PC, you should be fine. Just be sure to specify that you want to use the program for screen recording when installing the program.
Step 1. Install OBS Studio
Follow the link below to download the program and install it.
Once you’ve downloaded and installed the program, follow these steps to learn how to record using OBS.
Step 2. Launch the program
Open the program however you like – icon, start menu, search. Upon opening, OBS should auto-add a Scene into the interface. But if it doesn’t, simply click on the + icon. You’ll find it within the box that reads Scenes on the bottom left corner of the screen.
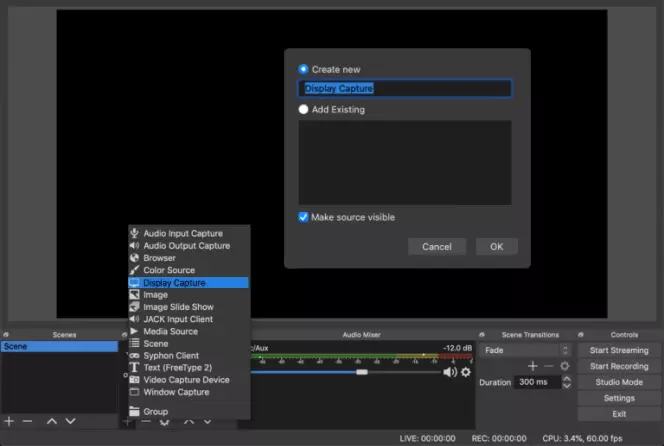
Step 3. Specify the settings
Look next to the Scenes box, and you should see the Sources box. Click the + at the bottom left of the Sources box. A menu of options should appear. Click Display Capture. In the pop-up window, create a title and click OK.
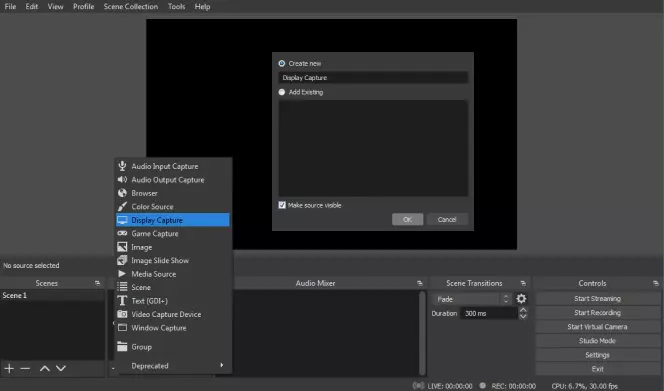
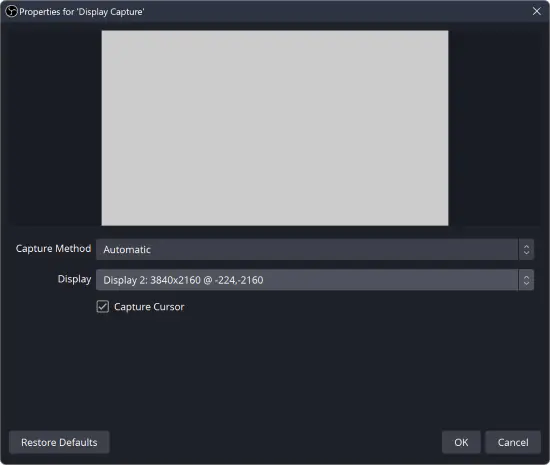
Step 4. Choose the capture method
In the next pop-up window, you’ll have options to select your display method and capture method and a check-box to select whether you want to show your cursor on the recording. If you’re using multiple monitors, be sure to click the down-arrow and select the appropriate display from the drop-down menu. When you’ve finished, click OK.
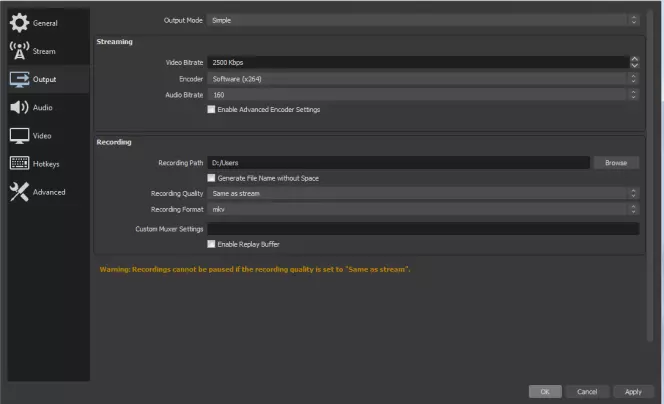
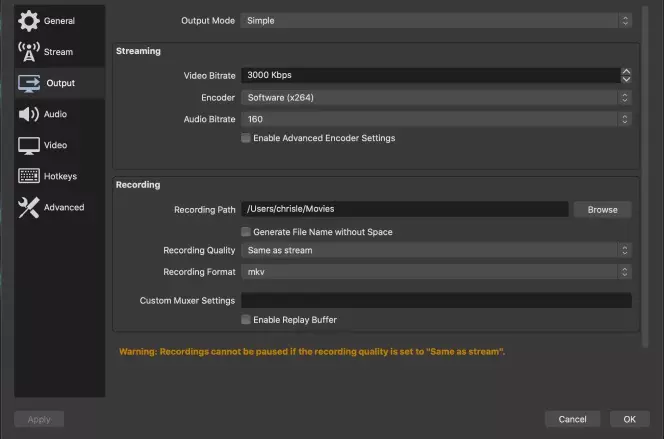
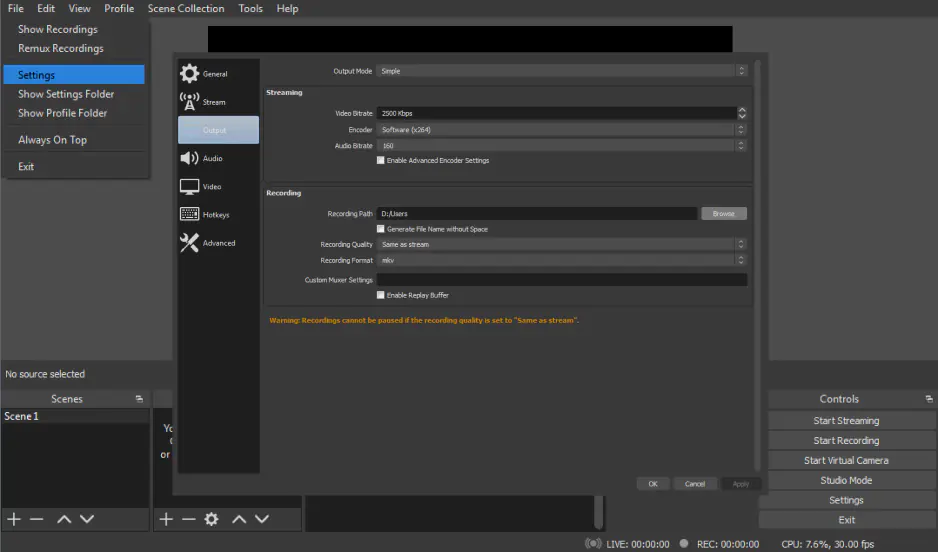
Step 5. Select the output folder
Click Settings on the bottom right of your screen. In the new window, click the Output icon in the menu on the left. In the Recording box, you need to choose your destination file under Recording Path. To do this, click Browse and select a destination.
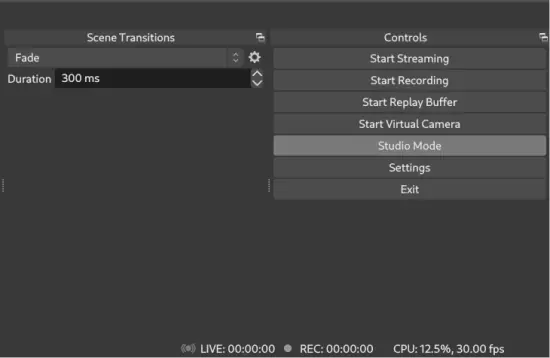
Step 6. Start recording
Once you’ve made all of your selections, click the Start Recording button on the OBS Studio record screen. It’s the icon on the lower right side of your screen below Start Streaming.
How to use OBS to record a screen and audio on a Mac
MacOS 10.13 is the current oldest compatible version that works with OBS Studio. Be sure that your Mac meets the requirements, and then download and install OBS.
Once you’ve installed the program, the steps for how to make OBS record your screen on a Mac are identical to Windows. But here’s a shortened version of the section above to set up OBS for recording.
Step 1. Specify the settings
Locate the Sources box at the bottom of your screen and click the + icon. From the options menu, select Display Capture and click OK.
Step 2. Choose the output folder
Click Settings on the bottom right and then Output from the sidebar. In this menu, use the Browse button next to Recording Path to choose a destination folder.
Step 3. Record your screen
To make a screencast, click Start Recording on the lower right side of the interface.
How to record using OBS Studio on Linux
To use OBS screen recorder on Linux, there are two requirements:
You must run Ubuntu 18.05 or higher.
You have to install the FFmpeg video filter.
With those two requirements met, you can download and install OBS Studio screen recording software from the official site.
After that, the steps to record a desktop or any video source are basically the same as Windows or Mac, with one small exception.
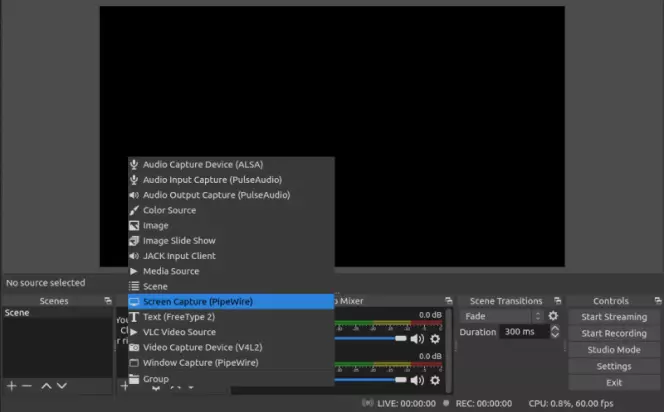
Step 1. Specify the recording settings
Open OBS and then locate the Sources box at the bottom. Click the + icon at the bottom of the box and an options menu will appear. Select Screen Capture from the menu. Screen Capture instead of Display Capture is the key difference from Windows or Mac.
In the pop-up menu, select OK. And if you have multiple monitors, be sure to pick the one you want to record.
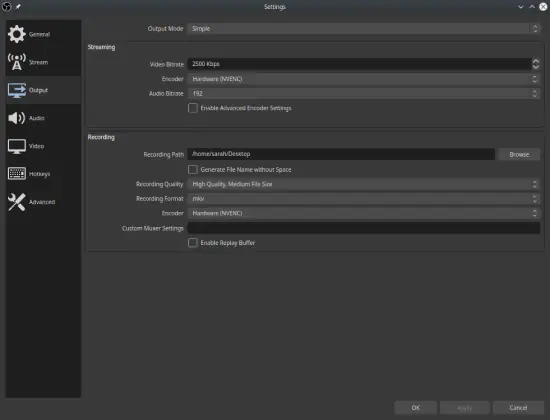
Step 2. Choose the output folder
Click the Settings icon on the bottom right and choose Output from the sidebar menu. Next to Recording Path either type one or click Browse to choose a destination for the saved file.
Step 3. Record the screen
Click the Start Recording button on the bottom right of the interface.
Similar guides
There is no mobile application or mobile version of OBS available yet. Many newer smartphones already have screen recording software built into their OS, so there isn’t much need.
But if you absolutely want to use the screen recorder from OBS on your mobile phone, there is a workaround. But you’ll need a cable to connect your phone to a computer. The lightning connector on the iPhone is standard. And if you have an Android device, you’ll need whichever connector your phone uses – typically USB-C or USB Micro-B.
With the cable ready, follow these steps:
Connect your iPhone to your Mac or PC with a lightning cable.
Open OBS and locate the Sources box at the bottom of the display.
Click the + icon at the bottom of the box and choose Video Capture Device from the menu.
Within the pop-up menu that appears, check the circle that says Create New. Then click OK.
Another window should appear. Next to Devices click the down arrow to open a drop-down list and choose your iPhone. If it isn’t there, check your connection and re-open the menu to see if it shows up.
When your iPhone screen displays on the interface, simply click the Start Recording button to record.
There is literally no difference in the steps between an iPhone or an Android device for recording your screen with OBS. Follow the steps above to get things moving. The only difference is that you’ll use a different cable to connect to your computer and select your Android device from the drop-down menu next to Devices.
Again, there are no applications or mobile versions of OBS, so it’s not the best method of capturing your mobile phone’s display. In fact, capturing the screen this way is known to be glitchy because you’re running the recording through a cable.
If your mobile device doesn’t come with screen recording software, it’s best to look through the Apple or Google Play store to find an alternative application. There are plenty of applications designed for mobile screen recording in both marketplaces.
Setting up OBS to record internal audio is relatively easy. Follow these steps to get it going:
Open OBS, and within the Sources box, click the + icon to add a new source.
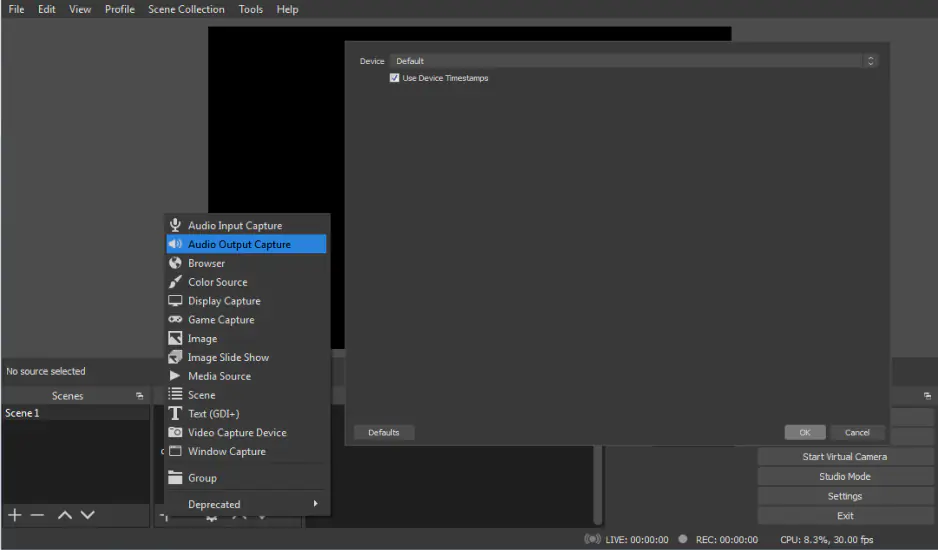
Select Audio Output Capture from the menu.
A pop-up menu will appear. Choose a name or leave it as-is and then click OK.
In the next menu, click the drop-down menu next to Default. Then, choose the default audio output device you use on your computer, or whichever you’re using. Click OK and you’re done!
Note: If you’re able to view the meters moving for your audio but can’t hear anything, it may be necessary to use a Multi-Output Audio Device or a monitoring system.

Mac is a little different from Windows. You must first download a program called Blackhole. It’s a set of drivers that allows you to push your audio to other applications with no latency issues.
Once you’ve downloaded Blackhole, open the Audio MIDI Setup application on your Mac. You can either search for it in the search bar or go to Applications > Utilities > Audio/MIDI Setup. From here, you must create a new Multi-Output device that has both Blackhole and your audio output.
After you’ve set this up, follow the same steps as in the Windows section above. Only you’ll select the Multi-Output device you created.
Double-check OBS is receiving the audio by monitoring the meter on the audio mixer. It’s essential that the meter doesn’t move into the red. Otherwise, your audio will definitely come out distorted in your recording.
Once all this is set up, the sounds that would typically come out of your speaker will now record to your video.
Recording multiple audio tracks
Recording multiple audio tracks can be extremely advantageous when you get to the post-production phase of a video or audio project. If you have multiple people speaking in a video, one may be louder than others, or there may be a background noise that you want to cut out. This is all much easier to do when you can separate out each individual audio track.
Much like layering video tracks to create a cohesive visual effect, when you record multiple audio tracks, you can layer them, edit different tracks separately, and put together a professional-sounding end product. We’ll discuss how to record multiple tracks separately or at the same time momentarily.
Recording a podcast
It’s possible to record a podcast with OBS Studio, but since OBS wasn’t specifically designed for podcasting, it can be a bit tricky. If you’re going to use this software for podcasting, we recommend utilizing OBS’ screen-recording capabilities, especially if you’re interviewing someone remotely for your podcast. To do this, you can start a video conference and record your screen and your webcam feed. Be sure to capture both your system audio and your microphone audio to ensure that you capture your voice and your interviewee’s voice for the podcast.
Recording separate audio tracks
OBS Studio allows users to capture up to six audio tracks separately. If you’re recording each piece of audio individually, you can save them as different audio files and drop them into your timeline on their respective audio tracks.
If you’re recording your audio simultaneously, you’ll need to adjust a couple of settings. To do this, follow these quick steps:
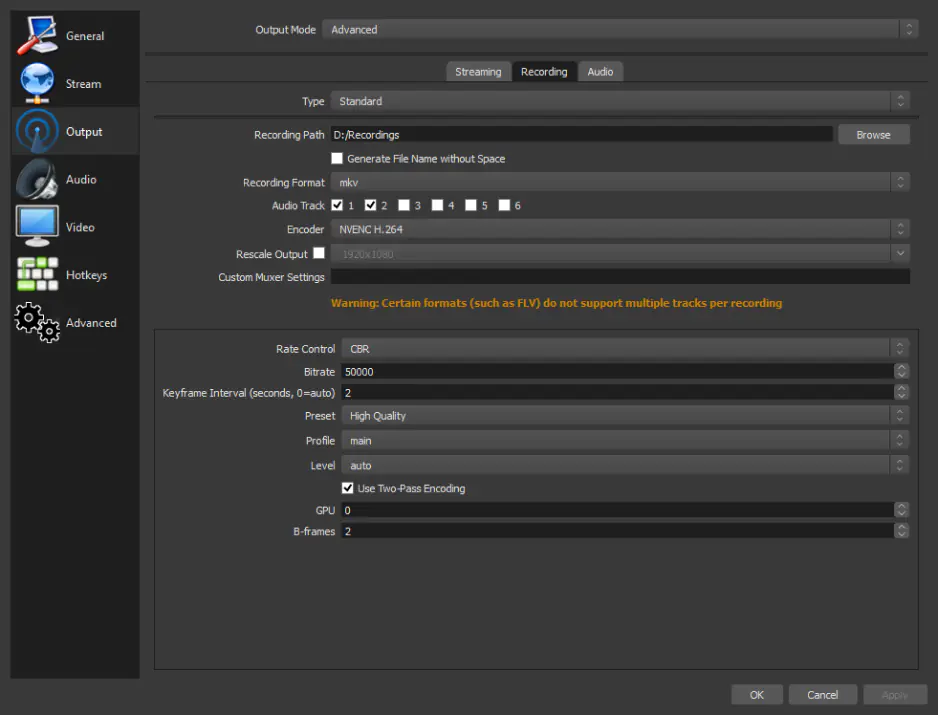
In OBS Studio, click on the Control tab and go to Settings.
In the Output Mode dropdown menu, click on Advanced.
Click on the Recording tab, set your preferred export format, and then check the boxes for as many audio tracks as you want to record.
Navigate back to the main screen and choose your audio sources (e.g., microphone, system audio, etc.).
Click on the settings (gear) icon in the Audio Mixer and choose Advanced Audio Properties.
Match your audio sources to their respective audio tracks, and you’ll be ready to start recording.
Recording from a microphone is a little easier than internal audio. The same process works for both Windows and Mac, so just follow these steps:
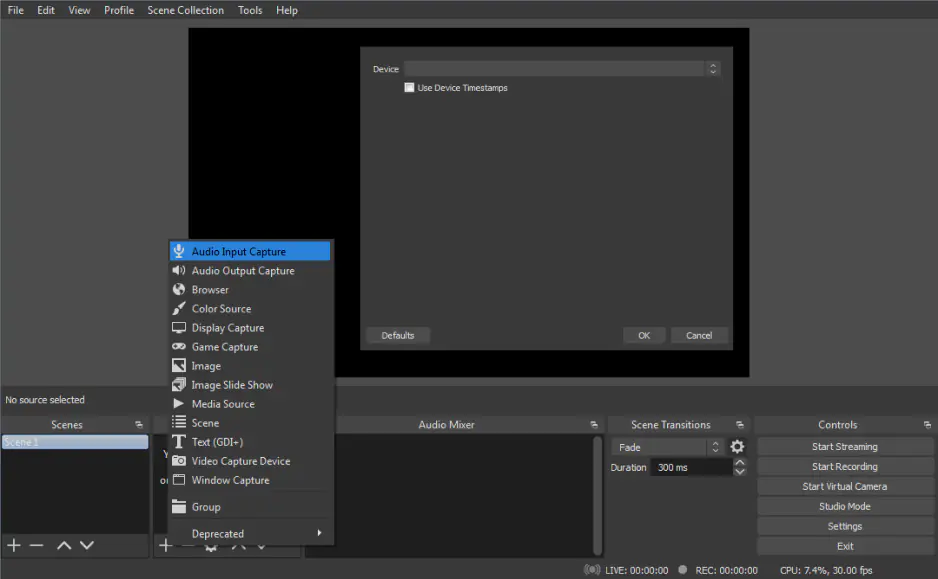
Open OBS and click the + icon in the Sources box at the bottom of the screen.
Choose Audio Input Capture from the menu that appears.
A pop-up menu will appear. Name your source or leave it and then click OK.
Click the drop-down menu next to Device and select your desired microphone from the menu.
Within the Audio Mixer box, you’ll see a new channel appear. You can monitor these meters to set your recording levels.
Note that with this method, your microphone audio will record directly to the video file and all audio sources will go into a stereo audio track within the video file that outputs.
If you want to do advanced-level audio mixing, right-click on the audio mixer and then select Advanced Audio Properties from the menu that appears.
How to record a webcam in OBS Studio
In addition to other methods, you can use OBS Studio to record a webcam. As long as the webcam properly connected to your desktop, then its video and audio output can be connected to OBS Studio. Plus, OBS can record not only your webcam but also your screen, which is useful for streamers or people who make tutorial videos.
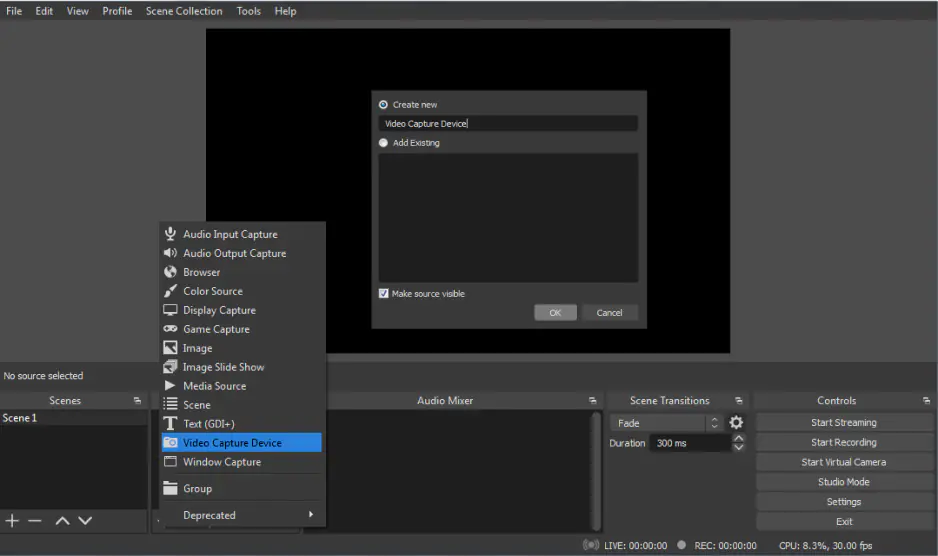
Step 1. Add your webcam as a source
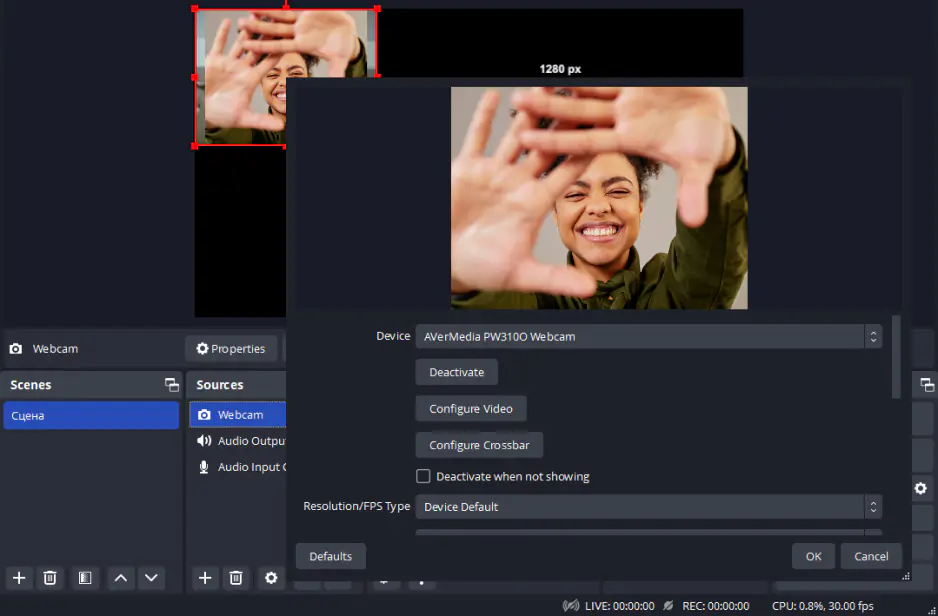
As with the other options, your webcam can be found as a source within OBS Studio’s settings if it is properly connected to your desktop. Within OBS Studio, open the settings and find Sources. Then, click the Plus icon to add a new video capture device. Hit Create New and name your webcam something that will help you remember it.
From the list of devices, select your webcam. We recommend using high for the preset, but you can configure that setting according to your needs. Don’t forget to double-check the audio source while you are in this menu, whether it is the webcam itself or another microphone.
Step 2. Choose the output folder
Next, go to the Output menu within the settings and find the Recording Path. This selects the destination for the video once you hit record. The easiest way to select the right path is to hit Browse and then navigate to the desired folder.
Step 3. Record the screen
Next, all you need to do is hit Start Recording located beneath Controls on the main interface. At that point, your recording or stream is rolling.
When you finish recording, OBS defaults the output to your default Video folder on Windows or Mac. To reveal the location, simply click File and then Show Recordings from the menu.
However, your files don’t have to go to the default Video folder, and it’s pretty easy to choose a custom location. Follow these steps:
Click the Settings icon at the bottom right of the interface.
Choose the Output tab on the sidebar on the left.
Under the Recording box, you'll see Recording Path. Type or paste your file destination there or click Browse and select your desired folder.
Once your recording is complete, the files will route to that folder. You can use the same File > Show Recordings process to open the folder.
If you’re having difficulty playing your recording, you may need to check your output format – MP4, MPV, or MKV, for example. If it isn’t your desired format, don’t worry. Simply click File and then Remux Recording. Select your file and then choose a better format for remux.
With this guide, you now know the basics about how to use OBS to record a screen and audio. As stated, many reviewers have spoken about the software’s high learning curve.
If you’re looking for a solid alternative that’s easy-to-use for beginners and advanced users alike, Movavi Screen Recorder is an excellent choice. Though it’s not meant for gaming recording, it’s a superb option for residential, educational, and commercial use.
Disclaimer: Please be aware that Movavi Screen Recorder does not allow capture of copy-protected video and audio streams.

Frequently asked questions
In the sections above, you’ll find detailed instructions on how to with OBS on Windows, Mac, Linux, and mobile devices. But here’s a shortened step-by-step version of what you’ll see above.
Open OBS and click the plus sign in the Sources section.
Choose a name for the source and click OK.
Choose a display and capture method and then OK again.
If you don’t want to use the default file destination source, click Settings and then Output. Then choose another destination folder next to Recording Path.
Click Start Recording.
Many people have reported this issue, so don’t feel you’re the only one. This issue mainly comes up for Windows users and computer systems where two graphics options – typically dedicated and integrated – are available. However, there is a wide range of possibilities. Below is a list of the most common causes for a black screen with OBS.
You’re not running the right version of OBS
Check to see if you’re running the 32 or 64-bit version of OBS. If your computer processor doesn’t match, this could cause an issue.
OBS doesn’t have administrator rights
OBS shares your screen when streaming and any content you bring up on your desktop. So if it doesn’t have the proper administrator privileges, it may not record properly.
You don’t have the right GPU selected for what you’re recording
If you have a dedicated graphics card for gaming and another for the monitor. You must select the correct GPU for what you want to record.
You haven’t enabled Multi-adapter capability
If you’re using SLI/Crossfire technology with two graphics cards and don’t have this enabled, it may cause a black screen recording.
You’re running conflicting software
Many users don’t realize they’re running software in the background that also deals in video recording or screen capture. It’s a good idea to check and see if any third-party applications are causing the issue and delete or disable them.
There are three general scenarios for recording with OBS. Check your recording scenario and review the bullets below to ensure you have a good setup.
Gaming
Open your capture settings and select Game Capture from the menu. The program takes care of the rest!
If you won’t be playing in full-screen but still want to capture the gaming window, set the Base (Canvas) Resolution as the same as the dimensions of the window.
To set up an audio-only recording session, set the audio to Desktop Audio. But you can also select the Mic Audio options and configure it to include narration.
Online conference or lecture
Set the video capture options to Display Capture. Activate the if needed.
Then adjust the Base (Canvas) Resolution to match your window.
Open Audio Settings. If you’re recording yourself as the presenter, then select your mic from Mic Audio for the best sound. If you’re recording a speaker, then select Desktop Audio.
Low-end computers
To create the best video possible with a low-end computer, go to the Settings menu and reduce the resolution – 16:9, 720p, or down to 480p.
If you’re recording gaming, you’ll need to do the step above and also reduce the resolution within the game itself.
To learn more about OBS settings for recording, follow the link below.
If you’re looking for an alternative to OBS, here are some recommendations.
Recording
Bandicam
Icecream Screen Recorder
FlashBack Express
Streaming
Lightstream Studio
Wirecast
Follow the link below to check out more alternatives:
Yes, OBS Studio is an open-source program that’s available completely free of charge for everyone. To learn more about OBS Studio, follow the link below to read a detailed program review.
OBS Studio is a quality and reliable tool for screen recording. Its advantages are low resource usage on your device and good technical support.
The answer to this depends on your preferences. OBS uses fewer machine resources, while some say that Streamlabs is easier to use. We recommend experimenting with both to find the right fit for you.
The best and most commonly used formats are FLV and MP4. FLV automatically backs up your recording as you record, which can be useful in the event of a crash. MP4 is more commonly accepted by editing software and video-hosting sites.


1.5M+ users already subscribed to our newsletter