
Step 1. Install the video editing program
Launch the installation file and follow the on-screen instructions. After the program is successfully installed, it will open automatically.

Intro Maker for YouTube Channel
Try Movavi Video Editor!
Add and customize intros and outros
Apply creative stickers and titles
Share videos to YouTube directly
A YouTube channel intro is like a signature. It makes the channel stand out from the crowd and conveys the channel’s nature in just a few seconds. Having a great intro should be the first step for every video content creator.
How to create a YouTube intro? Step one is coming up with a cool concept; this will emphasize the unique features of your channel. Unleash your creativity, imagine your perfect intro, and think through every aspect thoroughly:
Background photo or video. YouTube is all about video content, and this makes the visual aspect of your intro the most important. Make sure the photo or video you choose is of high quality, looks good, and stands out from others on the platform.
Caption. You want the viewer to remember the name of your channel, don’t you? Adding a caption will help you build a connection between your content and the name of the channel in the viewer’s mind.
Animation and effects. Many people find a static picture with text boring. Animation will make your intro more dynamic. Consider adding animated captions, emojis, filters, visual effects, 2D or 3D animation, etc.
Music and sound. No YouTube video is complete without audio, and intros are no exception. Find a song or tune that will complement your visual, creating a memorable experience for the viewer.
This is a comprehensive guide on how to make an intro for your YouTube channel and use that intro to brand your videos. The software we’ll be using in this tutorial is Movavi Video Editor.
This simple program, available for both PC and Mac, makes video editing the easiest thing ever. Here’s a gaming channel intro created with this tutorial.
What do you think? Want to make something similar? Click the button below to download Movavi Video Editor, install it on your computer, and let’s begin!
How to make an intro for YouTube
Step 1. Install the video editing program
Launch the installation file and follow the on-screen instructions. After the program is successfully installed, it will open automatically.
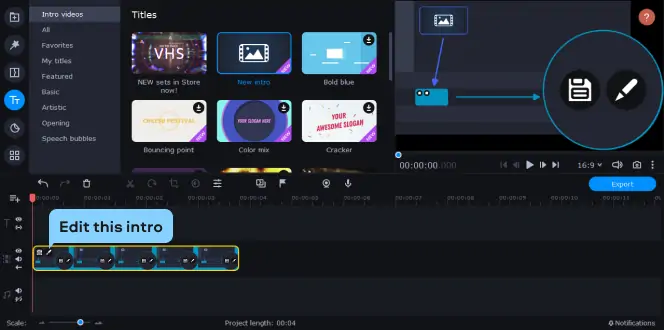
Step 2. Create a new intro template
Open the Titles menu and go to the Intro videos tab. There are some presets you can use for your intro, or you may choose to make one from scratch. In this case, drag and drop the New intro preset onto the timeline at the bottom of the program window.

Now click the Edit this intro icon. This will open the intro editing mode.
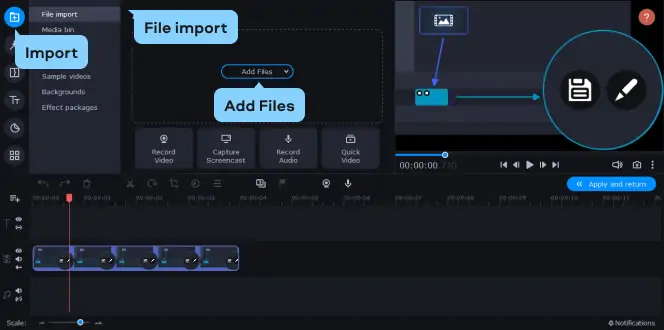
Step 3. Upload the background image for your intro
Let’s start with the background. Go to the Import menu, open the File import tab, click Add Files, and locate the image or video you’ve chosen for your intro. In our case, we'll use a still image – they’re a lot easier for beginners to use.
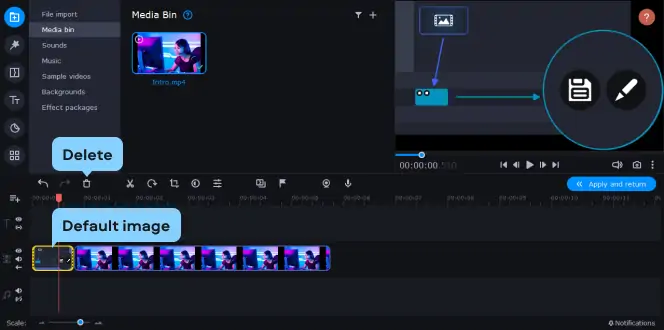
When the file has been added, don’t forget to remove the default image. Click the picture on the timeline and hit Delete.
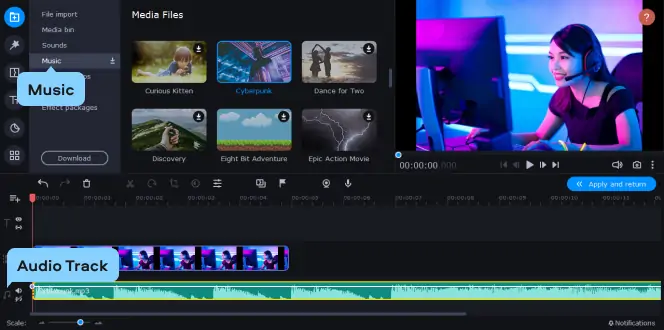
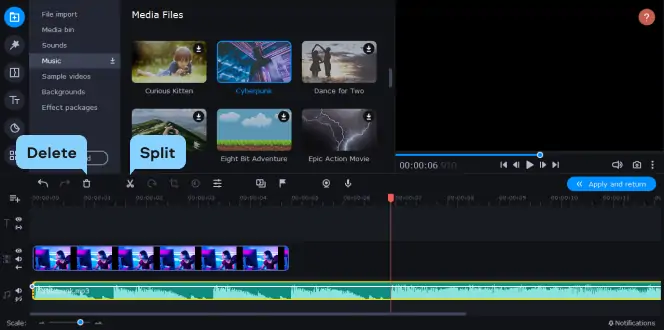
Step 4. Choose the music for your intro
If the music file you want to use is saved to your computer, click Add Files again and add the music the same way as you added the background.
If you haven’t yet decided what music to use, you can choose something from the program’s built-in collection. Click Music and select one of the options. Add it to the Audio Track via drag-and-drop.
If the audio is too long for an intro (for example, if you want to just use a mall section of a song), you will have to cut it. Select the music on the audio track, locate the place where you want to make a cut and click Split.
Now click on the piece of the audio you don’t need and hit Delete. Repeat the process as many times as you need to remove all the unwanted parts of the audio. If the music happens to be somewhere in the middle of the timeline, drag it to the start of the Audio Track.
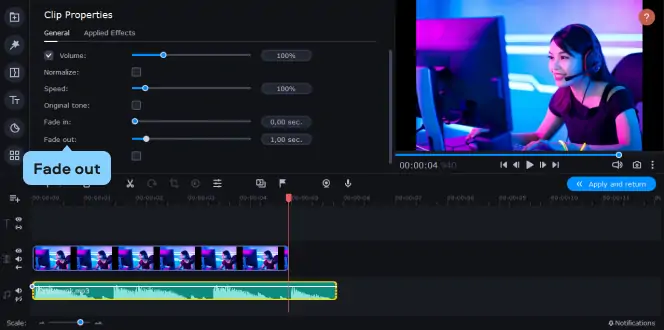
If the audio has been cut, it may sound rough at the end. If you want to make the ending smoother, it’s worth considering adding a fade-out effect to the audio. Double-click on the audio to open the Tools panel. Find the Fade out slider and set it to 1 second. This is enough for a short video like an intro. Of course, you can choose the fade-out length yourself. Just think about what will work best for your intro.
Also, make sure that your background matches the music on the timeline. Adjust the length of your background by dragging the right edge of the image on the Video track.
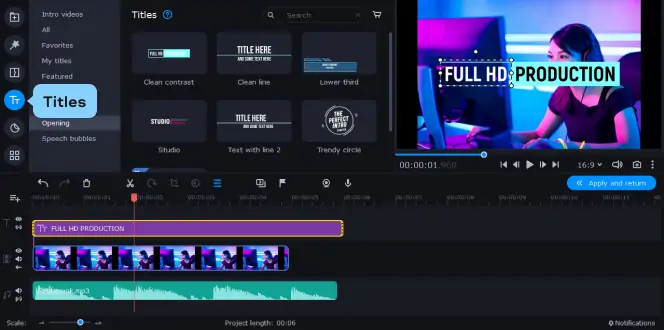
Step 5. Add a caption
Let’s add the name of your channel. Open the Titles tab and select one of the many presets included in the program. To add a title to the video, drag and drop the preset onto the Titles Track and adjust it to the length of the intro by dragging the edges on the timeline.
Double-click the title on the timeline to edit the wording. You can enter the text you need, change the color, font, and size of the characters, even speed up or slow down the animation. To accept the changes, click Apply.
If you can’t find anything to match your idea, check out our Movavi Effects. Each Effects set has plenty of options to choose from. It’s not just captions but also transitions, stickers, music, and backgrounds. If you run a travel channel, you may find something appropriate in the Dream Journey Pack. The Elegant Vlog Pack is nice for a beauty channel. For a gaming channel, we’ve chosen one of the presets from the Let’s Play Pack.
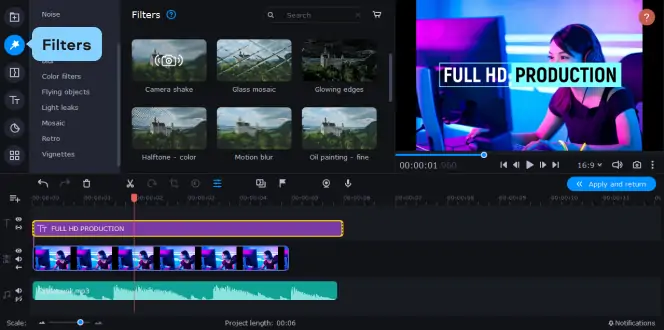
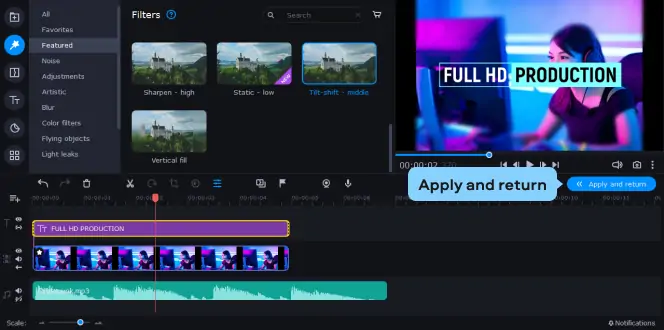
Step 6. Overlay filters (optional)
Your intro is pretty much ready. You can save the clip and call it a day now, or you can take it to the next level! For example, adding filters will change the atmosphere of the intro, and adjustments to the background image to use a different color scheme will add another dimension to your video.
Click Filters, select one of the many options in the program and drag it onto the background photo or video on the track.
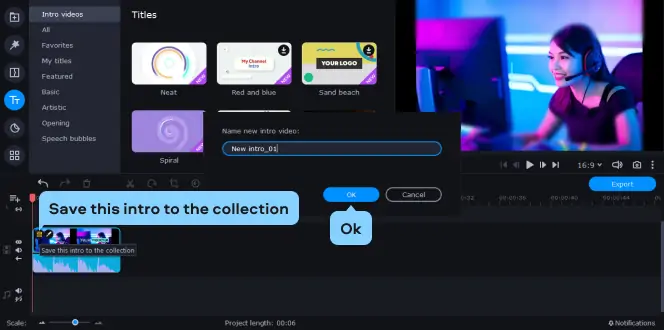
Step 7. Save the intro for later use
It’s time to save your intro. Click Apply and return to exit the intro editing mode.
You’ll see your newly created intro on the timeline. Click the Floppy Disc icon in the top left corner of the intro and enter a name in the pop-up window. When you click OK, your intro will appear with the other templates in the Intro videos tab. It is ready for you to use and edit any time you want.
If you decide to make changes to the intro, create a new project, add your intro to the timeline, and click the Edit this intro icon (as shown in Step 2). This will re-open the intro editing mode. After the editing is done, don’t forget to save the changes as described above.
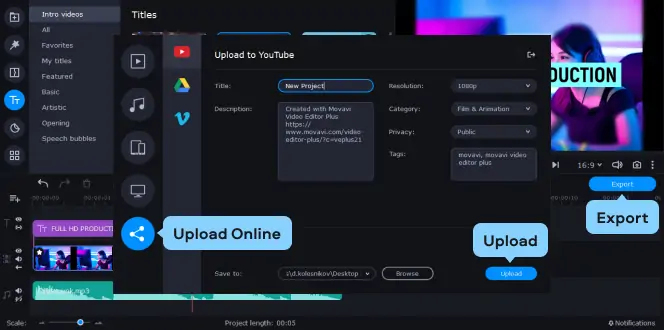
Step 8. Upload the video with the intro to YouTube (optional)
Now you can use this custom intro in your YouTube videos. Simply drag and drop the intro onto the timeline and go on with your montage.
When the video is complete, click the Export button. Of course, you can save the video in MP4 format, but there’s a better option. The software lets you upload the video to YouTube directly. Click Upload online, sign in to your YouTube account, enter the data for the video (title, description, tags, etc.), and hit Upload. When the process is complete, your video will be on YouTube gaining views and likes!
Now you know how to make a YouTube intro on your own. With Movavi Video Editor, it doesn’t matter whether you’re a montage professional or a beginner, whether you’re an avid gamer, a beauty blogger, or a business advisor – this easy-to-use software will meet your needs. Try the program and find out for yourself!
*The free version of Movavi Video Editor may have the following restrictions depending on the build: watermark on exported clips, 60-second video or 1/2 audio length limit, and/or some advanced features unavailable when exporting videos.

If you're looking for good intro ideas for your gaming YouTube channel, consider using Movavi Video Editor to create engaging and professional intros. It offers a wide variety of templates, effects, and tools that allow you to customize your intros to match your channel's style and target audience, which are gamers.
To create a good YouTube intro, Movavi Video Editor is a great choice. This video editor offers a range of features and templates designed to help you design eye-catching and professional intros with ease. You can add text, music, and effects to draw viewers in and keep them engaged.
Making a professional-looking intro for your YouTube channel is achievable with Movavi Video Editor. It provides you with a wide selection of professional-looking templates, transitions, and effects to create a high-quality intro that complements your channel's brand and content. This allows viewers to take your channel more seriously and increases viewer retention.
Popular intro styles for YouTube channels vary from simple text-based intros to animated graphics and cinematic scenes. With Movavi Video Editor, you can create a wide range of intro styles to suit your channel and attract viewers. The software offers animations, transitions, and customizable templates to help you develop a unique, high-quality intro.
How to make a movie from photos
How to use a music cutter
How to Merge Videos on Windows 10 – Top 7 Video Mergers
How to Make a Time-Lapse Video: 2 Easy Ways
How to Remove Audio from a Video: Free Ways
11 Online Video Editors without Watermark [Recommended 2026]
Top 17 Best Gaming Intro Makers in 2026 | [Free and Paid]
Best 10 Instagram Story Viewers to Watch IG Anonymously in 2026
Instagram Story Dimensions | Instagram Story Size
Free Online YouTube Intro Maker


1.5M+ users already subscribed to our newsletter