Looking for Webinar Creation Software?

Edited by Ben Jacklin
20 646

Try Movavi Video Suite!

  • Create complete movies with music and effects
  • Convert and play back media files
  • Burn CDs, DVDs, and Blu-ray discs

Before going live with a webinar, it is important to properly prepare for it. Apart from running a live video stream, which is usually provided by an online service, you should pay attention to the multimedia materials you want to use during your webinar. No matter what the theme of your lecture or online meeting, if you want to do a webinar that sells, there are a few steps you should take beforehand. In this article, you’ll learn how to prepare your online meeting using the Movavi Video Suite multifunction webinar making software. Try this powerful program for free and see what it can do!

What You Need to Make a Webinar

Convert Videos and Images to More Appropriate Formats

When it comes to working with media files, there’s always a chance you’ll get into trouble because a video does not play properly or an audio file doesn’t play at all – usually it means there’s some format incompatibility. These things should be checked beforehand. Take a look at the following tips on how to create a webinar and be prepared for any unexpected situation.

1. Convert All Your Videos to One Format

If the video files you want to present during your webinar are stored in different formats, it would be a good idea to convert them all to the same format. One of the most universal video formats is MP4, so transforming your video collection into MP4 will prevent unexpected playback problems.

2. Compress Videos to Save Space on Your Account Storage

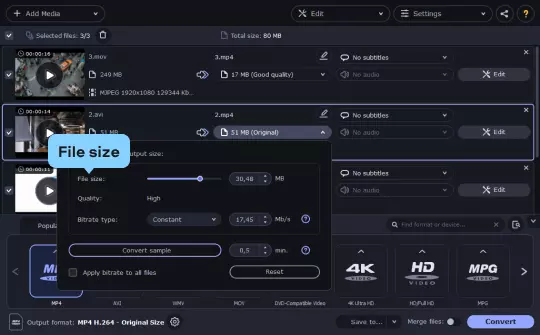
Another problem that may appear out of the blue is running out of free space in your account storage in the service you use. Usually, webinar services limit the storage space on user accounts, requiring additional payments to either extend the online storage or purchase a more expensive subscription plan. So, in this case, you should give some thought to the size of the videos you want to use. First of all, no Full HD or 4K videos. As your online presentation may also be viewed on mobile devices, the difference between HD and Full HD quality is barely noticeable, but the difference in size can be huge. In this case, large video files can be compressed and reduced in resolution.

3. Ensure All Your Videos Use One Aspect Ratio and Orientation

It often happens that the videos you include in your presentation are of different orientation or aspect ratio, which results in overall inconsistency and a less-than-perfect impression. To avoid this, you can check on every video file to be used and edit these two parameters by rotating and cropping the videos. When everything is done, simply export all the files at once.

Do the Screen Recording

Another important feature to be aware of when you begin to make a webinar is screen recording. There are many instances when you may need to demonstrate what’s happening on your computer screen, and that’s where our webinar creation software comes in handy.

1. Record Online Video Calls and Interviews

If you want to save video chats, online interviews, or conference calls on your PC for later use in your webinar, it’s pretty simple to do. To capture a video call, launch the screen-recording module and position the recording frame over the site window from which you want to record. Click the Start recording button to start capturing your call. When the call is over, click the Stop button. Your recording will automatically be saved on your computer.

2. Capture the Working Process of a Particular Program

You can also record complete tutorials of any computer program. Set the recording frame over the program interface and click Start recording. Use your microphone to add audio commentaries and highlight important functional elements with mouse cursor effects. When you’ve covered everything, click the Stop button to save the results.

3. Take Snapshots or Record Videos of Websites

Sometimes you may want to show certain news items, articles or other media content in the way in which it appears on a particular website. If you only need to show a still picture, use the screen-shot button: select the frame of your browser and click Snap. If you need to grab a video, click Start recording after the frame is set. While capturing the screen, you may also include audio commentaries and highlight certain elements with mouse cursor effects. Click Stop to save the recording.

Edit Your Videos

No matter who your audience is, you’ll be able to create truly unique and original videos using our built-in callouts, stickers, and extra sets of effects. Our video-editing software can help you execute a simple operation like cutting, trimming or cropping, as well as create a professional-looking promo video for your webinar.

1. Cut, Trim or Crop a Single Video

If you have a video that you need to quickly fix, for example in terms of length or aspect ratio, you will have no problems doing this in our video editor. Simply add the video onto the timeline, select it and choose the editing tool you need. Make all the necessary adjustments and click Done. Then press the Export button to save the final result.

2. Make a Slideshow With Music and Transitions

Making a slideshow with our video editor is fast and easy. Choose the Create slideshows option and follow the onscreen instructions to add photographs, select transitions, and choose music. At the end of the process, you will have a cool slideshow that you can use in your webinar or simply share with friends.

3. Create a Promo Video for Your Webinar

Using our video editor, you can create marketing and promo videos that attract people’s attention. Start with the basic editing - trim long videos, cut unnecessary parts and proceed to add stylish transitions and video filters. If you have a green screen at your disposal, you can even use the chroma-key effect to change the background. Top everything with colorful stickers and callouts to attract more viewers to your webinar.

Start Your Webinar

Now that all the preparations are done, you can safely start your webinar. Find a convenient platform, if you haven't already, attract viewers, and go live to have a successful webinar with the media content well-prepared ahead of time in Movavi Video Suite.

Join for how-to guides, speсial offers, and app tips!