

Step 1. Download and install the Movavi DVD ripper
Download the installation file for the program. Once the download is complete, open the file and follow the installation instructions to install the app on your PC or Mac.
Can you guess how many DVDs and CDs were produced over the last few decades? It’s estimated that we’ve created over 300 billion discs. However, ever since the rise of digital media, these once-wonderous pieces of tech are often thrown away. Something like 5.5 million boxes of them are dumped in landfills each year, in fact.
Just think of how much information is being lost! Unfortunately, DVDs do have an expiration date, which can be as short as a few years even under good conditions. To transition from physical to digital media without losing any content, you’ll likely want to rip your DVDs and convert them to MP4. Fortunately, there are plenty of programs that let you do exactly this. Unfortunately, the many options can make it difficult to pick one. That’s why we’ve tested a dozen of the best DVD to MP4 converters. We analyzed each one, combining my personal thoughts with reviews from other trusted sources, to help you determine which program is best for your individual needs.
Best overall: Movavi Video Converter
Strikes a great balance between being easy to use and offering powerful conversion features.
Best free option: VLC
It’s open-source and offers all features for free.
Best for efficient conversions: VideoProc Converter AI
Can convert files many times faster than other programs.
Best for Mac users: iSuper DVD Ripper
Lightweight, simple program optimized for macOS.
Best for professionals: MediaCoder
Extensive customization options come at the cost of a steeper learning curve.
If you want a fast conversion without losing quality, always look for a fast mode option like SuperSpeed in Movavi Video Converter. This saves time while maintaining good video quality, and you don't have to manually adjust advanced settings.
Why I picked it: I loved how Movavi Video Converter packages powerful conversion tools in an easy-to-use interface.
Want to watch your favorite movies on your mobile device, no matter where you are? This tutorial will teach you how to convert a DVD to MP4 in multiple ways using Movavi Video Converter, an online conversion tool, and free programs.
Using Movavi Video Converter, you can process your digital videos with just a few clicks. With its SuperSpeed mode, you will get your processed files in no time. The converter has some editing options: you can enhance video quality, add subtitles, crop and rotate your clips. You don't need to obtain any additional information about video formats or settings – just download the program, run it, upload your video, select a ready-made preset, and click Convert. Or use the online video converter as an alternative.
Choose the version of the DVD-to-MP4 converter for your OS and follow this easy step-by-step guide.
Download the installation file for the program. Once the download is complete, open the file and follow the installation instructions to install the app on your PC or Mac.
Open Movavi Video Converter and click the Add Media button, then choose Add DVD and click Open DVD to add your DVD files to the program. Locate the VIDEO_TS folder on your DVD and click Select Folder. Please be aware that Movavi Video Converter does not allow the conversion of copyright-protected videos and DVDs.
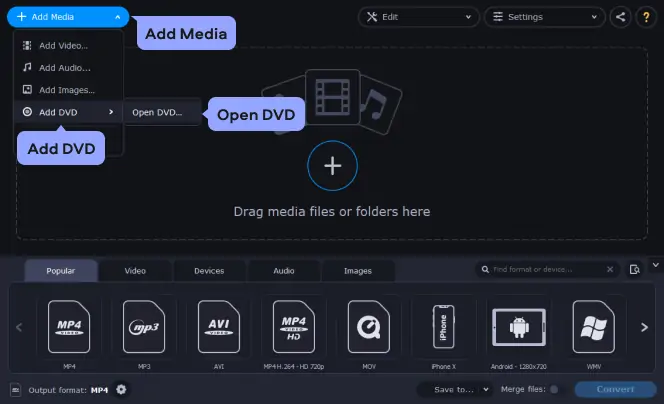
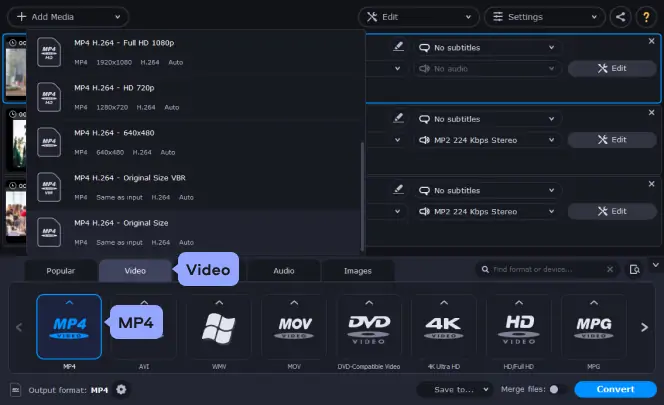
To set MP4 as the target format, go to the Video tab in the lower part of the program window. Find the MP4 group and select the preset that best suits your needs.
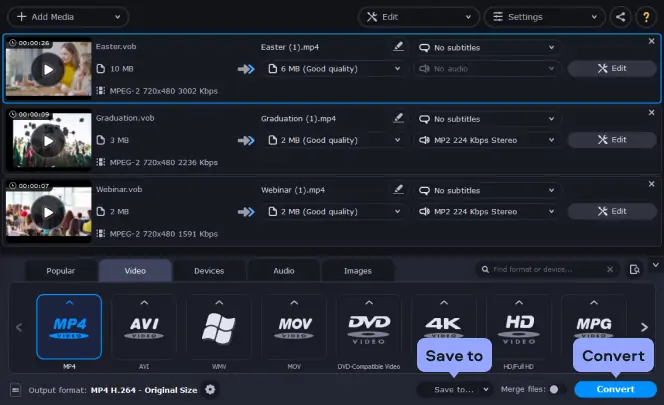
Click the Save to button to specify where the program should save the converted files. To convert a DVD to a video file, click the Convert button. The conversion process will now start. Converting from a DVD to MP4 couldn't be simpler!
Turn on your device and connect it to the computer. Start the mobile device uploader application, which will transfer the ripped files to your device. Or, depending on the device, just open a folder on it and save the converted files there. Please note: transferring may take some time, depending on the size of your video file.
And that's all there is to it! Convert a DVD to MP4 (MPEG-4) in no time with our simple program!
All-in-one video file format converter
Fast video conversion speed
Lossless file compression capabilities for the best video file exports
Can’t burn DVDs
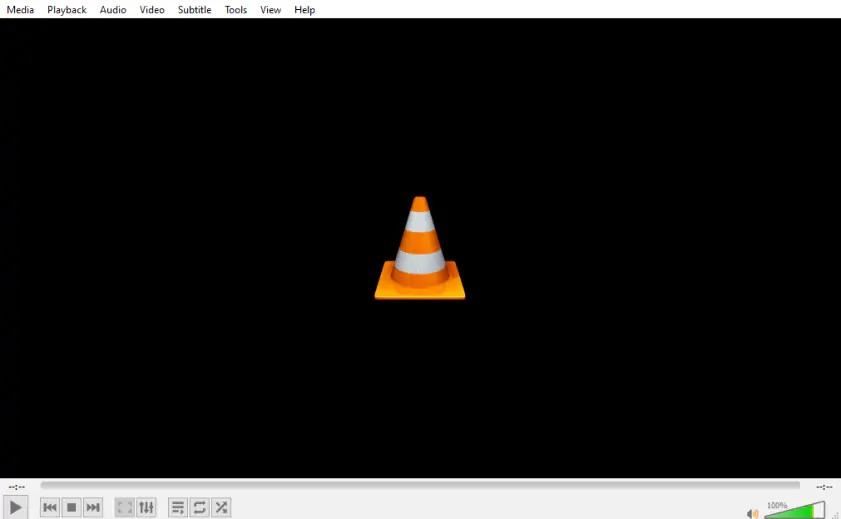
Why I picked it: I admire VLC’s commitment to remaining open-source (and therefore entirely free).
The next conversion option is to rip a DVD with VLC. It’s a popular media player that can not only play your videos but also convert files and record desktop. The app is available completely free of charge and can be quite handy if you need to convert a DVD from time to time. To learn how to convert a DVD to MP4 with VLC, check the step-by-step guide below.
Step 1. Download the installation file to your computer by following the link below.
After the download is complete, install the software on your computer and launch it.
Step 2. Open the Media menu in the top left corner of the program window and select Open Disc. Click the Browse button next to the Disc device. Locate the device or the VIDEO_TS folder and hit the Select Folder button.
Step 3. Open the Play drop-down list in the bottom right part and click Convert.
Step 4. In the new window that opens, find the Profile drop-down menu and choose Video - H.264 + MP3 (MP4). If you want to specify the advanced settings for the profile, click the Wrench button next to the profile’s name. You can change the video and audio codecs and set the bitrate and video quality. When you’re done, click Save.
Step 5. Hit the Browse button to enter the name for your videos and specify the output folder. To copy a DVD to MP4, click the Start button. That’s it! Now you know how to use VLC to rip a DVD without a watermark.
Drawbacks of this conversion option:
100% free video file format converter
No watermark on exported videos
Support for audio and video file conversions
Why I picked it: Few free DVD converter programs offer as many tools as HandBrake.
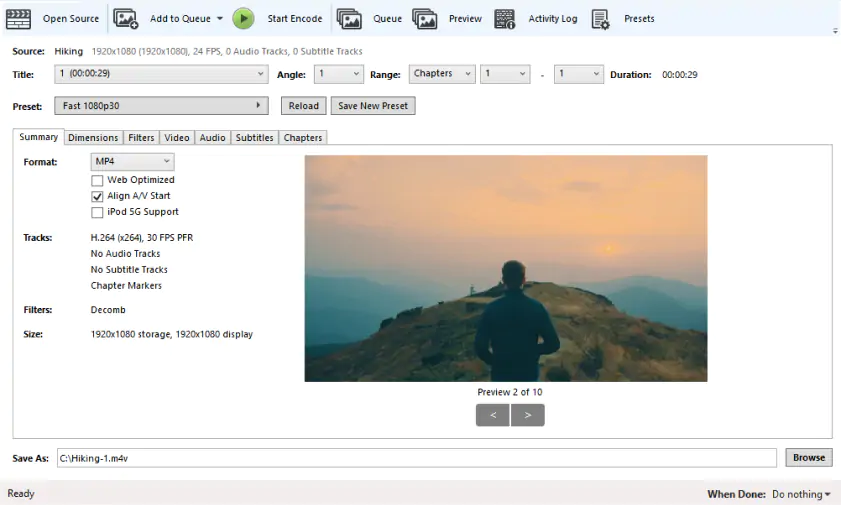
The next option is to convert a DVD to MP4 for free using HandBrake. HandBrake is a quick open-source converter that supports almost all media formats and codecs. It’s a cross-platform converter so you don’t have to worry about OS compatibility. One of the features worth mentioning is customizable presets that allow users to specify basic and advanced conversion options according to their needs.
On September 6, Handbrake’s developers released version 1.10.2. The update fixed a few crashes, including on Apple Silicon Macs, and updated a couple of libraries, including one for subtitles.
To learn how to rip DVDs with HandBrake, read the step-by-step guide below.
Step 1. Download the installation file for your OS by following the link.
Once the distribution file is downloaded, finish the installation process by following the instructions and run the converter.
Step 2. To upload your videos to the converter, click the Folder (Batch Scan) button. Find your DVD and select the VIDEO_TS folder.
Step 3. The MP4 format will be selected as the target format by default. If you want to change any video settings, go to the Filters and Video tabs.
Step 4. To choose the destination folder for your transformed files, click the Browse button in the lower right part of the program window. Hit the Start Encode button to launch the conversion. Done! Now you know how to convert a DVD to MP4 with HandBrake.
Drawbacks of this conversion option:
Similar interface to other video converters makes it easy to learn for veteran video creators
Helpful live preview for a sneak peek at how your finished video will look
User interface might be a little confusing for new users
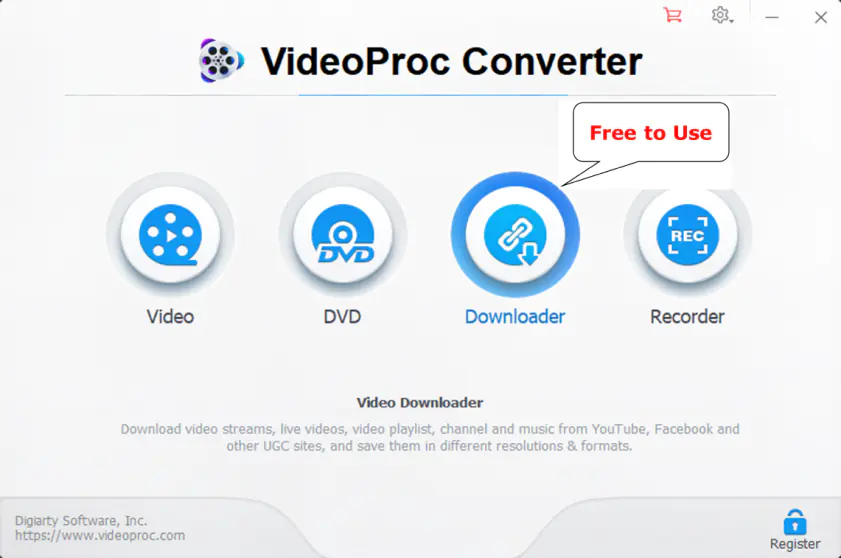
Why I picked it: When efficiency is the name of the game, it’s hard to beat VideoProc Converter AI’s conversion speed.
VideoProc Converter AI might appear simple but it offers more than meets the eye. It can handle DVDs of any type including Disney 99-title DVDs, Sony ArccOS DVDs, and other commercial DVDs encrypted by the latest encryption schemes. You can easily rip DVDs to popular formats such as MP4, AVI, WMV, and MOV, as well as copy full titles to MKV, VIDEO_TS folder, and ISO image files at a 1:1 ratio in just 5 minutes. It provides a full list of presets for different devices (iPhone, iPad, Android, TV, etc.) and video platforms (YouTube, Vimeo, Facebook, etc.), allowing beginners to rip DVDs with just one click. Experienced users are not left out in the cold as VideoProc Converter AI offers complete control over video resolution, bitrate, frame rate, video codec, and subtitle track.
VideoProc Converter AI released a major update on August 26, 2025. The update added an AI-powered vocal remover to the program, which can separate vocals from audio with a single click. I tested it to try and make a karaoke version of a song, one of the recommended use cases, and found it surprisingly easy and effective.
Step 1. Download the installation file to your computer by following the link below. After installing the program, open it up.
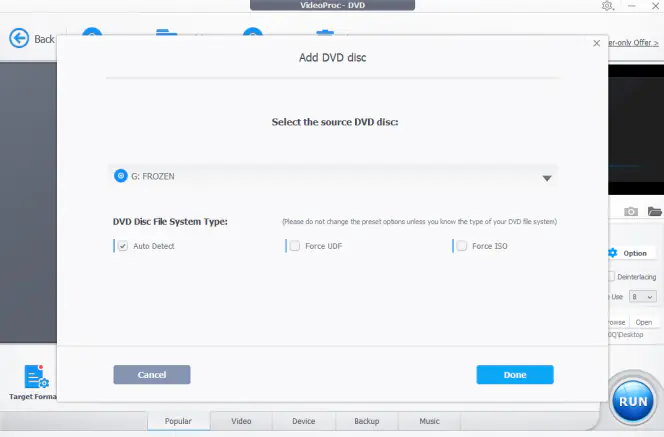
Step 2. Click DVD > Disc. The software will detect the discs mounted on your computer. Choose the DVD you want to rip into MP4. Hit Done to confirm.
Step 3. Click Video and choose MP4 H.264. Suppose you need to rip DVD to MP4 for sharing or playing on specific devices or platforms, click Target Format, and then choose the desired options such as Apple TV, iPhone, iPad, Xbox, YouTube, and Facebook.

Step 4. (Optional). By default, VideoProc Converter AI selects the main title. You can manually choose the title, subtitle track, and chapters. Better still, you can access a variety of editing tools by clicking the Edit button to refine the DVD content.
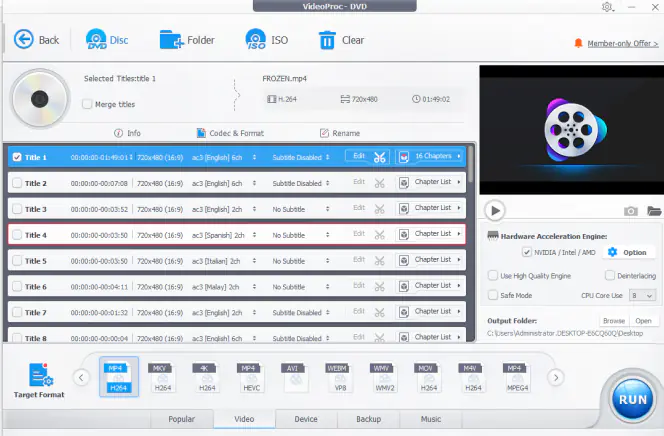
Step 5. Click Browse to select an output folder. Hit the RUN button to start copying the DVD to your computer in MP4 format.
Drawbacks of this conversion option:
Automatically bypasses protection from commercial DVDs
Offers multiple output formats and device presets
All-in-one: convert, compress, and download videos
Advanced AI features for enhancing old DVD content
Cannot handle Blu-rays
Why I picked it: This is a great option for folks who want to convert DVDs to MP4 without downloading software.
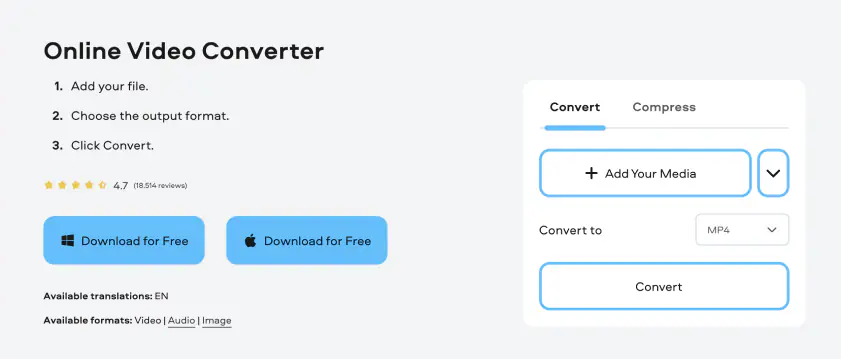
The next conversion option on our list is to use a DVD-to-MP4 converter online. We recommend you try Online Video Converter by Movavi – an easy-to-use online conversion service that will help you to recode your files in a few clicks with no watermark. One significant advantage of this method is that you don’t have to download any potentially dangerous freeware or shareware, so you won’t waste any time installing apps or risk installing malware on your computer.
Check out the short guide on how to convert a DVD to MP4 online.
Step 1. Visit the online DVD ripper website.
Go to Online Video Converter by Movavi
Step 2. Before the conversion, make sure you’ve saved the video from your DVD to the computer. Next, click the Add Your Media button to upload files to the online converter. Find your video and click Open.
Step 3. MP4 will be selected as the output format by default. To change the video resolution, audio quality, or set a specific part of the video for the conversion, click the Cogwheel icon next to the formats drop-down list.
Step 4. To convert DVD files to MP4, hit the Convert button. After the conversion is complete, the file with the .mp4 extension will automatically be downloaded to your computer. Alternatively, you can click the Download button. Now you know how to use the online DVD converter to do the MP4 conversion.
Drawbacks of this conversion option:
Easily convert videos to different formats without downloading any software
Supports most popular video file formats
Requires an Internet connection to work
Why I picked it: Freemake is a great option for people using older machines that might not be able to handle more powerful programs.
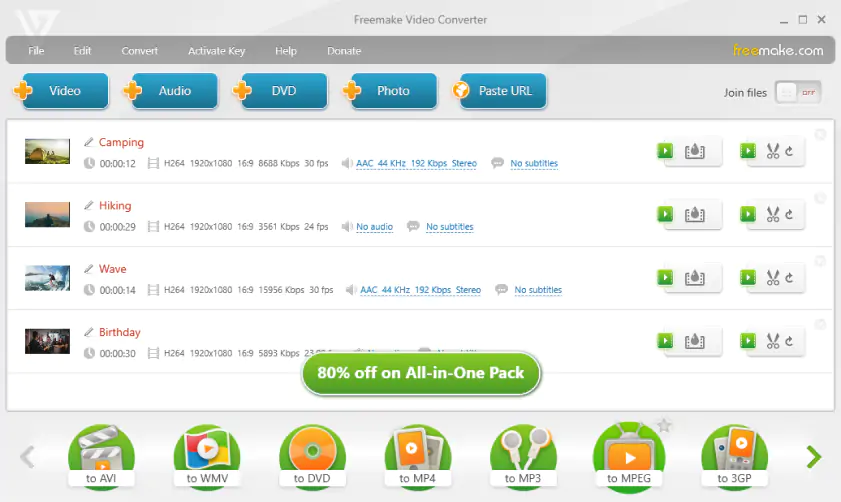
Another way to rip a DVD to MP4 is to use a free app by Freemake. With this converter, you can easily extract your DVDs and turn them into MP4 videos. The program has a simple interface that will take a few minutes to master. Freemake Video Converter supports different types of DVDs, including DVD+R/RW, DVD+R DL, and others. Note that the app is only available for Windows.
Follow the steps below to rip a DVD to MP4 for free using Freemake Video Converter.
Step 1. Download the DVD-to-MP4 converter for free.
Download Freemake Video Converter
Follow the on-screen instructions to install the program and run it.
Step 2. Hit the DVD button to upload the videos. Locate your DVD and click OK.
Step 3. If you want to cut your video before converting it, click the Scissors icon. Make cuts in the new window that opens and click OK to save the changes.
Step 4. To select MP4 as the target format, click the to MP4 button in the lower part of the program window. In the new window that opens, you can choose the preset for your videos and an output folder. To start ripping DVDs on Windows 10, hit the Convert button.
Drawbacks of this conversion option:
Easily convert DVDs to MP4 and other file formats
Support for popular video file formats for desktop and mobile devices
Easy-to-learn user face, even for brand new users
Not available for Mac or Linux computers
Intro clip and watermark automatically added to all converted videos

Why I picked it: Few programs can overcome as many types of DVD encryption as WinX DVD Ripper.
With over nine million downloads, WinX DVD Ripper must be doing something right. Actually, this software does two things right: speed and versatility. WinX DVD Ripper claims to be one of the fastest solutions available. You can convert a two-hour DVD in less than 10 minutes. If you’re short on time or facing a large stack of DVDs to convert, you’ll likely want to consider software that boasts speeds faster than 95% of the alternatives.
WinX DVD Ripper is also impressive when it comes to challenging DVDs. WinX DVD Ripper claims to be able to convert damaged DVDs just fine. It also has unique technology that bypasses Disney’s strict 99 titles protections, which can prevent many DVD conversion software options from successfully turning Disney DVDs into digital files.
While the website for WinX DVD Ripper might be intimidating to new users, the process of using this software is straightforward.
WinX DVD Ripper released a major update in December, 2024, which markedly improved the program. The team fixed several issues relating to subtitles, digital DVD copies, hardware acceleration, and memory usage. In short, things you might not notice while using a program, unless you’d encountered one of the issues that was fixed. While I didn’t notice any major system slowdown during testing, the update to memory usage should reduce slowdowns for high-power users.
Step 1: Download and install WinX DVD Ripper. Make sure you are downloading the application from the official website. It’s free to download. However, note that it is only compatible with Windows.
Step 2: Launch WinX DVD Ripper.
Step 3: Load your DVD onto your device. If you’re using a modern laptop without a DVD port, you’ll need to use a DVD reader attachment.
Step 4: Select title. WinX DVD Ripper should read your loaded DVD and automatically select the appropriate title. If it hasn’t, select the correct title in the menu.
Step 5: Select your desired output. WinX DVD Ripper converts a DVD into multiple digital file formats. You can select a recently used profile to efficiently reselect settings you used previously, or one of the general profiles. There are plenty of options, including device-specific ones, if you are converting with a specific device in mind.
Step 6: Select the save location. By clicking the Browse button, you’ll be prompted to choose where you want your output files to be saved. Make sure to select a location with sufficient space.
Step 7: Convert! Click the Run button to begin the conversion process.
Drawbacks of this conversion option:
Free to download
One of the fastest conversion tools available
Able to convert Disney DVDs
Many features require payment
Why I picked it: I liked being able to adjust the many different customization settings available.
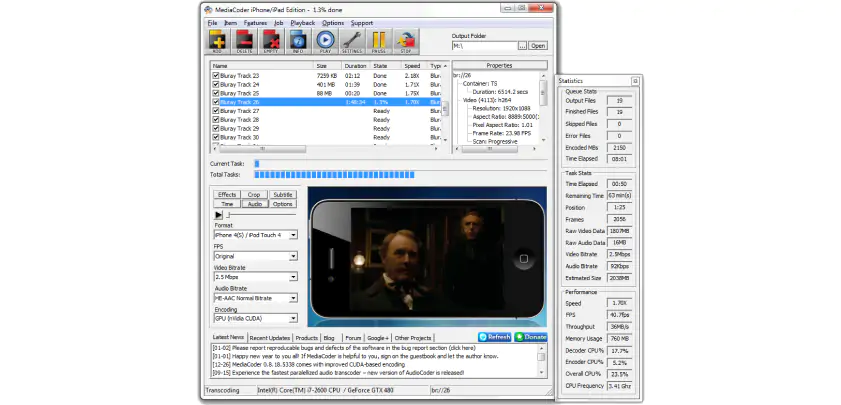
MediaCoder admits that it might not be the easiest tool out there. However, if you’re willing to overlook this, you’ll be rewarded with one of the most powerful DVD conversion tools available.
MediaCoder comes with all the usual tools you’d expect from a high-end media converter. It can compress large files, which is convenient for people ripping multiple DVDs. MediaCoder can also fix corrupted and partially downloaded files, extract the audio from a disc, and convert media for specific purposes like broadcasting.
The app also comes with more powerful, less common tools. For example, you can go beyond mere conversion and use MediaCoder to enhance the audio and video you are ripping. A wide range of transcoding parameters gives you precise control over the content you convert. The list goes on and is increasingly growing longer as new updates come out.
Step 1: Download and install the software. Ensure you download it from the official site. It is entirely free to download and use. As you’ll see when you click the Device heading, multiple versions are available for download. There is the complete edition, which is likely the one you want. Additionally, there are several other versions, each specialized for a certain function, like converting audio or encoding video for specific devices. Read the notes attached to each version and choose the one that best suits your needs. If you’re not sure, download the full edition, as it will likely be able to achieve what you need.
Step 2: Boot up the app and load your DVD into your device. Remember, MediaCoder is not about ease of use, so don’t be surprised at the interface, which will likely look outdated to modern users and intimidating to those new to converting.
Step 3: Select the track you wish to convert. You can select these by clicking the checkbox next to each track you want to convert. MediaCoder can convert multiple tracks.
Step 4: Choose the output file format. This is available in a drop-down menu labeled Format.
Step 5: Adjust other settings.
Step 6: Convert. Hit the Play button to begin converting. You can pause or stop at any time and see the progress in the classic blue-dashed progress bar in the middle of the window.
Drawbacks of this conversion option:
Specialized versions for specific tasks
Supports most file formats
A wide range of advanced conversion and enhancement tools
Interface is less intuitive than in other options

Why I picked it: Having video editing tools included in a conversion program saves time when you need to make adjustments to your converted videos.
DVDFab is a DVD ripper, decrypter, and converter that can crack vintage and new DVDs. Unlike many DVD conversion software solutions, DVDFab is available on both Windows and Mac. You can download each version for free, though a one-time payment is required to unlock the full version of the application. If you’re looking for a powerful DVD converter that can unlock even the highest-security DVDs and quickly convert them to high-quality digital files, DVDFab DVD Ripper is a must-try.
DVDFab released several new updates in August, 2025 for both the Windows and Mac version of DVDFab DVD Ripper. I like the new update notification window, which now contains a helpful log detailing recent changes. Other additions include some 100 new device output configuration choices and support for new Blu-ray protection.
Step 1: Download and install DVD Ripper from the official website. Make sure you download the version that is compatible with your device.
Step 2: Launch the application and insert your DVD into your device or an attached disc reader. If you have the DVD’s contents as a digital file, you can also drag and drop that file into the application.
Step 3: Select the output format you wish to convert the DVD into.
Step 4: Make further edits. DVDFab allows you to perform a number of editing actions on your file, including cropping, subtitles, and even AI resolution enhancement.
Step 5: Convert your DVD! Ensure you are saving your new file in a location that has sufficient free space.
Drawbacks of this conversion option:
Supports hundreds of file types
Retains quality of video and audio
Advanced tools, including AI enhancement
Why I picked it: Being able to convert videos to 4K quality is great when dealing with high-quality DVD files.
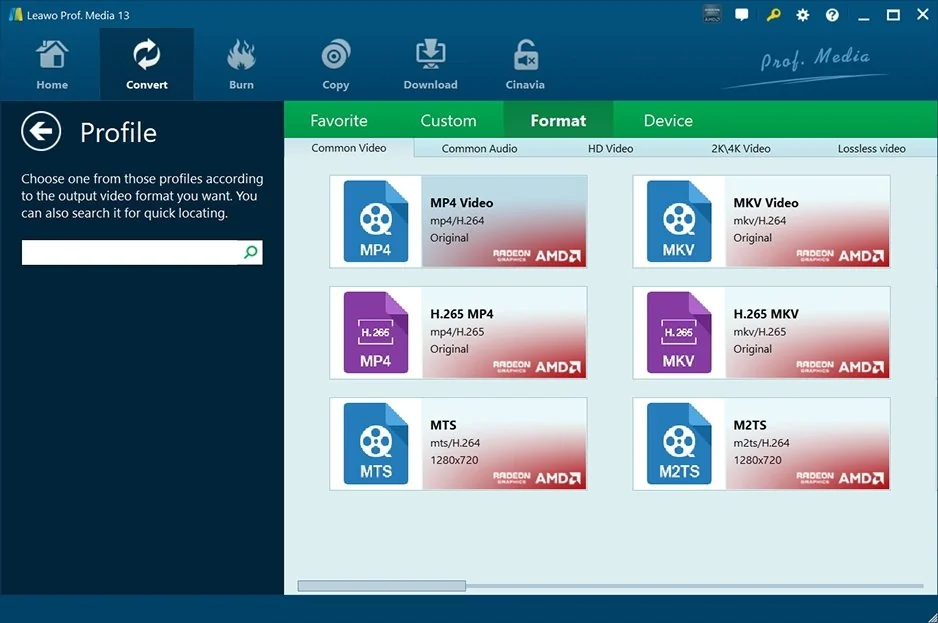
Leawo DVD Ripper is an efficient, polished DVD ripper. In a space where so many programs can feel a little clunky, Leawo DVD Ripper’s straightforward interface is refreshing. Case in point: the program allows you to convert DVDs to well over 100 different file formats, but I found it simple to figure out how to convert to MP4 specifically. When converting, Leawo DVD Ripper lets you fine-tune various features of your video, including the resolution and frame rate. My conversions were high-quality, and if you want to maximize that you can opt for a lossless conversion. Leawo also offers a few video editing tools, almost like a very basic video editor. It quickly became clear to me that any serious editing would require a separate program, but having the ability to conduct quick fixes could come seriously in handy at times. For example, if you want to crop your DVD or add a watermark to your converted video, you’ll be able to do that within Leawo DVD Ripper. You can even preserve subtitles.
I particularly liked a few of Leawo DVD Ripper’s more granular functions. For example, you can choose to convert specific parts of a DVD. And if you know your output is intended for a specific device, like an iPhone, you can create a custom output profile to streamline your workflow.
Whatever you choose to do, you can preview what your converted MP4 will look like before actually carrying out the conversion. I found this very helpful. It helped me catch a few mistakes before converting, saving me time.
Not that converting DVD to MP4 with Leawo DVD Ripper takes much time. Just follow these steps:
Step 1: Download and install Leawo DVD Ripper. Launch it and ensure your DVD is inserted into the DVD drive.
Step 2: Click the Add Blu-ray/DVD button. Navigate to your DVD and select it.
Step 3: Choose which parts of the DVD you want to convert.
Step 4: Select MP4 as your desired output format. Alternatively, choose a preset that will convert to MP4. Now’s your chance to make adjustments. Remember, you can preview your output video if you want to double-check what you’re doing.
Step 5: Choose where you want your converted video to be saved.
Step 6: Click Convert. It should look like a big green button. You can’t miss it!
Some users experience an issue where the program only converts half of a movie
Fewer video customization options compared to other programs
Why I picked it: A straightforward user interface allows even beginners to convert and edit videos.
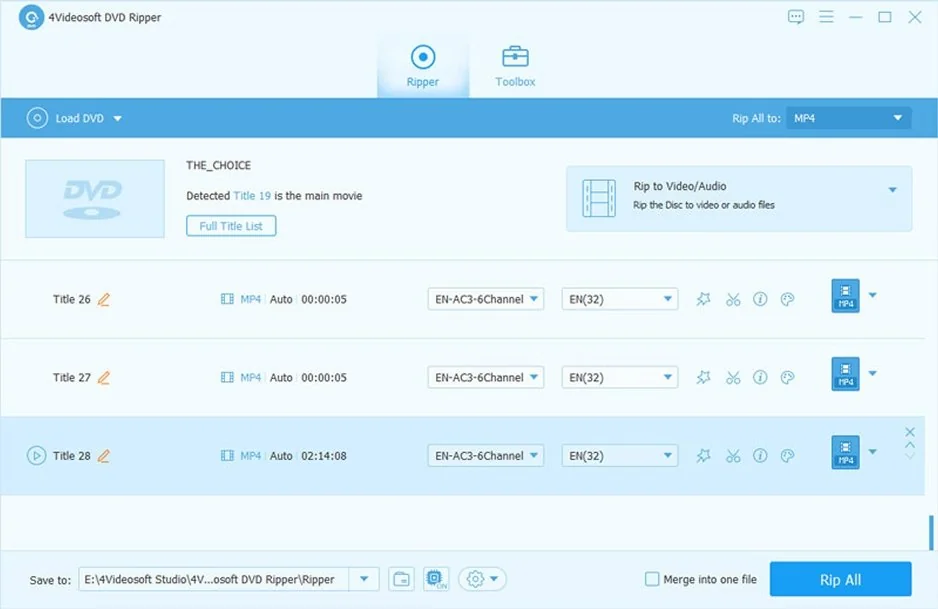
There are all kinds of reasons to convert DVDs to MP4. If you, like me, are ripping DVDs for personal use, then you might also like 4Videosoft DVD Ripper. It’s got a user-friendly interface that doesn’t take long to learn. While it might not support as many file formats as other options on this list, it covers all the main options, including MP4. That’s usually sufficient for personal use, anyway; having hundreds of options, while important for professionals converting obscure files, can be overwhelming for many users. One useful feature I liked was the ability to specifically convert audio tracks. Of course, if you’re looking to convert to MP4, you probably want video and audio. But being able to save only the audio can be really useful.
4Videosoft DVD Ripper contains some basic video editing tools. While testing, it became clear these really are basic. You can trim clips, crop, and add text and watermarks. The program also lets you make adjustments to your video, with settings like brightness, saturation, and hue. There’s also a tool to help boost video quality, which I found useful when converting old video clips. However, that’s about it. For any serious editing, you’ll need to turn to a separate program.
That said, I usually don’t need extensive editing tools when converting DVDs to MP4, and I found during testing that I didn’t really miss them. More important was 4Videosoft DVD Ripper’s speed (it can go several times faster on modern hardware with acceleration), screenshot preview feature, and ability to save multiple audio tracks and subtitles. It can also convert DVD files that have previously been ripped from a physical disc.
As I mentioned, the user interface is also simple. To convert DVD to MP4, all you need to do is follow these steps:
Step 1: Download and install 4Videosoft DVD Ripper, and insert your DVD into the DVD disc.
Download 4Videosoft DVD Ripper
Step 2: Load your DVD to the program. You can do this by clicking the Load Disc button.
Step 3: Choose MP4 as your desired output format from the provided list. Alternatively, select an output profile that includes the MP4 format.
Step 4: Select the audio and subtitle tracks you want to include in your converted video.
Step 5: Choose where you want your converted file to be saved by clicking Browse. Now you can make adjustments to your video, including basic edits.
Step 6: Select which files you want to convert by checking the box next to them.
Step 7: Click Convert. The program will display various progress parameters. You should be able to see how fast each file is converting and how long your overall conversion will take.

Why I picked it: This is a great, macOS-optimized option for people embedded in the Apple ecosystem.
We’ve covered plenty of programs that can run on Windows. But what about Mac users? If you, like me, are a fan of Apple’s ecosystem, you might like iSuper DVD Ripper. It’s only available on Mac, and can run on devices with macOS 10.7 or later. That’s a fairly old version of macOS, so you should be able to use the program without issues there.
Besides being Mac-only, iSuper DVD Ripper is comparable to other DVD rippers and converters. It can convert DVDs into several common video file formats, including MP4. Additionally, it can extract and convert audio files to various formats, including M4A and MP3. Like some other programs I tested, iSuper DVD Ripper contains some simple video editing tools. You can add and adjust effects, such as saturation and brightness. If you pay for the full version, you’ll also unlock a few more editing tools, including cropping, rotating, and adding watermarks.
One important thing to be aware of before you commit to iSuper DVD Ripper is that it only works with DVDs that are unencrypted and unprotected. That means you generally won’t be able to rip commercially produced DVDs with iSuper DVD Ripper. If you, like me, are only ripping homemade DVDs, that’s no bother.
iSuper DVD Ripper is lightweight and easy to use. To make MP4 from DVD, follow these steps:
Step 1: Download and install the program. You can find it in the Mac App Store.
Step 2: Insert your disc into the DVD drive.
Step 3: Click the Load Disc button in iSuper DVD Ripper.
Step 4: Select which DVD title you want to convert to MP4.
Step 5: Choose MP4 from the menu of output profiles.
Step 6: If you want to adjust your video, now’s your chance. Click on the Adjustments button.
Step 7: Click Browse to select where you want your converted video to be saved.
Step 8: Hit the Convert button.
There’s no single “best” MP4 converter, because different programs are often better at different things. That said, there’s likely a “best” program for you. To figure out which program that is, carefully consider your needs.
For example, how much experience do you have ripping and converting DVDs? If you’re a seasoned professional, you’ll likely be able to handle the more complex user interface of a program like MediaCoder. In return, you’ll get access to a range of powerful conversion tools, including extensive customization options. On the other hand, if you’re a beginner, you’ll probably want a program with a clean, straightforward interface and a shallow learning curve, so you can get started converting straight away. 4Videosoft DVD Ripper, iSuper DVD Ripper, and Movavi Video Converter are all great options for beginners.
Another thing to consider is functionality. What specific features will you need? For example, if you know you’ll need to make basic edits to your videos, consider a program that includes editing tools like WinX DVD Ripper or 4Videosoft DVD Ripper. If you aren’t going to need to edit your videos, or plan on using a separate video editor, feel free to go for a program without editing tools.
Then there’s output formats. All of the programs we discussed can convert DVDs to MP4, of course, but will you need a program that can also handle more obscure files formats? If you know what sort of device you’ll be exporting your converted videos to, you might consider a program with the appropriate conversion presets to save you time and effort.
Finally, it’s a good idea to investigate the community using each program. Are there tutorials? Have users been able to get issues resolved with customer support? User reviews can help you determine how good a program actually is in practice.
By considering all the above, you’ll be well on your way to choosing the very best DVD to MP4 converter for you.

When selecting products to include in our reviews, we research both demand and popularity.
All the products covered in this article have been tested by our team.
When testing, we compare key characteristics, including supported input and output formats, quality loss when converting, and other significant features.
We study user reviews from popular review platforms and make use of this information when writing our product reviews.
We collect feedback from our users and analyze their opinions of Movavi software as well as products from other companies.
You can transfer your videos using a DVD-to-MP4 converter for free, for example, Movavi Free Video Converter. This converter can extract DVDs, and it also supports all popular media formats, including MP4. The app also has a batch conversion option so you can easily convert multiple files at once.
Follow the steps below to know how to rip a DVD to MP4 with Movavi Free Video Converter.
Step 1. Get the appropriate version of the converter for your PC or Macintosh from the page linked below.
Download Movavi Free Video Converter
Install the free DVD-to-MP4 converter by following the on-screen instructions and run the program.
Step 2. To add your files to the converter, click the Add Media button. Choose Add DVD from the drop-down menu, and then click Open DVD. Next, find the VIDEO_TS folder located on your DVD and hit the Select Folder button.
Step 3. Open the Video tab in the lower part of the program window. Locate the MP4 group and select the appropriate preset from the list.
Step 4. To select the destination folder for your converted videos, hit the Save to button. Finally, click Convert to start ripping a DVD to MP4.
Drawbacks of this conversion option:
The app adds watermarks to processed videos.
There are no editing options available.
The free converter doesn’t support fast conversion.
Unfortunately, you cannot rip DVDs with Windows Media Player. If you want to convert a DVD video to MP4, we recommend you use a converter, for example, Movavi Video Converter. This easy-to-use program supports dozens of video formats, including DVD-compatible ISO, VOB, IFO, etc., and works really fast thanks to its SuperSpeed mode.
There are two main options to save a DVD as MP4 on your Windows PC: you can use a desktop app or an online converter. A desktop converter is a preferable option since it doesn’t have any limitations, such as file size limit and the number of converted files per day. To rip DVDs to MP4 with Movavi Video Converter, follow these steps.
Download the converter by following the link below.
Download Movavi Video Converter
Follow the on-screen instructions to install the program and launch it.
Hit the Add Media button, then choose Add DVD, and click Open DVD. Locate your DVD, select the VIDEO_TS folder and click Select Folder.
Open the Video tab, find the MP4 group of presets, and choose the suitable preset.
If you want to change the output folder for the converted files, click the Save to button. To turn a DVD into MP4, hit the Convert button.
If you are a Mac user and need to rip a DVD, follow the short guide below:
Get the DVD-to-MP4 converter and start the installation process: double-click the file and follow the instructions on the screen. When the process is finished, run the software.
Download Movavi Video Converter for Mac
First, insert the DVD you need to rip into the drive. Click Add Media, choose Add DVD, then click Open DVD.
There’s a line of tabs under your file list. To convert your DVD to MP4, open the Video tab and choose the MP4 group of presets. Specify the preset that best suits your needs.
If needed, click Save to to specify a new destination. To start processing the files, click Convert.
It depends on the size of the original DVD video and the desired bitrate of the output file. To burn a DVD to MP4 takes about 16 minutes with Movavi Video Converter without SuperSpeed acceleration enabled.
Ripping DVDs that contain copyrighted work is illegal in most cases. However, if you do it for personal use and don’t try to distribute ripped DVDs, it’s unlikely that the authorities will pay any attention. To be on the safe side, we recommend checking your local laws before you rip an encrypted DVD.
How to change the bitrate of MP3 files without quality loss
How to convert a 4K video to HD
How to compress a MOV video
How to put DVD movies on an iPhone
Best VHS to DVD сonverters
Convert MP4 to MOV (QuickTime) online for free
Convert AVI to MOV (QuickTime) online & free
8 Best ways to convert MXF to MP4 on Mac/Windows
7-Zip vs. WinRAR vs. WinZip: Which Is Better?


1.5M+ users already subscribed to our newsletter